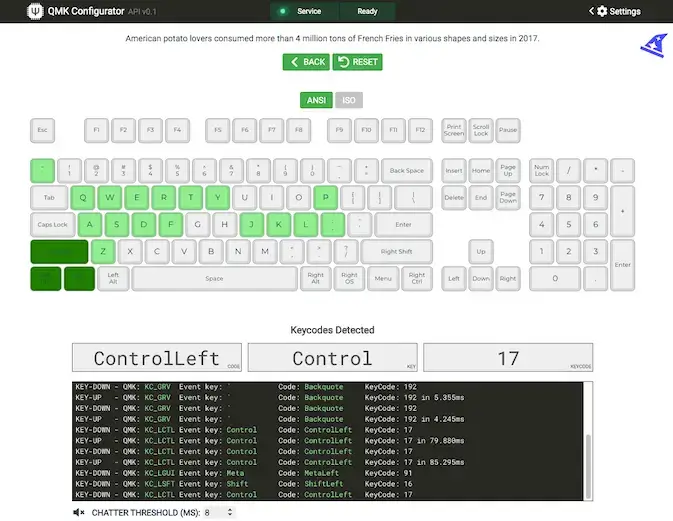
The first time someone told me my keyboard could “run QMK,” I genuinely thought they were describing some separate piece of hardware I needed to buy. It took embarrassingly long to realise it was already sitting there, built into the board I owned, waiting for me to open a piece of free software and start clicking. Once I did, remapping my barely-reachable right Ctrl key into something useful took about thirty seconds, a change that would have required learning actual firmware programming just a few years earlier.
This guide explains exactly what QMK and VIA are, how they relate to each other, what you can actually do with them, and how to check whether your next keyboard supports either before you buy.
⚡ Quick Answer
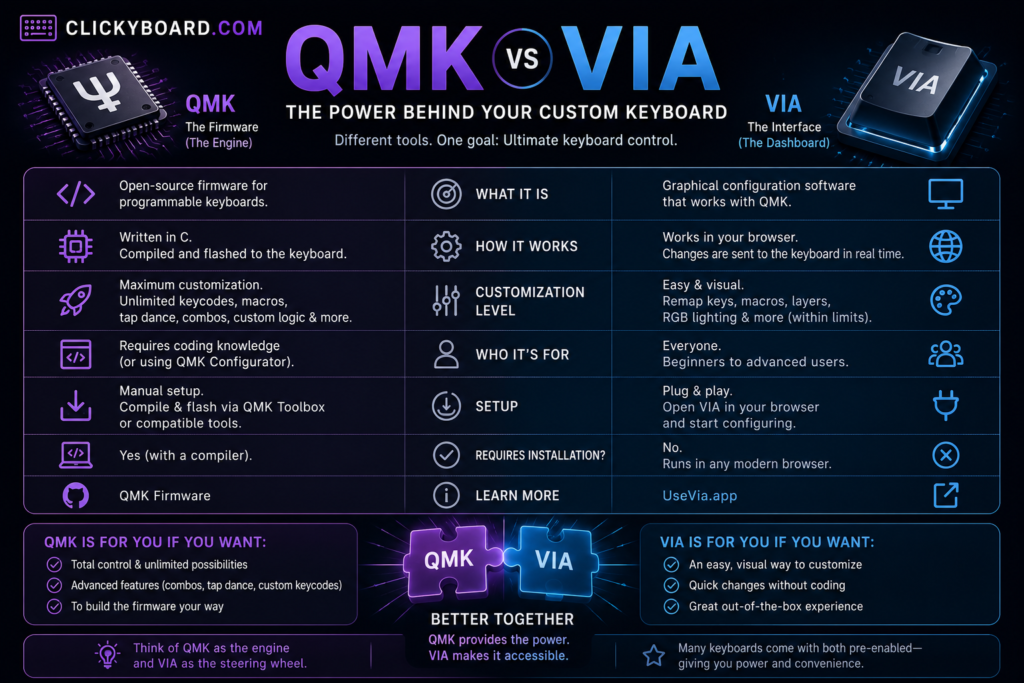
QMK is open-source firmware that runs directly on a keyboard’s microcontroller, storing its keymap and settings. VIA is a graphical desktop app that lets you configure QMK-compatible keyboards by clicking instead of writing code. Together they let you remap any key, build custom layers, and record macros, all without programming knowledge. Check a board’s product page or the official VIA supported list before buying if this matters to you.
1. QMK vs VIA: They’re Not Competitors
QMK (Quantum Mechanical Keyboard) is open-source firmware that runs directly on the keyboard’s microcontroller, storing the keymap, macros, layers, and lighting settings. VIA is a graphical desktop application that communicates with QMK-compatible keyboards, letting you configure all of that by clicking instead of writing and compiling code.
⚙️ QMK = The Engine
Lives on the keyboard itself. Handles every keystroke, stores your configuration, and keeps working even when no computer software is open.
🖱️ VIA = The Steering Wheel
A free app you install on your computer. Talks to QMK firmware to change settings, you don’t need it open after you’ve finished configuring.
2. What You Can Actually Do
🔄 Remap Any Key
Reassign any physical key to any function, swap Caps Lock for Escape, move a modifier, whatever suits you.
🧱 Custom Layers
Stack multiple full keymaps switched by holding or tapping a key, the backbone of compact layouts.
⏺️ Macros
Record a sequence of keystrokes and play it back with a single press.
🌈 RGB Lighting
Control per-key RGB lighting on boards with compatible hardware.
3. Do You Need to Know How to Code?
No. If your keyboard supports VIA, you can remap keys, build layers, and record macros entirely through a graphical interface with no coding required. Coding only becomes necessary for advanced custom QMK features beyond what VIA’s interface exposes, such as highly specific custom logic, which most users never actually need.
✅ If VIA covers your needs, you’ll likely never touch a line of code. The vast majority of practical customization (remapping, layers, basic macros, lighting) lives entirely inside VIA’s point-and-click interface.
4. Checking Compatibility Before You Buy
Check the manufacturer’s product page for explicit mention of QMK or VIA. Search the official VIA supported keyboards list for your specific model. Check community forums for unofficial QMK configurations hobbyists have built for boards without official support.
⚠️ “Programmable” doesn’t always mean QMK/VIA. Some manufacturers use proprietary software with similar but more limited remapping and market it as “programmable” without QMK or VIA support specifically. If open, standardised firmware matters to you, verify the specific terms rather than trusting generic marketing.
5. Common Real-World Use Cases
Fixing an awkward stock layout: swap Caps Lock for Escape, move a misplaced modifier, or relocate a function you use constantly.
Making compact layouts livable: the FN-layer system on every 60% and 65% keyboard exists because of exactly this layer-switching capability.
Gaming binds: macros and remapped keys let players set up complex inputs without relying on in-game settings alone.
Multi-language typing: remap keys to type special characters or switch layouts for different languages on the same board.
6. Frequently Asked Questions
What is QMK?
QMK (Quantum Mechanical Keyboard) is open-source firmware that runs directly on a keyboard’s microcontroller, storing the keymap, macros, layers, and lighting settings. It is the underlying engine that makes advanced keyboard customization possible.
What is VIA and how is it different from QMK?
VIA is a graphical desktop application that lets you configure a QMK-compatible keyboard by clicking instead of writing and compiling code. VIA is not a replacement for QMK, it is a friendly interface that communicates with QMK firmware already running on the keyboard.
Do I need to know how to code to use QMK or VIA?
No. If your keyboard supports VIA, you can remap keys, build layers, and record macros entirely through a graphical interface with no coding required. Coding is only necessary for advanced custom QMK features beyond what VIA’s interface exposes, which most users never need.
How do I know if my keyboard supports QMK or VIA?
Check the manufacturer’s product page for explicit mention of QMK or VIA support, search the official VIA supported keyboards list for your specific model, or check community forums for unofficial QMK configurations hobbyists have built for boards without official support.
What can I do with QMK/VIA that I can’t do otherwise?
QMK/VIA lets you remap any physical key to any function, build multiple custom keymap layers accessed by holding or tapping a key, record macros that play back a sequence of keystrokes with one press, and control per-key RGB lighting on boards with compatible hardware.
Can QMK/VIA break my keyboard if I make a mistake?
It is very difficult to permanently damage a keyboard through normal QMK/VIA configuration, since changes are stored in firmware that can be reset or reflashed. Most mistakes, like an awkward layout, are simply inconvenient until corrected rather than destructive.
Last Updated: July 28, 2026
By: Elizabeth & Olivia
We regularly review and update our guides to ensure keyboard recommendations, specs, and software information stay current with the latest releases and updates.
Affiliate disclosure: this article contains Amazon affiliate links. Purchases made through these links support Clickyboard at no extra cost to you.
My first custom keyboard build did not go smoothly. I bent six switch pins trying to rush the PCB installation, forgot to lube the stabilizers entirely, and assembled the whole thing before realising I had never flashed the firmware. I had to take it apart three times. By the end of that Saturday, I had a keyboard that sounded like rattling coins in a tin can.
I also could not stop typing on it.
There is something that changes when you use a keyboard you built yourself. Every keystroke carries the memory of the work you put in, the hours of prep, the satisfaction of hearing that first clean thock when everything finally came together. That feeling is what drives people to build their second, third, and fifteenth board.
This guide is the one I wish I had for that first build. Every mistake I made is documented here as a warning, and every step is sequenced the right way. Whether you are spending $120 or $400, hot-swapping or soldering, building a 60% or a TKL, this guide covers it.
⚡ Quick Answer
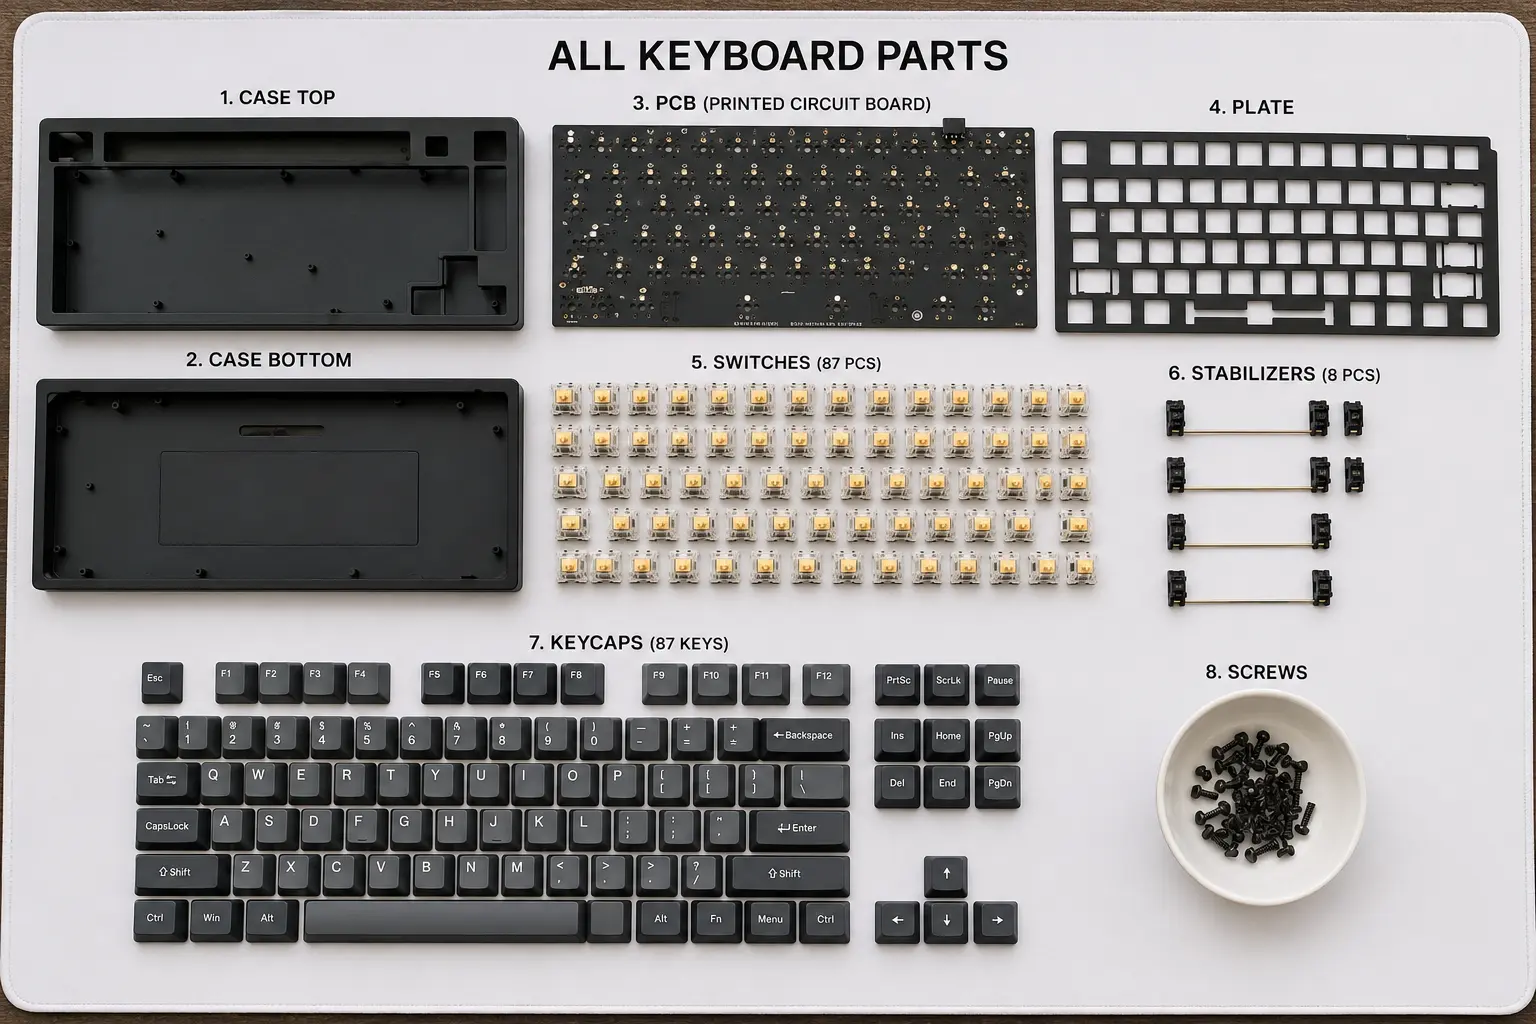
To build a custom mechanical keyboard you need six core parts: a case, a PCB (hot-swap recommended), a plate, switches, stabilizers, and keycaps. Lube your stabilizers and switches before assembly, test the PCB before installing switches, then assemble case, plate, and keycaps in sequence. A beginner build takes 3–4 hours and costs $100–200 for a solid entry-level result.
1. Why Build a Custom Keyboard Instead of Just Buying One?
This is a fair question, and it deserves an honest answer. A pre-built keyboard from Keychron or Logitech can be genuinely excellent. You do not need to build a keyboard to get a great typing experience. So why do thousands of people go through the effort?
🎛️ Total Control
Every element (case material, switch feel, sound profile, keycap colours) is your choice. No compromises forced by a manufacturer.
💰 Better Value
A $200 custom build usually outperforms a $200 off-the-shelf board because you choose the exact switches and keycaps.
🔄 Fully Upgradeable
Swap switches without a new board. Change keycaps seasonally. Add foam mods later. A good case and PCB are a platform.
🎓 Deep Understanding
You learn how every part works, which makes troubleshooting, modding, and future builds far easier.
ℹ️ Honest caveat: If you want a great keyboard for under $80 right now with zero effort, a pre-built like the Keychron V series is genuinely good. Custom builds make the most sense in the $120–400 range where the quality gap becomes significant.
2. Choose Your Layout First, and Everything Else Follows
Your layout choice determines which cases, PCBs, plates, and keycap sets are compatible with your build. Choose the wrong layout and you will find yourself with limited part options. Choose before you buy anything else.
60% ~61 keys Compact
65% ~68 keys ⭐ Best for beginners
75% ~84 keys Function row
TKL ~87 keys No numpad
Full Size 104 keys With numpad
Why 65% Is the Best First Layout
The 65% layout hits the sweet spot that no other size quite matches. It keeps the arrow keys, which you will miss far more than you expect on a 60%, while removing the function row and numpad most people rarely use. The result is a board that fits on any desk, supports an enormous range of keycap sets, and has more kit options than any other non-standard layout. If you are genuinely unsure, pick 65% and do not second-guess it.
💡 Keycap compatibility tip: Before committing to any layout, check that your chosen keycap set covers it. Most sets support full-size, TKL, and 65%. Some do not include 75% modifiers or 60% bottom rows. Always verify compatibility on the keycap listing before purchasing.
3. Budget Planning: Three Realistic Tiers
Custom keyboard budgets vary wildly. Here is an honest breakdown of what each tier actually gets you, based on real builds, not aspirational marketing.
Entry Level $100–180
KBD67 Lite kit + Gateron switches + budget keycap set. Polycarbonate or acrylic case, hot-swap PCB. Excellent performance for the price, this tier still feels premium.
Mid Range $200–350
Keychron Q2 Pro or Zoom65 kit + quality switches (Gateron Oil King, Boba U4T) + GMK or Domikey keycaps. Aluminum case, gasket mount. Where most enthusiasts live.
Enthusiast $400–800+
Group buy boards (Mode Eighty, Satisfaction75) + hand-lubed premium switches + premium GMK keycaps. Brass or aluminum plate, POM gaskets. The diminishing-returns tier.
💡 Spend most on keycaps and switches, least on the case. A $90 KBD67 Lite case with $50 Gateron Oil Kings and an $80 GMK keycap set will sound and feel better than a $200 aluminum case with stock switches and cheap keycaps. Prioritise what touches your fingers.
4. Every Part Explained
Every custom keyboard build requires exactly six components. Miss any one and the build cannot be completed. The table below breaks down each part, what to look for, and where to buy.
Part
What It Does
Beginner Pick
Where to Buy
Budget
Case
Houses all components; defines sound, weight, aesthetics
Sits between PCB and switches; affects sound and feel
Polycarbonate (flexible, absorbs sound)
Bundled with most kits
$15–50
Switches
Moving mechanical parts under each key; defines typing feel
Gateron G Pro 3.0 linear or Boba U4 tactile
Divinikey, Ringerkeys, KBDfans
$20–60 / 70
Stabilizers
Support larger keys to prevent wobble
Durock V2 or TX screw-in
Divinikey, KBDfans
$15–30
Keycaps
Visible tops of each key; defines look and feel
PBT doubleshot or dye-sublimated
Divinikey, KBDfans, Drop
$30–150
Switches: The Decision That Matters Most
Of all six parts, your switch choice has the greatest impact on how the finished keyboard feels. Switches fall into three categories: linear (smooth, no bump), tactile (a bump at the actuation point), and clicky (tactile bump plus an audible click). For a first build, linear or tactile are strongly recommended, as they are more forgiving to lube and more universally pleasant.
Keycaps come in two main plastics: ABS (smooth, vivid colours, develops shine over time) and PBT (slightly textured, more durable, resistant to shine). For a first build, PBT doubleshot or dye-sublimated keycaps offer the best durability and value.
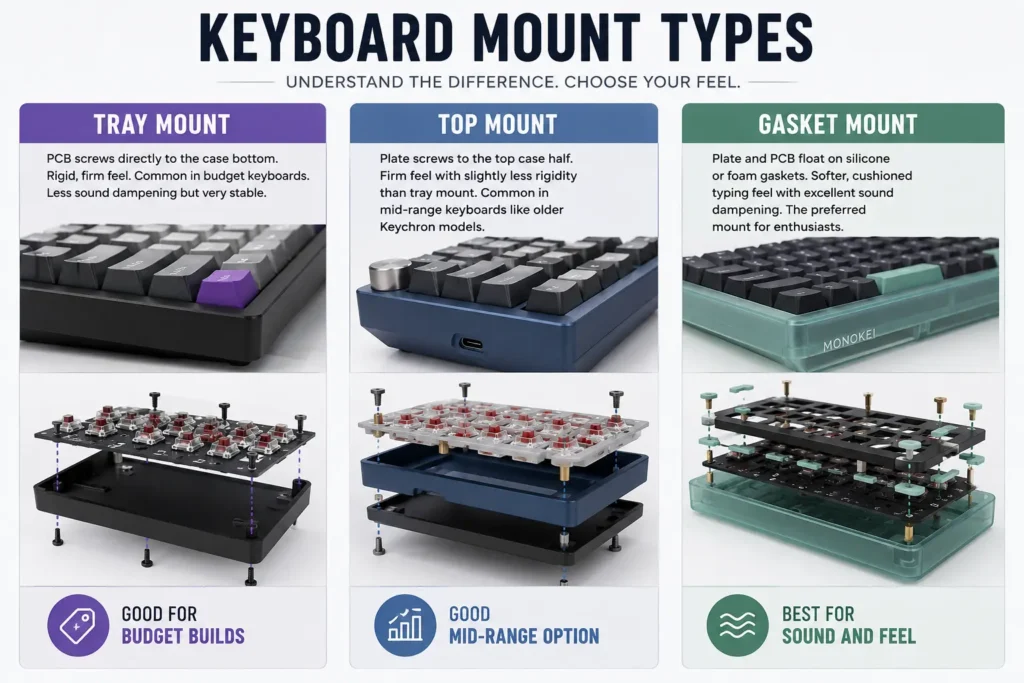
5. Case Mount Types Explained
The mount type determines how the plate and PCB assembly connects to the case, which directly affects sound and typing feel.
ℹ️ For a first build: Gasket mount is worth paying for if your budget allows, the improvement in sound and feel is immediately noticeable. The KBD67 Lite ($90) offers gasket mount at an entry-level price and is the best-value starting point in 2026.
6. Tools You Need
Most of these are one-time purchases that carry across every future build. The switch opener and switch puller are the two items worth buying specifically for this hobby.
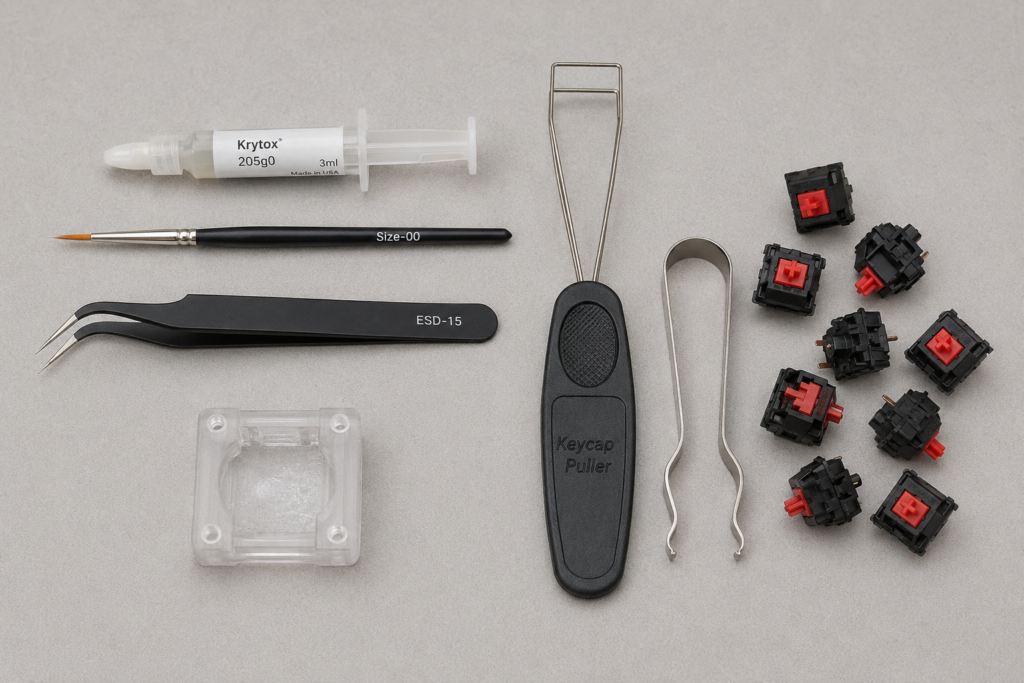
Phillips screwdriver (#0 and #1), for case screws. A precision set covers both, under $10.
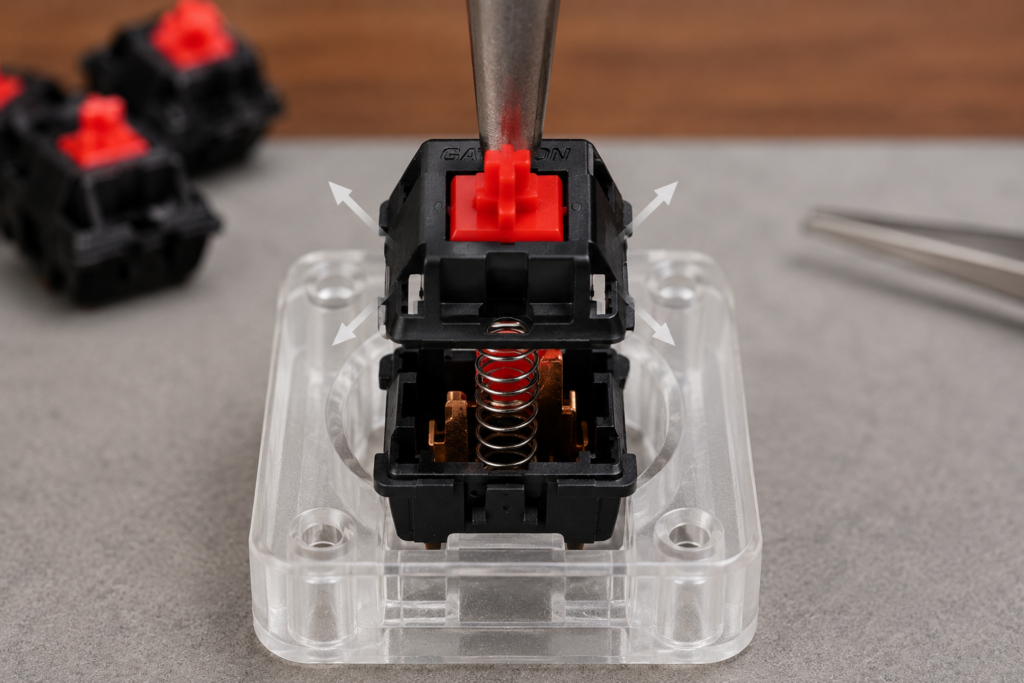
Switch opener, for opening switches before lubing. Never use a flathead; it cracks housings. (~$5–8)
Fine-tip brush (size 00), for applying lube precisely. (~$3–5)
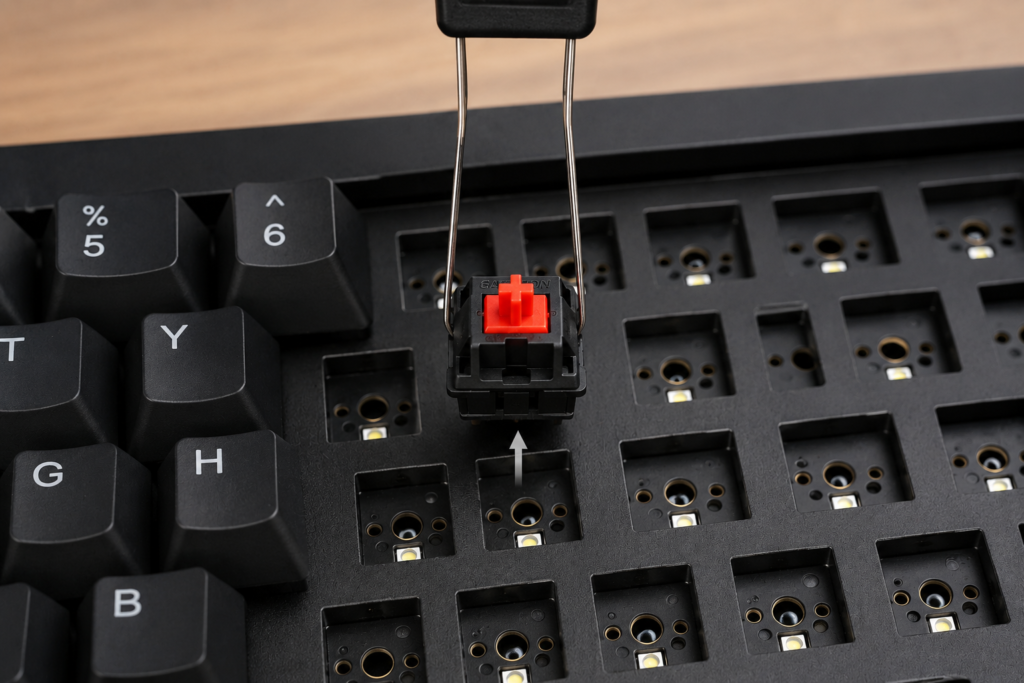
Switch puller, removes and installs hot-swap switches without bending pins. (~$5–8)
Wire keycap puller, always wire, never ring-style, to avoid scratches. (~$5)
Tweezers, for springs, stabilizer parts, and small components. (~$4)
USB-C cable, for PCB testing and firmware flashing.
Isopropyl alcohol (90%+), for cleaning parts and fixing lube mistakes.
7. Step-by-Step: How to Build Your Keyboard
This sequence applies to any hot-swappable 65% kit build. The order matters: stabilizers go in before switches, and the PCB is tested before both. Follow it and you will avoid the mistakes that forced me to disassemble my first board three times.
Step 1: Unbox and inventory all parts
Lay everything out on a clean mat. Account for every component: case halves, PCB, plate, all screws, the stabilizer set, foam sheets, and the USB cable. Count your switches, most 65% boards need 68–70. Check keycaps against a layout diagram. It is far better to find a missing part now than three hours into the build.
Step 1: Lay out all parts and verify inventory before beginning
Step 2: Lube and prepare stabilizers
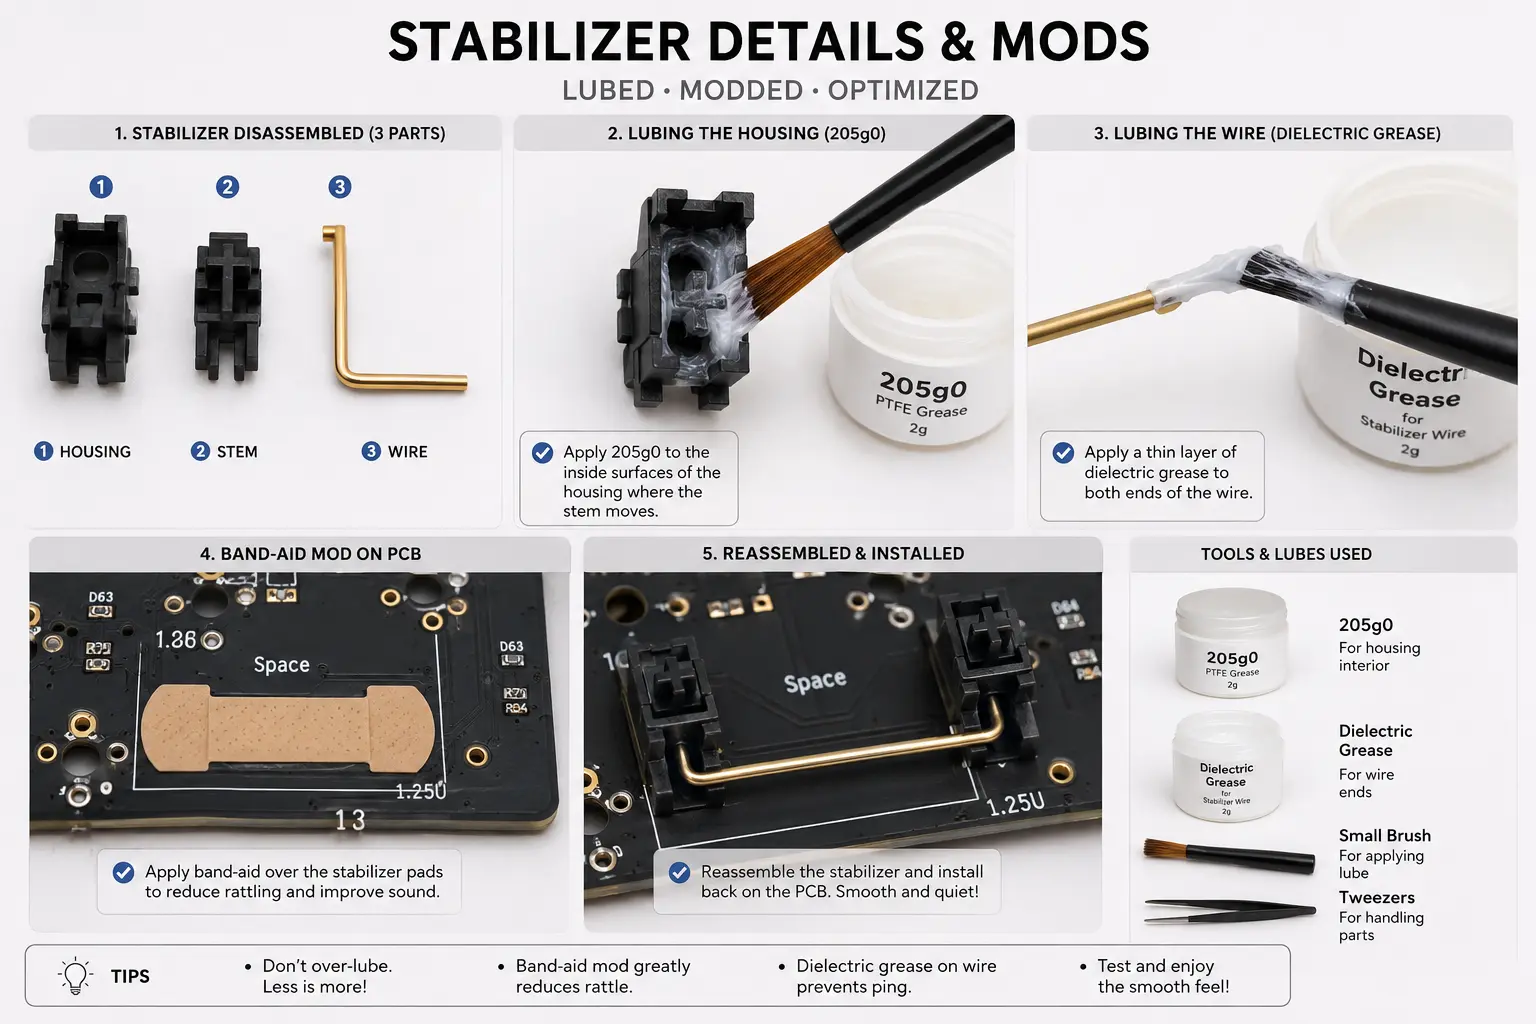
This takes 30–45 minutes and is the single most impactful thing you can do for final sound quality. Disassemble each stabilizer into housing, stem, and wire. Apply Krytox 205g0 to the housing interior and stem sides. Apply dielectric grease to both wire ends to eliminate rattle. Apply the band-aid mod to the PCB stabilizer pads. Full instructions in our stabilizer guide.
Step 2: Prepare and lube stabilizers for optimal performance
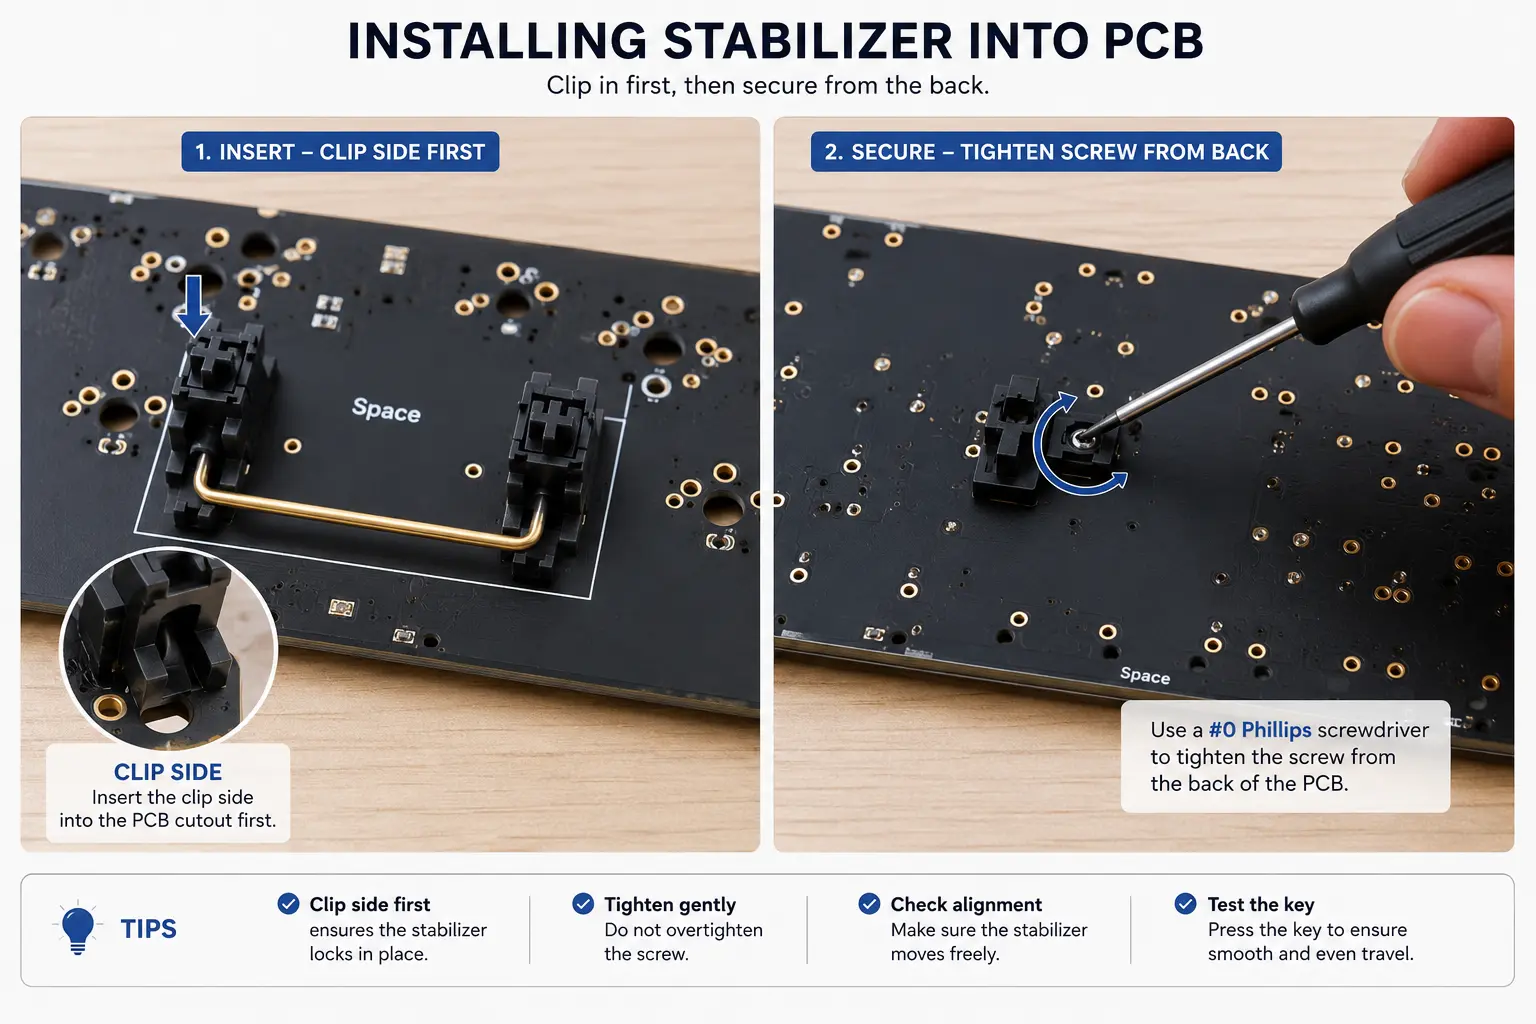
Step 3: Install stabilizers onto the PCB
Screw-in stabilizers install through the PCB with a screw on the back and a clip on the front. Insert the clip side first, then thread the screw from the back with a #0 screwdriver. Tighten until snug, but do not overtighten, as PCBs can crack. Wiggle the housings and press the stems; there should be minimal rattle.
Step 3: Install stabilizers securely onto the PCB
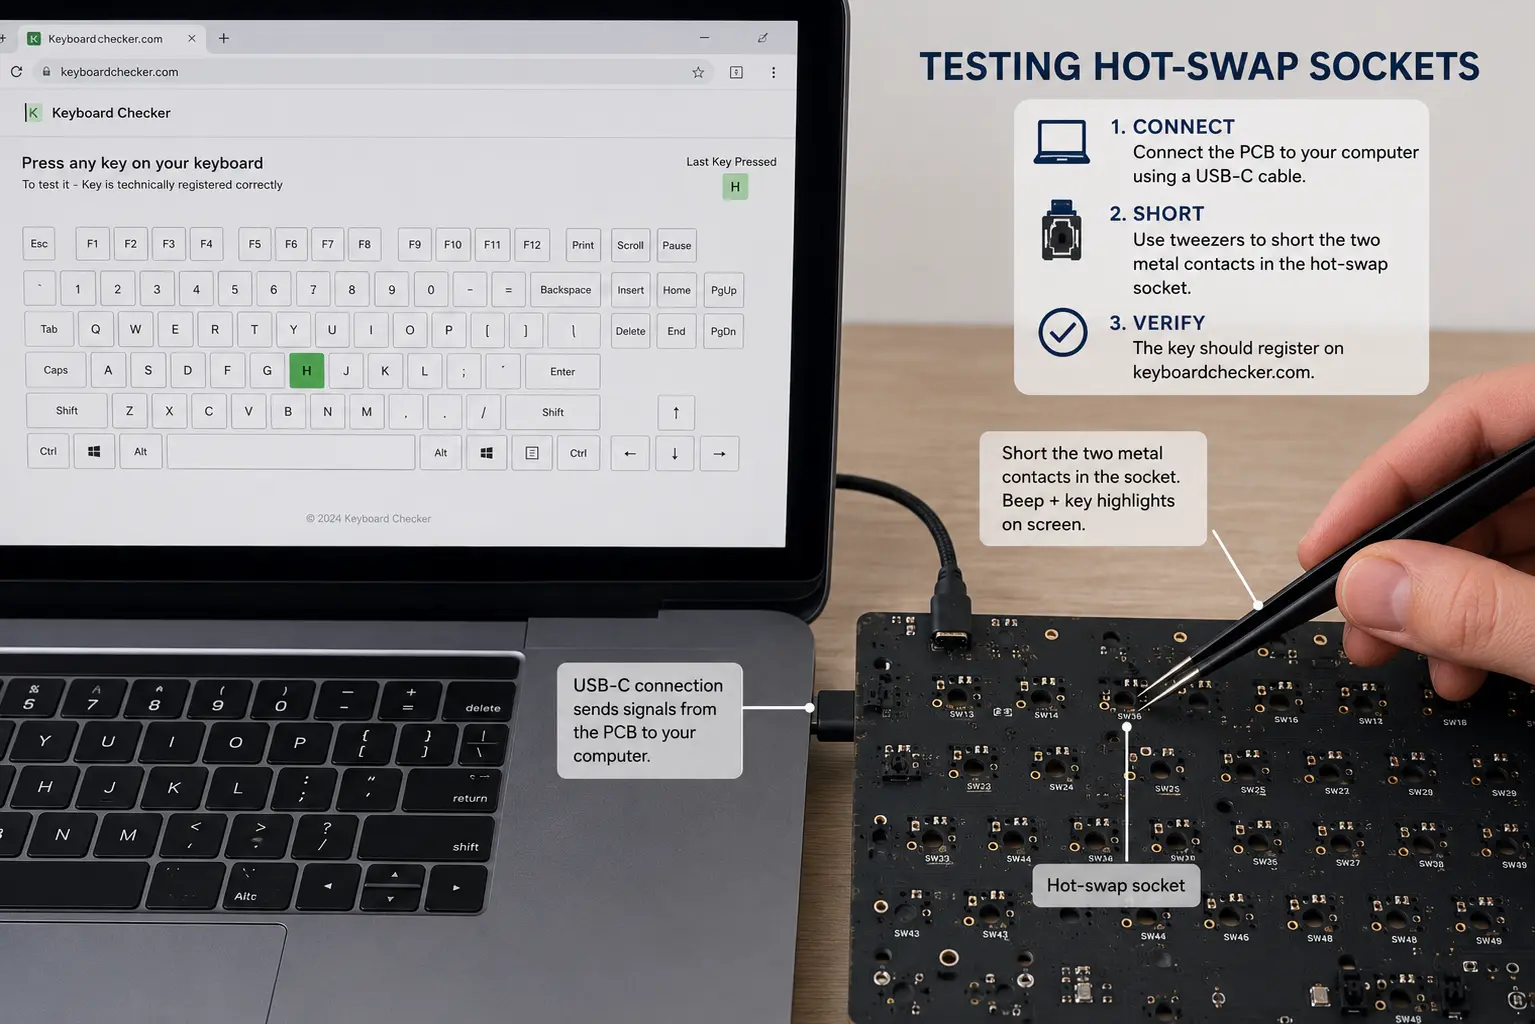
Step 4: Test the PCB before installing switches
This saves enormous time. Connect the PCB via USB-C and open a key tester in Chrome. Use metal tweezers to briefly short each hot-swap socket, and every position should register on screen. If one does not, check for debris, a bent socket pin, or a solder bridge. Fix issues now, before switches and keycaps are on.
Step 4: Test all PCB positions before proceeding
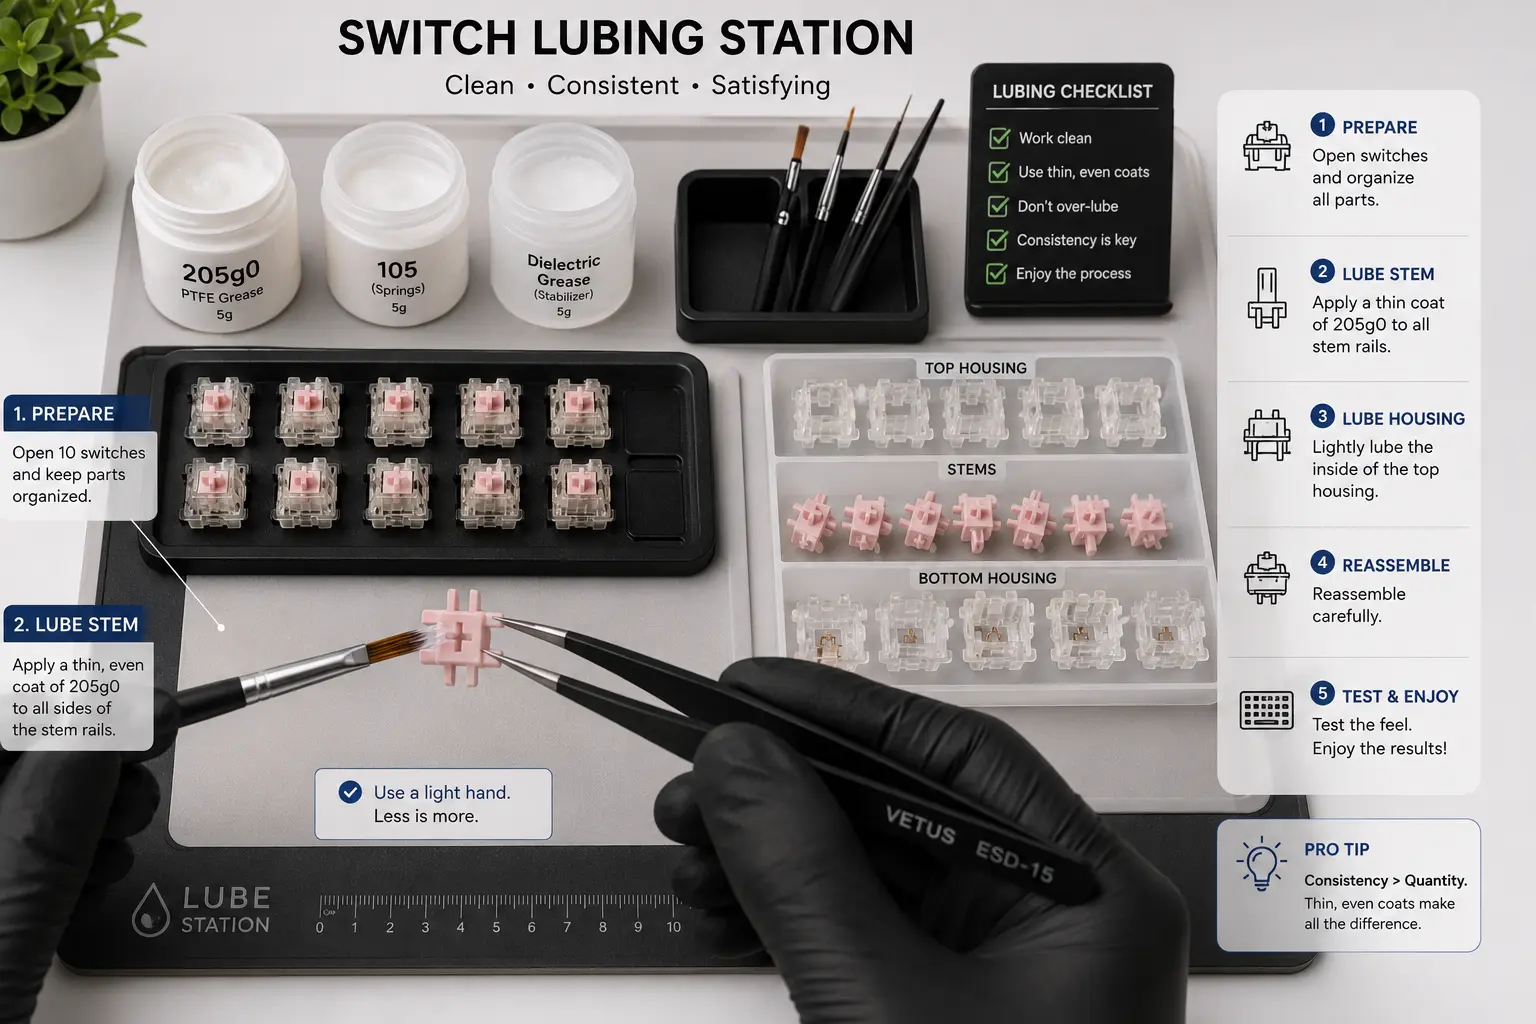
Step 5: Lube your switches
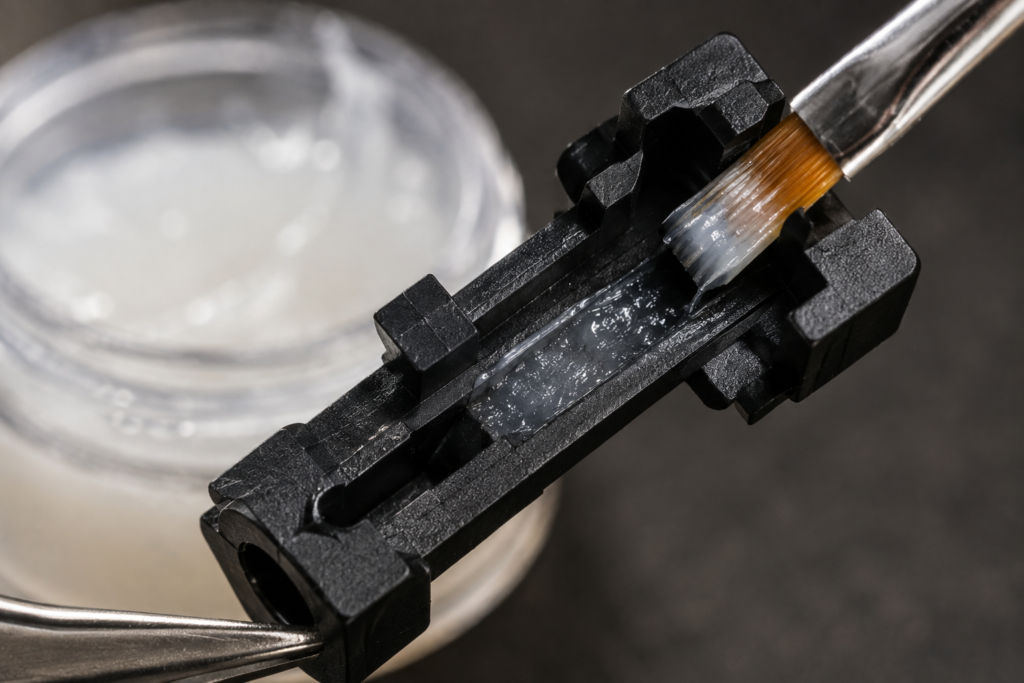
Open each switch, apply Krytox 205g0 (linear) or Tribosys 3203 (tactile) to the stem and housing rails, lube the springs, and reassemble. This adds 1–2 hours but transforms the result, the difference between lubed and unlubed is immediately audible. Full technique: How to Lube Keyboard Switches.
Step 5: Lube each switch for optimal feel and sound
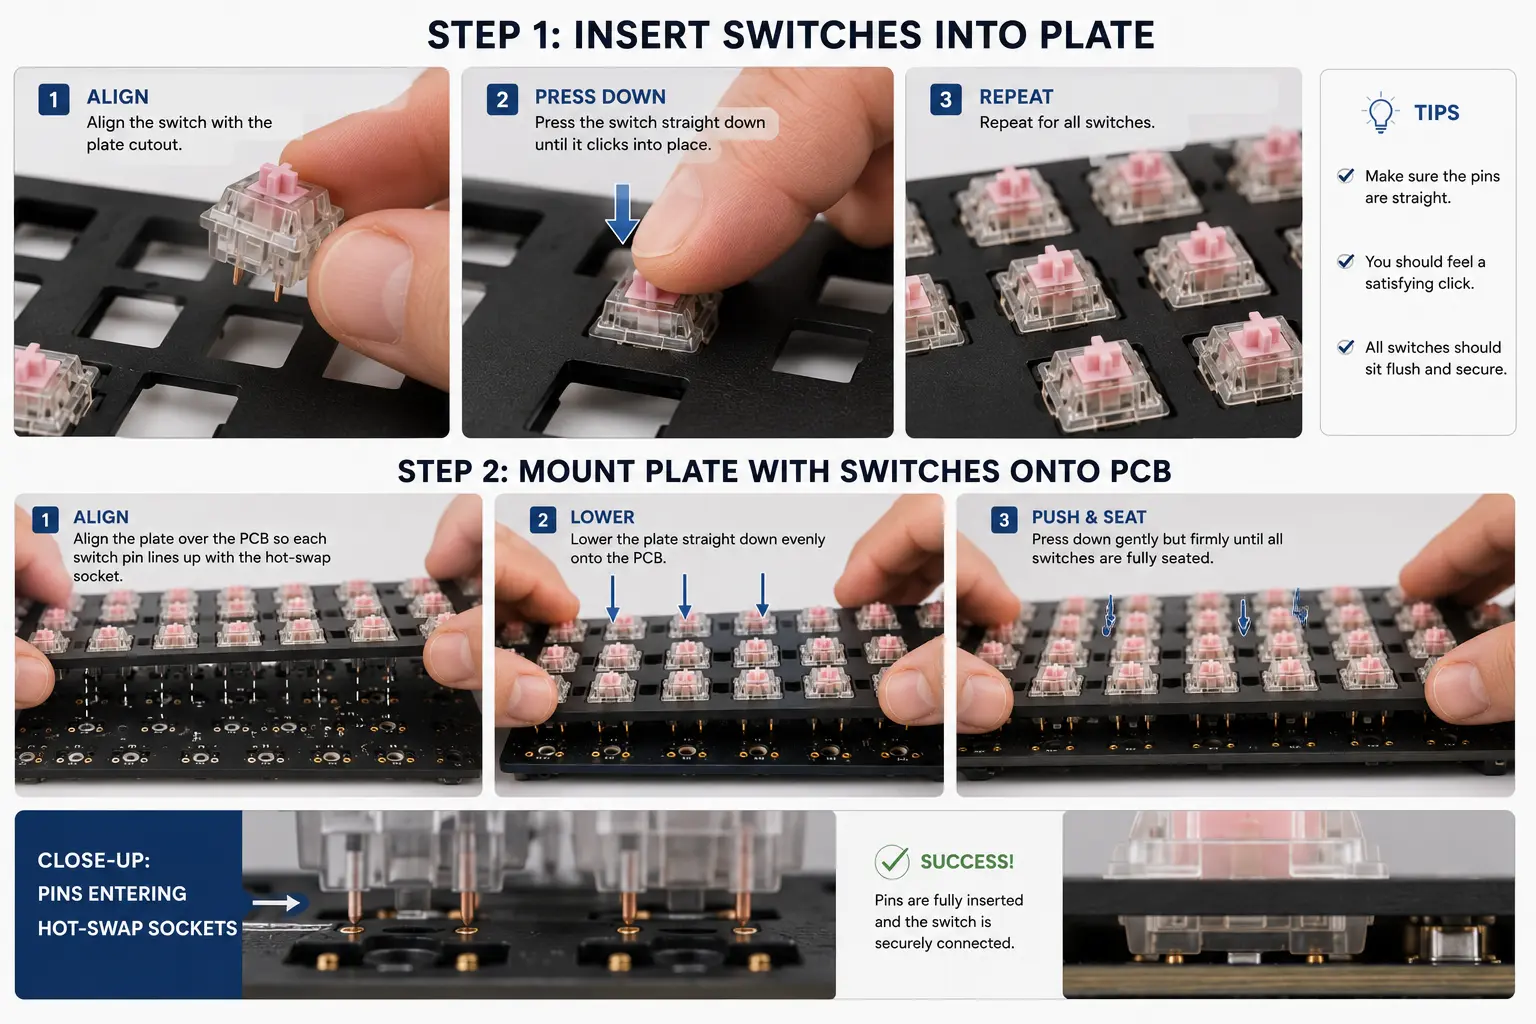
Step 6: Seat switches into the plate, then press onto PCB
Insert each switch through the plate cutouts until the tabs click. Install all switches into the plate first, then align the assembly above the PCB, making sure every pin lines up with a socket. Press down firmly and evenly from the center outward. Do not force switches in at an angle; that bends pins.
Step 6: Install switches into the plate, then press onto the PCB
Step 7: Add foam dampening (optional but recommended)
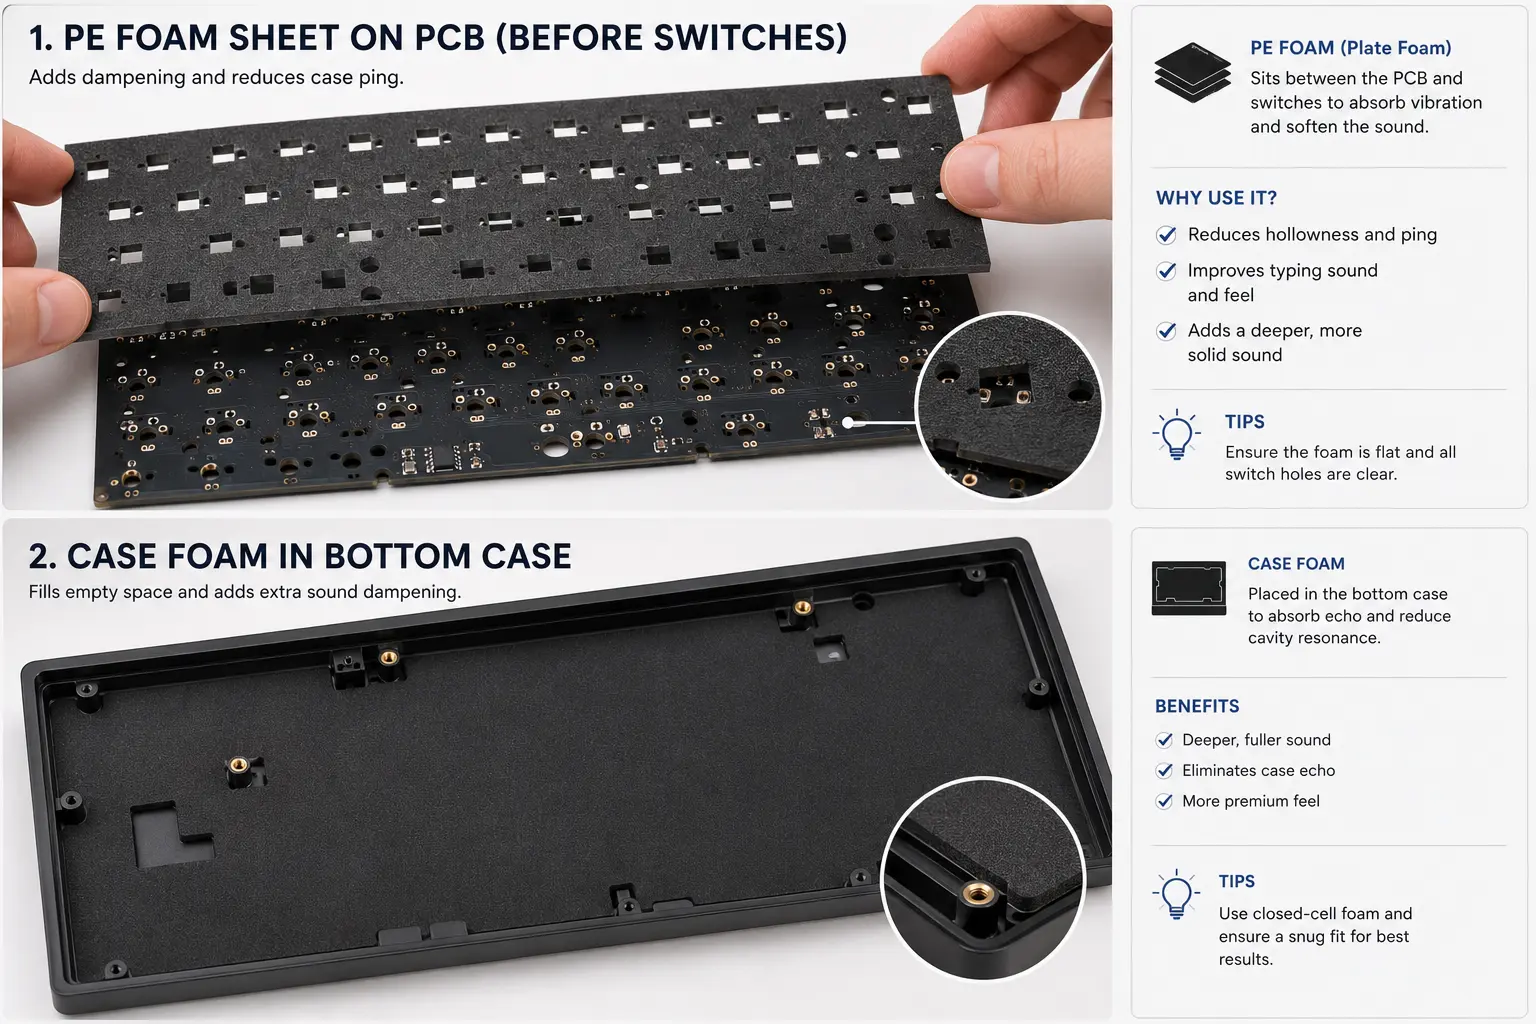
Before closing the case, add sound dampening. Case foam reduces hollowness. PCB foam tightens the sound. The PE foam mod (a thin sheet on top of the PCB before switches) produces the warm, poppy sound popular in 2024–2026. Cut foam to your PCB layout and place it before the next step.
Step 7: Add foam layers for improved sound and feel
Step 8: Assemble the case
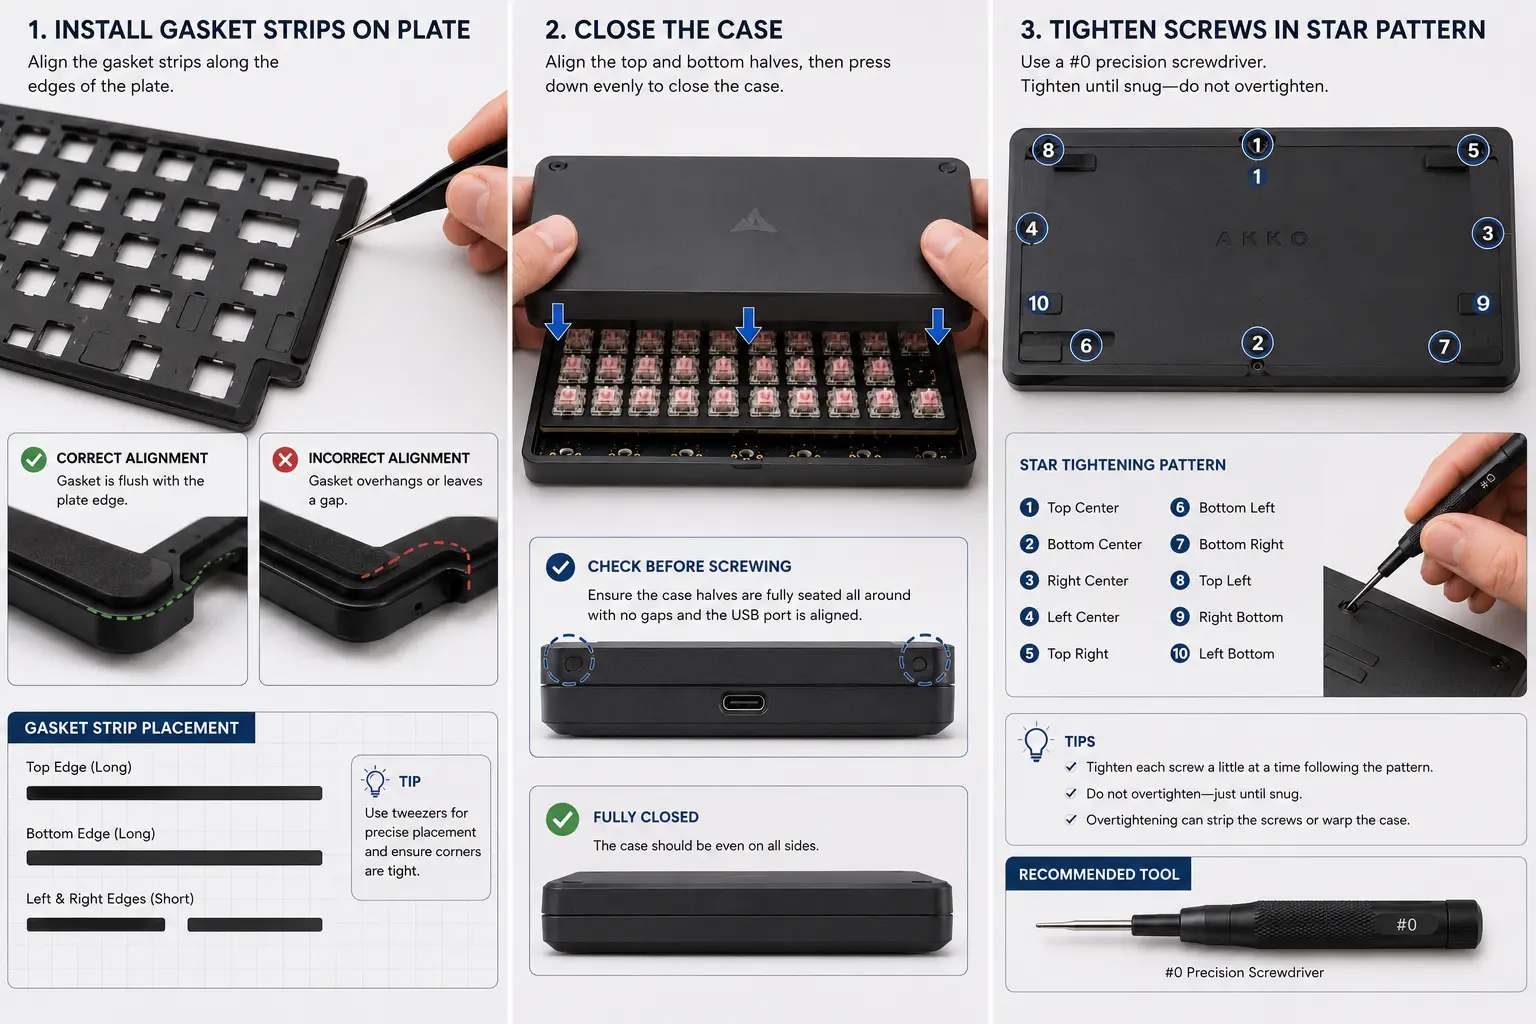
For gasket mount, align the gasket strips with the case channels before pressing the halves together. Thread all case screws by hand first, then tighten in a star pattern for even pressure. Finger-tight plus a quarter turn is enough. Overtightening warps PCBs and strips threads.
Step 8: Assemble case halves and secure with proper torque
Step 9: Install keycaps and run final test
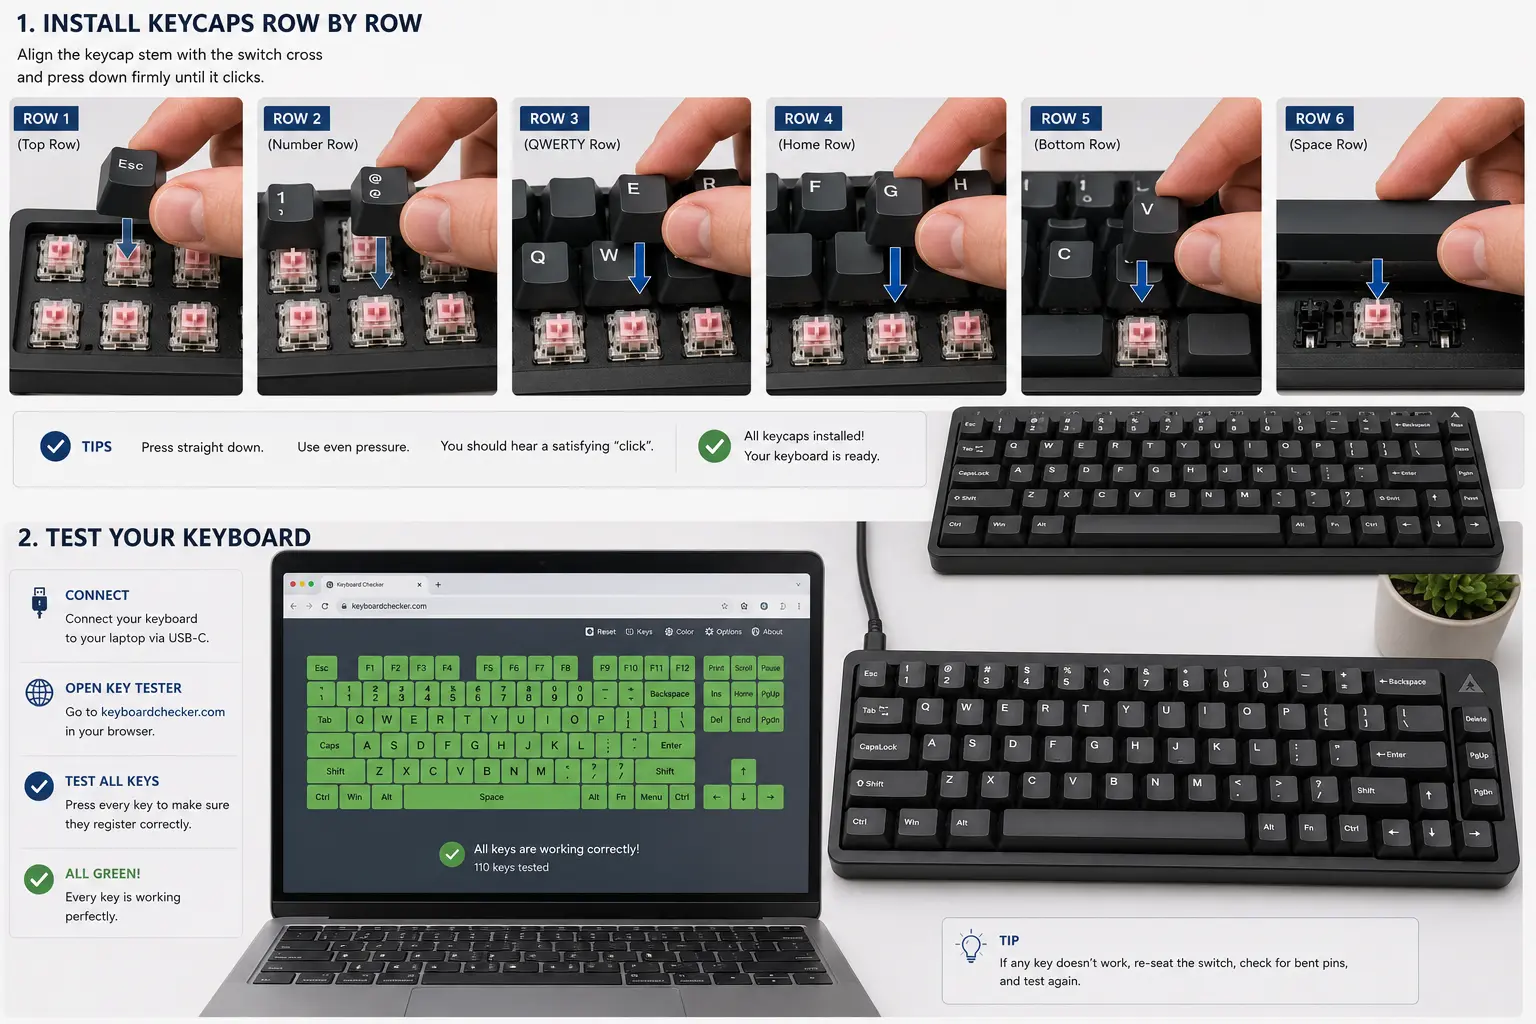
Press keycaps onto the stems, alphas first, then modifiers, then special keys. Once all are on, connect the board and open a key tester. Press every key and confirm it registers. Test stabilized keys and listen for rattle. If a key is dead, pull the switch, check for a bent pin, straighten, and reinstall.
Step 9: Install keycaps and test every key
8. Common Beginner Mistakes
🚫 Not testing the PCB first. A dead key found after assembly means removing keycaps and switches to diagnose, 20 minutes. Testing takes 5 minutes before assembly. Always test first.
🚫 Skipping stabilizer lubing. An unlubed spacebar in an otherwise great build sounds like a rattling tin can. Budget 30–45 minutes and do it properly, it cannot be shortcut.
⚠️ Overtightening case screws. Screws only need to be snug. Overtightening warps PCBs, strips threads, and can crack polycarbonate cases. Finger-tight plus a quarter turn is correct.
💡 Buying cheap stabilizers. This is the one place where spending $5 more makes a disproportionate difference. Durock V2 or TX stabilizers ($15–25) are dramatically better than generic bundled ones. Upgrade these before anything else.
9. Firmware: VIA and QMK
Most modern PCBs ship with QMK pre-flashed and VIA enabled, so you can remap keys on first connection, no coding required.
Using VIA (recommended for beginners)
VIA is a browser-based tool that connects over USB and lets you remap keys, create layers, and assign macros visually, no install, no code. It requires Chrome (Web USB). Changes save to the keyboard’s onboard memory and persist unplugged. Learn more in our guide to QMK and VIA.
Using QMK (advanced)
QMK is the open-source firmware underneath VIA, giving access to per-key RGB, tap-dance, combos, and custom functions. The trade-off is compiling from source. The official QMK docs are excellent, but for a first build, use VIA.
10. Frequently Asked Questions
How much does it cost to build a custom mechanical keyboard?
A solid entry-level build costs $100–180. A mid-range build with gasket-mount case, premium switches, and quality keycaps costs $200–350. Enthusiast builds start at $400 and climb. The sweet spot for most beginners is $150–200.
Is building a custom keyboard hard for beginners?
A hot-swap build is beginner-friendly, no soldering. If you can follow instructions and assemble flat-pack furniture, you can build a keyboard. Budget 3–4 hours, work carefully, and test the PCB before installing switches.
Do I need to solder to build a custom keyboard?
No, hot-swap PCBs require zero soldering. Switches press into metal sockets on the PCB. Look specifically for “hot-swap” in the product listing.
What switches should I choose for my first build?
For linear, Gateron G Pro 3.0 or Gateron Oil King. For tactile, Boba U4 (silent) or Gateron Brown Pro 3.0. Unsure? Read our full comparison first.
What is a gasket mount keyboard and should I buy one?
A gasket mount suspends the plate and PCB on gaskets instead of screwing them rigidly to the case, creating a softer feel and better dampening. Worth choosing if sound and feel are priorities. The KBD67 Lite offers it at $90.
⚡ Quick answer
To film a switch, open it, drop a thin plastic film onto the bottom housing so it fills the gap between the two halves, then reassemble. Filming reduces housing wobble and tightens the sound. Not sure whether your switches even need it? Read what switch films are and whether you need them first, then come back here for the how-to.
This guide is the step-by-step. If you have your films and want to get filming, everything you need is below.
What you need
Your switches and a set of switch films (usually 0.15mm to start)
A switch opener (do not use a flathead, it cracks housings)
Tweezers for handling the film
A clean, well-lit workspace and a tray to catch springs
Step-by-step: how to film a switch
Open the switch. Set it in the switch opener and press down to pop the top housing off the bottom. Set the stem and spring aside so nothing gets lost.
Place the film. Lay the film onto the rim of the bottom housing. Most films have cutouts that line up with the internal posts and the gold contact leaf. Line them up and do not cover the leaf.
Check the fit. The film should sit flat and flush against the rim, with no overhang, lifting, or wrinkling. Nudge it with tweezers until it seats cleanly.
Reassemble. Drop the spring and stem back in, then snap the top housing on. It should close with a normal press. If it needs real force, the film is too thick, so switch to a thinner one.
Test it. Press the switch a few times. A filmed switch should feel noticeably tighter with less side-to-side wobble than before.
Repeat for each switch. A full board takes 1 to 2 hours once you find a rhythm.
Pro tips
Film before you lube. Handle the dry housing and film first, then apply lube after the film is seated. If you plan to lube too, our switch lubing guide covers the next step.
Start with 0.15mm. It suits most switches. Go thinner (0.125mm) if reassembly feels tight, thicker (0.2mm) only for very loose housings.
Do a test batch of five before committing to the whole board, so you can confirm the thickness is right.
Common mistakes to avoid
Covering the contact leaf with the film, which stops the switch registering. Keep the leaf area clear.
Forcing a too-thick film, which raises the top housing and can bind the stem. Drop to a thinner film instead.
Wrinkled or overhanging film, which prevents a clean close. Reseat it flat.
Frequently asked questions
How long does it take to film a keyboard’s switches?
About 1 to 2 hours for a 60 to 80 key board, similar to lubing. It goes faster once you settle into a rhythm.
Should I film or lube first?
Film first, then lube, since both need the switch open and lube would get in the way of seating the film cleanly.
What thickness film should I use?
Start with 0.15mm. It works for most switches; go thinner or thicker only if reassembly is too tight or the housing is very loose.
Do all switches need filming?
No. Tight, premium switches gain little. See our switch films explainer for how to tell if yours will benefit.
The bottom line
Filming is simple once you have the rhythm: open, seat the film, reassemble, test. Start with a small batch at 0.15mm, film before you lube, and keep the contact leaf clear. Done right, your switches will feel tighter and sound cleaner.
We keep our how-to guides updated as tools and techniques change.
⚡ Quick answer
To test a keyboard PCB, plug it into your computer, open a key-testing tool (VIA, the QMK Configurator test matrix, or a browser tester like keyboardchecker.com), and short each switch footprint’s two pads with metal tweezers. Every position that registers on screen is good; any that stays silent has a hardware fault. The walkthrough below covers the switches, the microcontroller, the LEDs, and the USB connector, then how to fix what you find.
Whether you are building your own keyboard or troubleshooting one that started dropping keys, a few minutes of PCB testing saves hours of frustration later. The PCB is the backbone of the board, tying every switch and component together, so a single bad joint or trace can take out a key, a row, or the whole thing. Testing early tells you exactly where the problem is while it is still easy to fix or return.
What you need
The keyboard PCB
A USB cable
A computer
A key-testing tool: VIA (usevia.app) or the QMK Configurator test matrix for programmable boards, or a browser tester such as keyboardchecker.com for any board
A conductive object: metal tweezers, a paperclip, or a small screwdriver
A multimeter set to continuity mode (optional, for tracing dead spots)
Work on a clean, static-free surface and take a moment to look over the board first. Knowing where the switch pads, diodes, and microcontroller sit makes it much easier to spot anything out of place while you test.
How a keyboard matrix works (and why it matters)
Before you test, it helps to know how the board is wired. Keyboards do not give every key its own wire to the controller. Instead the switches sit on a grid of rows and columns, and each key is the crossing point of one row and one column, with a small diode to stop ghosting. The controller scans the grid many times a second to see which crossings are closed.
This is why faults come in patterns. One dead key is usually a local problem at that switch. A whole row or column going dead at once points to a single shared trace or diode, not a dozen failed switches. Reading the pattern tells you where to look before you touch a soldering iron.
Step 1: Test the switch positions
The switch positions are the most important thing to check, since they register every key press. You can test them on a completely bare PCB, no soldering required.
Connect the PCB to your computer with the USB cable.
Open your key-testing tool and, if prompted, select the layout that matches your PCB.
Take your metal tweezers or paperclip and briefly bridge the two pads for one switch position.
Watch the screen. If that position is good, the tester registers a key press.
Repeat for every switch position on the board.
If a position never registers, you have found a fault at that spot. On a hot-swap PCB you can also test by pushing a known-good switch into the socket instead of bridging the pads, which is often faster and more reliable than the tweezer short.
Step 2: Test the other components
Once the switch matrix checks out, confirm the rest of the board is healthy.
Microcontroller: with a multimeter, measure the voltage across the VCC (power) and GND (ground) pins. A reading close to the expected value, usually around 5V or 3.3V, means it is powered correctly.
LEDs: power the board and check that any indicator or per-key LEDs light up as expected. Dead LEDs point to a bad solder joint or a faulty LED.
USB connector: plug the board into your computer and confirm it is recognised as a device. If nothing appears, the connector or its solder joints are the first suspects.
Step 3: Troubleshoot what you find
When a position or component fails, the fix depends on the pattern of the fault. This table covers the faults you will actually meet.
Symptom
Likely cause
Fix
One dead key
Cold solder joint or cracked diode leg
Reflow the joints, check the nearby diode
Whole row or column dead
One shared broken trace or diode
Trace the row/column with continuity mode, find the break
Board not detected
USB connector or controller solder joints
Reflow the USB and controller pins first
Dead LEDs only
Bad LED joint or faulty LED
Reflow, then replace the LED if needed
Key registers twice
Missing or backwards diode
Check diode orientation and reseat it
Always unplug the board before reworking joints, and take basic anti-static precautions when handling the components. If the part itself is damaged rather than just badly soldered, it may need replacing, which calls for careful soldering or professional help.
Extra tips
Test in a logical order. Work row by row so you never lose track of which position you just checked, especially on a full-size board.
Not sure about a single key? Bridge its pads again and watch closely. A position that registers intermittently usually has a marginal solder joint worth reflowing.
Use the multimeter for the stubborn faults. Continuity mode between a switch pad and the microcontroller side quickly reveals a broken trace that a key tester alone cannot pinpoint.
💡 Building a board from scratch? Test the bare PCB before you solder or seat a single switch. It takes ten minutes and catches faults while they are still easy to fix. See our custom keyboard build guide for where this fits in the full process.
Frequently asked questions
When should I test my keyboard PCB?
Test a bare PCB before soldering switches or assembling the case. It takes ten minutes and catches faults while they are still easy to fix or return. Re-test after any modification, and whenever keys start misbehaving.
Can I test a keyboard PCB without soldering it?
Yes, that is exactly what the tweezer test does. Shorting the two switch pads with a conductive tool simulates a key press, so you can verify every position on a completely bare PCB. Hot-swap PCBs can also be tested by pushing switches into the sockets.
What should I do if some keys do not register during testing?
Check the solder joints and traces around the dead key first, and use a multimeter in continuity mode between the switch pad and the microcontroller side to find the break. If a whole row or column is dead at once, the fault is usually a single shared trace or diode rather than the individual switches.
Which software tools can I use for PCB testing?
VIA (usevia.app) has a built-in key tester and runs in the browser for VIA-enabled boards. The QMK Configurator offers a test matrix for QMK boards. For anything else, a generic browser tester such as keyboardchecker.com shows each registered keystroke.
Do I need to test a pre-assembled PCB?
Yes, briefly. Factory QC misses things, and shipping can damage solder joints. A two-minute full-key test on arrival keeps you inside the return window if something is wrong.
Why does one of my keys register twice?
A key that fires twice or chatters usually has a missing, damaged, or backwards diode at that position. Check the diode orientation against a working key, reseat or replace it, and reflow the joint.
⚡ Quick answer
Yes, keyboard lube does dry out, but slowly. Quality PFPE lubricants like Krytox 205g0 or Tribosys 3204 typically stay effective for one to two years of daily typing before friction and scratchiness creep back. Heat, dust, and heavy use shorten that window, and a thin, well-applied coat lasts noticeably longer than a thick, sloppy one.
Lubing your switches and stabilizers reduces friction, quiets rattle, and makes typing feel smoother. But lube is not permanent. Over time it thins, migrates, or picks up dust, and the scratch you spent an afternoon removing slowly returns. Here is how long it actually lasts, how to spot when it is going, and how to make it last as long as possible.
What affects how long lube lasts
The lube itself. Thick PFPE greases like Krytox 205g0 last longest. Thin oils used on springs break down sooner. Quality matters more than anything else here.
How much you type. A keyboard used eight hours a day wears its lube faster than a weekend board. Heavy, hard typing accelerates it further.
Heat and humidity. High temperatures thin the lube and can help it migrate off the contact surfaces; humidity and dust contaminate it over time.
Application. A thin, even coat in the right places lasts longer and performs better than a thick layer that oozes and attracts grime.
Signs your lube is drying out
Typing feels rougher. The smooth glide turns slightly sticky, scratchy, or uneven. This is usually the first thing you notice.
More rattle or inconsistent sound. As lube thins, stabilizers can start to tick or rattle again and the sound becomes less uniform key to key.
Visible changes. Pull a switch and look. Lube that has clumped, dried to a film, or discoloured is no longer doing its job.
Which lubes last the longest
Longevity depends heavily on the lube you choose and where you use it. Here is how the community favourites compare:
The thick PFPE greases (Krytox 205g0, Christo-Lube) are the most durable and are what most enthusiasts reach for. Thin oils like Krytox 105 are for springs and need reapplying sooner. Match the lube to the job and it will last as long as possible.
Do factory pre-lubed switches dry out?
Yes, and often a little sooner than a careful hand-lube. Factory-lubed switches such as the Akko V3 Pro line, Gateron Pro series, and most Cherry MX2A switches use a lighter, thinner factory coat applied fast on an assembly line, not the generous hand-tuned layer an enthusiast puts down. That coat is enough to take the edge off scratch out of the box, but it is thinner and less evenly placed, so it tends to fade within the first year of heavy use.
The good news is you rarely need to strip a factory-lubed switch. When it starts to feel scratchy, a light hand-lube on top of what is already there brings it back and usually lasts longer than the original. If you bought factory-lubed switches specifically to avoid lubing, treat the first re-lube as optional maintenance a year or two down the line, not a fault.
How to make lube last longer
Keep it clean. Dust is the enemy. Blow out your keyboard with compressed air now and then, and consider a cover when it is not in use.
Apply it thin and in the right spots. Over-lubing does not last longer; it just makes a mess and can mute switches. A light, even coat is best.
Avoid heat. Keep the board out of direct sun and away from heat sources, which thin the lube faster.
Use the right lube for the part. Thick grease on switch housings and stems, thin oil on springs, and a heavier grease on stabilizer wires.
When to reapply or replace
When typing feel drops off or the rattle returns, it is time to re-lube. In practice that is every one to two years for a good grease on a daily-use board, sooner if you type heavily or use thin oils. There is no need to strip everything until performance actually declines. When you do re-lube, clean off the old lube first so the new coat sits properly, and follow our step-by-step guide to lubing switches without desoldering.
Frequently asked questions
How long does keyboard lube last?
A quality PFPE grease like Krytox 205g0 lasts one to two years or more of daily typing. Thin spring oils last around six to twelve months. Heavy use, heat, and dust shorten these estimates.
How do I know when to re-lube my switches?
Re-lube when typing starts to feel scratchy again, the sound becomes uneven, or stabilizers begin to rattle. If a pulled switch shows clumped or dried lube, it is definitely time.
Does keyboard lube go bad in the container?
Sealed keyboard lube has a very long shelf life, usually many years. Keep the container closed and away from heat and it will stay usable far longer than any single application lasts inside a switch.
Can I just add more lube on top of the old lube?
For a lightly worn or factory coat, adding a thin layer on top is fine and works well. For old lube that has clumped, dried, or picked up dust, clean it off first; fresh lube over degraded lube feels inconsistent.
Does lube on stabilizers dry out faster than on switches?
Often yes. Stabilizer wires move more and carry a heavier grease that can migrate, so stab rattle usually returns before switch scratch does. A thicker grease like Krytox 205g0 or dielectric grease on the wires lasts longest.
Is it worth lubing switches if it dries out anyway?
Yes. One to two years of smoother, quieter typing from an afternoon of work is a strong trade, and re-lubing later is faster than the first pass. The improvement is real even though it is not permanent.
Buying a replacement spacebar only works if you get the size right. Spacebars are measured in units (U), and the size you need depends on your keyboard’s bottom row, not on how big the board is overall. Below you’ll find the full size chart, the stabilizer spacing for each size, and how to measure the spacebar you already have. It also explains why your ruler will read about a millimetre short.
⚡ Quick answer
One keyboard unit (1U) is 19.05 mm. The most common spacebar is 6.25U, a 119.06 mm layout footprint, used on standard ANSI keyboards, with stabilizer stems 100 mm apart. The other common sizes are 7U (133.35 mm) and 6U (114.3 mm). The keycap itself measures roughly 1 mm less than its footprint, so a 6.25U spacebar reads about 118 mm on a ruler. Measure, divide by 19.05, and round up to the nearest standard size.
Affiliate links: if you buy through them we may earn a small commission at no extra cost to you.
Spacebar size chart
The footprint is the space the key occupies in the layout (units × 19.05 mm). The measured keycap column is what a ruler typically reads across the base of the cap, which is slightly narrower so neighbouring keys don’t rub. Stabilizer spacing is the centre-to-centre distance between the two stabilizer stems.
Size
Footprint (mm)
Footprint (in)
Measured keycap (approx.)
Stabilizer spacing
Where you find it
7U
133.35 mm
5.25 in
≈132 mm
114.3 mm
7U (Tsangan/WKL) bottom rows, many customs
6.5U
123.83 mm
4.88 in
≈123 mm
Varies by board
Occasional European and custom layouts
6.25U
119.06 mm
4.69 in
≈118 mm
100 mm
Standard ANSI and ISO, most keyboards
6U
114.3 mm
4.50 in
≈113 mm
95.25 mm (check stem position)
Some 60% boards, vintage layouts
5.5U
104.78 mm
4.13 in
≈104 mm
Varies by board
Some ergonomic and Alice-style layouts
4U
76.2 mm
3.00 in
≈75 mm
Varies by board
Compact and 40% layouts
3U
57.15 mm
2.25 in
≈56 mm
Usually a 2U stabilizer (23.8 mm)
Split-spacebar layouts
2.75U
52.39 mm
2.06 in
≈51 mm
2U stabilizer (23.8 mm)
Split spacebars, right Shift
2.25U
42.86 mm
1.69 in
≈42 mm
2U stabilizer (23.8 mm)
Split spacebars, left Shift, Enter
📌 The quick rule. Measured width in millimetres ÷ 19.05, then round up to the nearest size in the chart. A cap reading 118 mm gives 6.19, which is a 6.25U spacebar; 132 mm gives 6.93, which is 7U. Rounding down is how people end up ordering 6U by mistake.
Layout footprint vs measured keycap width
Size charts, including ours, list the footprint: 6.25 × 19.05 = 119.06 mm. That is the slot in the layout, measured from the centre of the gap on one side to the centre of the gap on the other. The plastic keycap is deliberately smaller so it never touches its neighbours. On most profiles the base of a 1U cap measures around 18.1–18.4 mm, so a spacebar loses roughly 0.7–1 mm against its footprint.
6.25U spacebar from above: the dashed outline is the 119.06 mm footprint; the keycap is about 1 mm narrower; the stabilizer stems sit 100 mm apart.
Two practical consequences. First, don’t treat a measurement of 118 mm as a mystery size. It’s a normal 6.25U cap. Second, measure at the base, not the top. Sculpted profiles like SA and Cherry taper towards the top surface, so measuring the top can read several millimetres short. The stabilizer spacing is the more reliable check, because it’s fixed by the stabilizer hardware rather than the keycap maker.
What does 7U mean?
7U means a key seven units wide: 7 × 19.05 = 133.35 mm of layout footprint. In practice it almost always refers to a 7U spacebar and the bottom row built around it, where the modifiers are 1.5U, 1U and 1.5U on each side instead of the standard row of 1.25U keys. That arrangement is usually called a Tsangan bottom row. A 7U spacebar uses stabilizers 114.3 mm apart, so it can’t go on a board with 6.25U stabilizers.
A standard 6.25U bottom row and a 7U (Tsangan) bottom row drawn to scale. Both total 15U.
The three sizes that matter most
6.25U, the standard
This is what the vast majority of keyboards use, in both ANSI and ISO layouts. The bottom row runs 1.25U modifiers on either side of the spacebar. Replacement 6.25U spacebars are the easiest to find in any keycap set, colour or material.
Footprint: 119.06 mm (6.25 × 19.05); measures ≈118 mm
Stabilizers: 100 mm apart, 50 mm either side of centre
A 7U spacebar sits in a bottom row with wider 1.5U modifiers. It was common on older boards and is still popular on custom keyboards. Keycap sets support it less often, so check that the set’s kit list includes a 7U spacebar and the 1.5U modifiers before you buy.
Footprint: 133.35 mm (7 × 19.05); measures ≈132 mm
Stabilizers: 114.3 mm apart, 57.15 mm either side of centre
Bottom row: 1.5-1-1.5-7-1.5-1-1.5
6U, the awkward one
Found on some 60% boards and older keyboards. It catches people out because a 6U bottom row shifts the modifier positions, and few keycap sets include the right kit. Some 6U spacebars also have the switch stem off-centre rather than in the middle, and a centred-stem 6U cap won’t fit a board built for the offset version, or the other way round. Turn yours over and note where the centre stem sits before ordering.
Footprint: 114.3 mm (6 × 19.05); measures ≈113 mm
Stabilizers: commonly 95.25 mm apart, but confirm against your board
7U vs 6.25U: the comparison people actually need
Both bottom rows total exactly 15U. The spacebar and the modifiers around it are simply divided differently.
6.25U row
7U row
Spacebar
6.25U (119.06 mm)
7U (133.35 mm)
Modifiers
Seven keys, all 1.25U
Six keys: 1.5U, 1U, 1.5U each side
Row total
15U
15U
Stabilizers
100 mm apart
114.3 mm apart
Keycap support
Nearly every set
Often needs a separate kit
Because both rows come to 15U, some PCBs and plates support either. The hardware is not interchangeable, though: the stabilizers sit 14.3 mm further apart on a 7U layout, so a 6.25U spacebar can’t mount on 7U stabilizers, and the modifier keycaps are different widths too.
📌 If you’re choosing: pick 6.25U unless you have a specific reason not to. Keycap sets support it almost universally, replacements are cheap and easy to find, and you’ll never hunt for a compatible kit. 7U feels slightly more generous under the thumb and gives a cleaner-looking bottom row. That’s the whole advantage.
Why is the spacebar so big?
It’s the most-pressed key on the board. In ordinary English text roughly one keystroke in six is a space, more than any single letter. It’s pressed by a thumb, the least precise digit, which approaches from below and needs a wide landing area that both thumbs can reach from the home row. And it fills the space left over: the bottom row must be as wide as the rows above it, so once the modifiers are placed the spacebar absorbs whatever width remains.
What size spacebar does my keyboard use?
Board size and spacebar size are largely independent. A 60% keyboard usually has the same spacebar as a full-size one, because compact layouts remove keys from the edges rather than shrinking the bottom row.
Keyboard
Usual spacebar
Full-size, TKL, 75%, 65% (ANSI or ISO)
6.25U
60%
6.25U, occasionally 6U or 7U
40% and compact
4U or smaller, sometimes split
Alice-style and ergonomic
Split, often 2.25U plus 2.75U
JIS (Japanese) boards
Much shorter, with conversion keys either side
ISO and ANSI boards share the same 6.25U spacebar; the differences are at Enter and left Shift. JIS boards are the exception, with a short spacebar that standard sets don’t cover. Our keyboard layouts guide shows how to tell the three apart, and the keyboard sizes guide covers form factors.
How to measure your spacebar
You need a ruler or calipers and a keycap puller. It takes two minutes.
Photograph the bottom row before you remove anything, so you can put the modifiers back correctly.
Pull the spacebar with a wire keycap puller, lifting evenly from both ends so you don’t bend the stabilizer wire.
Measure the base, edge to edge, with the spacebar face down. Calipers are more accurate; a ruler is close enough.
Divide by 19.05 and round up to the nearest size in the chart. Expect your reading to be about 1 mm under the footprint.
Measure the stabilizer stems centre to centre underneath and match them to the chart. This is the most reliable check.
Note where the switch stem sits. Centred is normal; off-centre means you need a matching offset spacebar.
💡 Faster shortcut. Count the keys either side of your spacebar. If they’re all the same small width (1.25U), you have a 6.25U spacebar. If the outer ones are noticeably wider with a narrow key between them, you’re looking at a 7U bottom row.
Check your exact model before you order
Measurements get you close; your keyboard’s documentation settles it. Before buying a spacebar or a full set, confirm the size against at least one of these for your exact model and revision. Manufacturers do change bottom rows between versions.
The manufacturer’s product page or manual. Look for a layout diagram or a keycap-size list, not a marketing photo.
The PCB or plate layout options for custom kits. These list which bottom rows (6.25U, 7U, split) the board supports.
The VIA or QMK layout for boards that use them. It shows every key width in the bottom row.
The keycap set’s kit list. Check it includes your spacebar size and your modifier sizes, since a 7U spacebar is useless without 1.5U and 1U modifiers.
Stabilizers: Cherry vs Costar
Size is only half the compatibility question. The other half is the stabilizer mount your spacebar is designed for, and you can tell by turning it over.
Cherry-style spacebars have three cross-shaped sockets; Costar-style spacebars have one switch socket plus two clips for the stabilizer wire.
Cherry style uses plastic stems that push into cross-shaped sockets on the underside of the spacebar. Almost every modern keyboard and keycap set uses it.
Costar style uses a metal wire that clips into inserts or hooks near the ends of the spacebar. Found on some older and prebuilt boards. Costar and Cherry spacebars are not interchangeable.
Most replacement spacebars sold today are Cherry-compatible. If yours rattles or binds after a swap, our keyboard stabilizers guide walks through tuning and lubing them.
Installing a spacebar properly
Lube the stabilizers first. It’s much easier with the spacebar off and makes the biggest difference to how it sounds. See our stabilizer guide.
Line up the stabilizer stems with the sockets on the spacebar before pressing anything.
Press down evenly at both ends and the centre. Pressing one end first is what bends wires and pops stabilizers loose.
Test it. Press the far left, far right and centre. It should feel the same everywhere, with no rattle or binding.
Common spacebar problems and fixes
Problem
Usual cause
Fix
Rattling
Dry or loose stabilizer wire
Lube the wire ends with dielectric grease; check the stabilizers are fully seated
Sticking or binding
Misaligned stems or wrong size
Reseat the spacebar; confirm size and stabilizer spacing match your bottom row
One end feels dead
Stabilizer wire popped out
Remove the spacebar and reseat the wire in the housing
Hollow, echoey sound
Empty space inside the keycap and case
Add a thin foam or felt strip inside the spacebar, or case foam
Sits crooked
Warped keycap, offset stem mismatch or uneven stabilizers
Check it sits flat on a table; confirm the stem position matches; replace if warped
Where to Buy a Replacement
Most keycap makers sell spacebars individually or as part of a set. What differs is the profile, material, and which sizes they include.
GMK, thick ABS in Cherry profile, 6.25U and 7U. Premium colourways, premium prices.
Signature Plastics, SA, DSA, and DCS profiles in 6.25U and 7U. The go-to for tall, spherical keycaps.
Tai-Hao, budget-friendly ABS and PBT, mostly 6.25U, in a wide range of colours.
EnjoyPBT, durable dye-sublimated PBT in Cherry and OEM profiles, 6.25U and 7U.
Varmilo, dye-sublimated PBT in OEM profile, generally 6.25U.
Keyreative, newer profiles like KAM and KAT in multiple sizes.
Whichever you pick, match the profile to your existing keycaps as well as the size. A Cherry-profile spacebar next to OEM-profile keys will sit at a slightly different height. Our keycap profile guide explains the differences, and the ABS vs PBT guide covers materials.
Frequently asked questions
What size is a standard spacebar?
The standard spacebar is 6.25U: a 119.06 mm layout footprint (6.25 × 19.05 mm), with the keycap itself measuring about 118 mm. It’s used on most ANSI and ISO keyboards, with stabilizers 100 mm apart. Other common sizes are 7U (133.35 mm) and 6U (114.3 mm).
What does 7U mean on a keyboard?
7U means a key seven units wide, a 133.35 mm footprint. It usually refers to a 7U spacebar in a Tsangan-style bottom row, with 1.5U, 1U and 1.5U modifiers either side. Its stabilizers sit 114.3 mm apart, so it doesn’t fit boards built for a 6.25U spacebar.
How many mm is 1U on a keyboard?
One unit (1U) is 19.05 mm, or 0.75 inches. That’s the key pitch: the distance from the centre of one key to the next. The keycap itself is smaller, around 18.1–18.4 mm at the base, so that neighbouring keys don’t rub together.
Why does my spacebar measure 118 mm instead of 119 mm?
Because charts list the layout footprint, not the plastic. A 6.25U slot is 119.06 mm, but the keycap is made about a millimetre narrower so it clears its neighbours. A 118 mm reading is a normal 6.25U spacebar. Measure at the base, since sculpted profiles taper towards the top.
Can I use a 7U spacebar on a 6.25U keyboard?
No. The stabilizer mounts don’t line up: 6.25U uses 100 mm spacing and 7U uses 114.3 mm. The widths differ too, so the surrounding modifiers wouldn’t fit either. You need the size your bottom row, plate and PCB were built for.
What is the difference between Cherry and Costar stabilizers?
Cherry-style stabilizers use plastic stems that push into cross-shaped sockets under the spacebar, and are the modern standard. Costar-style stabilizers use a metal wire that clips into inserts near the ends of the keycap. The two aren’t interchangeable, so check the underside before buying.
What is a split spacebar?
A split spacebar replaces the single long bar with two or more smaller keys, most often a 2.25U plus a 2.75U. It appears on Alice-style and ergonomic layouts. Those pieces use ordinary 2U stabilizers (23.8 mm apart), the same as Shift keys, so the rules for a 6.25U bar don’t apply.
⚡ Quick answer
Keyboard ghosting is when pressing several keys at once makes the board register a key you never pressed, or drop one you did. It happens on cheaper keyboards that share electrical paths between keys without an isolating diode on each switch. The fix is a keyboard with a diode per key and N-key rollover (NKRO), which is standard on most mechanical keyboards, or at least 6-key rollover over USB.
Ghosting is one of those keyboard problems you only notice when it bites, usually mid-game when your character bolts the wrong way. Here is what actually causes it, how to tell the difference between ghosting and a rollover limit, how to test your own board in two minutes, and how to make sure it never happens again.
What keyboard ghosting actually is
Keyboards do not run a separate wire from every key to the controller. The keys sit on a grid of rows and columns, and the controller scans that grid to see which crossings are pressed. That is cheap and efficient, but it creates a problem: when you hold three keys that share rows and columns in the wrong pattern, the current can find a path through a fourth key, and the controller reads it as pressed. That phantom key is ghosting.
The cure is a tiny diode behind each switch that forces current to flow one way only, so no phantom path can form. Boards with a diode per key cannot ghost. Cheaper membrane keyboards skip the diodes to save money, which is why they are the ones that ghost.
Ghosting vs blocking vs NKRO: the part people get wrong
Most people say ghosting when they mean one of three different things. Getting them straight tells you what to look for on a spec sheet.
Term
What happens
Cause
Ghosting
A key you never pressed registers
No diodes; phantom current path
Blocking (jamming)
A key you did press fails to register
Rollover limit reached
NKRO
Every key registers, always
Diode per key + full rollover
Here is the honest nuance: true phantom-key ghosting is rare on modern keyboards, because even basic ones now include enough diodes to stop it. What most people actually hit today is blocking, where the board simply refuses extra keys past its rollover limit. Both feel like the keyboard betraying you, and both are solved the same way, by a board with a diode per switch and N-key rollover.
Key rollover, and what NKRO and 6KRO mean
Rollover is the number of keys a keyboard can register at the same time. You will see two terms:
6KRO (6-key rollover): registers any six keys at once, plus modifiers. This is the standard USB limit and is plenty for typing and most gaming.
NKRO (N-key rollover): registers every key at once, no limit. This is what you want if you mash a lot of keys together, and it is standard on good mechanical boards.
For nearly everyone, 6KRO is already enough, since you rarely need more than six real keys plus Ctrl, Shift, and Alt. NKRO is the safety net that guarantees you will never find the limit.
How to test your keyboard for ghosting
Open a rollover tester. A browser tool like keyboardchecker.com shows every key as you press it.
Hold the combinations you actually use. For gaming, try W + A + Space, or W + Shift + Space + E, the clusters where problems show up.
Watch the screen. A key that lights up without being pressed is ghosting. A key you are holding that fails to light is blocking, a rollover limit.
Rule out software first. If a board behaves on one computer but not another, the problem is drivers, sticky keys, or malware, not the keyboard.
Who ghosting actually affects
Gamers feel it most, because games demand several keys at once (move, sprint, jump, ability) and a dropped or phantom input costs you the play. Fast typists hit it less often but can still drop letters during quick bursts on a cheap board. And it is a real accessibility barrier, since some assistive input methods rely on holding multiple keys, which a ghosting keyboard mangles.
How to fix and prevent it
You cannot add diodes to a membrane keyboard that lacks them, so the fix is a better board rather than a tweak. When shopping:
Buy a mechanical keyboard. Almost all have a diode per switch and offer NKRO or 6KRO, which eliminates ghosting.
Look for NKRO or anti-ghosting in the specs. Reputable gaming boards state it plainly.
Be wary of cheap membrane keyboards. Many share electrical paths and ghost under load, though better gaming membranes add anti-ghosting on the common gaming keys.
Keep it clean and updated. Dust and stale firmware cause their own erratic behaviour. Our maintenance guide helps.
Frequently asked questions
What is keyboard ghosting?
Keyboard ghosting is when you press several keys at once and one or more keys you never pressed register anyway. It is caused by the electrical limits of a key matrix when the switches are not isolated by diodes, and it mostly affects cheaper membrane keyboards.
How do I test my keyboard for ghosting?
Open a browser tester such as keyboardchecker.com and hold the key combinations you actually use. If a key lights up that you did not press, it is ghosting; if a key you are holding fails to register, it is a rollover limit (blocking).
What is the difference between ghosting and rollover?
Ghosting is an extra, phantom key registering. Rollover is how many real keys the board can register at once, so hitting the rollover limit drops keys you did press. Diodes stop ghosting; N-key rollover stops dropped keys. A good board does both.
Are mechanical keyboards better for preventing ghosting?
Generally yes. Most mechanical keyboards include a diode per switch and offer N-key or 6-key rollover, which eliminates ghosting. Membrane keyboards share electrical paths and are far more prone to it.
Can software or malware cause ghosting-like issues?
Occasionally. Before blaming the keyboard, rule out sticky-keys settings, outdated drivers, or malware. If the problem follows the keyboard to another computer it is the hardware; if it stays with the PC, it is software.
Is 6-key rollover enough, or do I need NKRO?
For almost everyone, 6-key rollover is enough, since you rarely press more than six real keys plus modifiers at once. NKRO is a guarantee you will never hit the limit, which is nice for heavy gaming but not essential for most players.
⚡ Quick answer: To lube keyboard stabilizers, remove all large keycaps and stabilizers from your PCB, disassemble each stabilizer into its housing, stem, and wire, then apply Krytox GPL 205g0 to the housing interior and stem surfaces. Apply Krytox XHT-BDZ (or Permatex Dielectric Grease) generously to both wire hook ends. Optionally perform the band-aid mod on the PCB contact points. Reassemble, reinstall, and the rattle is gone. The full process takes 45 to 90 minutes and costs under $25 in supplies.
There is a specific sound that every keyboard builder dreads: that hollow, metallic clatter on the spacebar that makes an otherwise excellent keyboard sound like a toy. You lube your switches, you foam the case, you install a nice brass weight, and then you press the spacebar and it goes clack-rattle-clank. All of that careful work undone by two bent pieces of wire.
Stabilizers are the most underappreciated component in a mechanical keyboard build. They are not glamorous. Nobody posts about them on social media. There are no enthusiast-grade stabilizer colorways or artisan wire-bending studios. And yet they are responsible for a disproportionate amount of the acoustic character of your finished board, for better or worse.
I have modded stabilizers on more than 20 builds, from cheap boards with factory clip-ins to high-end ones with Durock V2s and Gateron Inks, and every last one needed proper lubing to sound right. Everything I have picked up along the way is here: which lubes actually work, how to apply them, the order that matters, and the optional mods that take a decent stab job to a genuinely silent one.
1. Why stabilizers rattle (and why it is not the switches)
Rattle is not one problem, it is four, and each one has its own fix. Figuring out which you are actually hearing saves you from lubing the wrong part and wondering why the noise will not go away.
🔗 Wire-to-stem contact The most common cause. The bent metal wire hooks rattle inside the plastic stem channel during every keystroke. Fix: generous thick grease on both wire hook ends eliminates all metal-on-plastic contact.
🏠 Stem-to-housing friction The plastic stem slides up and down inside the housing with inadequate lubrication. This creates scratchiness and a slight clatter on return. Fix: Krytox 205g0 on all stem surfaces and inner housing walls.
💥 Bottom-out impact The housing makes hard plastic-on-PCB contact at full keystroke depth. This creates a sharp, hollow clack separate from any rattle. Fix: the band-aid mod cushions this contact point with a soft pad.
⚖️ Wire imbalance If the wire is not perfectly centered, one side of the keycap bottoms out before the other, creating a wobbly, inconsistent feel and sound. Fix: wire balancing, gently bending the wire until both sides are level.
💡 Worth knowing: lubing your switches does nothing for stabilizer rattle. These are entirely separate systems. You can have perfectly lubed switches on a board with rattling stabilizers, and the stabilizers will dominate the sound profile completely. Always address both in the same session.
2. Types of stabilizers: which one do you have?
The modding process is nearly identical across all stabilizer types, but you need to know what you are working with before you start removing anything. The wrong removal method can damage your PCB or break the stabilizer tabs.
⭐ Recommended 🔩 Screw-in (PCB mount) Secured to the PCB with a small Phillips screw through a mounting hole. The most stable design, with zero wobble and zero flex during keystrokes. Found on most quality boards over $60. Look for a small screw at the top of each housing. These are the gold standard and worth upgrading to if your board supports them.
Common 📎 Clip-in (PCB mount) Snap into cutouts in the PCB using two small plastic tabs. No screws required, but more prone to movement under heavy use. Found on most budget keyboards and some mid-range boards. Removal requires pressing both tabs inward simultaneously. Can be upgraded to screw-in on compatible PCBs.
Less common 🔧 Plate-mount Clips into holes in the keyboard plate rather than the PCB. Common on older keyboards and some budget gaming boards. Significantly less stable than PCB-mount types and generally considered inferior for modding. The lubing process is identical, but the band-aid mod cannot be applied since the stabs do not contact the PCB.
Custom builds 🏗️ Integrated / custom Some premium custom keyboards use proprietary stabilizer designs: Topre rubber domes, Alps-style stabs, or plate-integrated solutions. These require different lubricants and techniques. This guide covers standard MX-compatible stabilizers, which account for the vast majority of the market.
⚠️ Not sure which type you have? Remove the spacebar keycap and look at the stabilizer. A screw at the top of the housing means screw-in. Two small plastic clips on the sides means clip-in. Attached to the metal plate rather than the circuit board means plate-mount. When in doubt, check your keyboard’s product page or Reddit’s r/MechanicalKeyboards.
3. Stabilizer anatomy: what to lube, what to avoid
A standard MX-compatible stabilizer has three components. Unlike switch lubing where you must avoid the contact leaf at all costs, stabilizers are more forgiving, but the two parts that need the most attention are the ones most beginners under-lube or skip entirely.
🏠 Housing (×2) · Lube: 205g0 The outer plastic shell that mounts to the PCB or plate. Contains the vertical channel the stem slides through. Apply Krytox 205g0 to all interior walls. Lube generously: unlike switch housings, there is no contact leaf to avoid here.
🔲 Stem (×2) · Lube: 205g0 The white or clear plastic piece that slides inside the housing, with a hook channel at the top for the wire. Lube all four outer sides, the top cap face, and crucially the interior of the hook channel where the wire sits.
〰️ Wire (×1) · Lube: XHT-BDZ The steel wire connecting both housings and stabilizing the keycap. The two bent hook ends are the primary source of rattle. These must be coated in thick grease, not standard 205g0, but XHT-BDZ or dielectric grease. This is the step most beginners under-do.
🔩 Mounting screw · Do not lube The small Phillips screw that secures screw-in stabilizers to the PCB. Do not apply lubricant to it: it can cause the screw to slip, loosen over time, or damage the mounting hole. Tighten firmly but do not overtighten, as the PCB material is fragile.
4. Best lubes for stabilizers: the complete comparison
Stabilizers need two different lubricants for two different jobs. Using a single lube for everything is the most common stabilizer modding mistake. It produces results that are better than stock but nowhere near optimal.
Lubricant
Viscosity
Use on
Why it works
Price
Verdict
Krytox GPL 205g0
Medium grease
Housing interior, stem surfaces
Excellent plastic lubrication, long-lasting, will not attract dust
$10 to 12 / 5ml
Best for housing and stem
Krytox XHT-BDZ
Very thick grease
Wire hook ends only
Thick enough to stay packed in wire bends, prevents metal-on-plastic rattle permanently
$8 to 12 / 3ml
Best for wire ends
Permatex Dielectric Grease
Very thick grease
Wire hook ends (budget option)
Nearly identical performance to XHT-BDZ at a fraction of the cost, available at any auto parts store
$5 to 8 / tube
Best budget wire lube
Tribosys 3203 / 3204
Thin to medium grease
Housing and stem (alternative)
Works well but slightly thinner than optimal for stabilizer housings, better suited to switches
$8 to 10 / 5ml
Acceptable alternative
Krytox GPL 105 oil
Thin oil
Do not use on stabilizers
Too thin, wears off wire ends within weeks. Use only on switch springs.
$8 to 10 / 5ml
Avoid on stabs
WD-40 / petroleum jelly / machine oil
Various
Never
Degrades plastic over time, attracts dust, causes long-term damage to stabilizer components
n/a
Never use
🔬 Why thick grease for wire ends specifically: the wire hook sits inside a small channel in the plastic stem and moves slightly with every keystroke. A thin lubricant like 205g0 will not stay packed inside that hook channel, and it gradually works its way out through normal use. XHT-BDZ and Permatex Dielectric Grease are thick enough to remain compressed inside the bend, maintaining a permanent buffer between metal and plastic. This is why people who use 205g0 on wire ends often report rattle returning within a few months, while those using thick grease report permanent results.
5. The full stabilizer mod stack, ranked
Lubing is just one part of achieving perfect stabilizers. Here is every commonly used stabilizer modification ranked by impact, so you know which ones are worth your time and which are optional.
Mod
Impact
What it does
🧴 Wire end lubing
🔥 Highest
Thick grease on wire hooks. Eliminates the primary source of rattle permanently. Never skip this.
🩹 Band-aid mod
🔥 Highest
Padding on PCB contact points. Eliminates hollow bottom-out impact sound. Free if you have band-aids.
🏠 Housing and stem lube
🔥 High
205g0 on all sliding surfaces. Removes stem scratchiness and ensures smooth, consistent travel.
⚖️ Wire balancing
⚡ Medium
Adjusting wire bend symmetry so both sides bottom out simultaneously. Fixes wobbly spacebar feel.
🔇 Foam under stabs
⚡ Medium
Thin foam strips under stab housings add cushioning. Similar to the band-aid mod but more consistent coverage.
🌊 Tempest mod
⚡ Medium
Filling the space between stab wire and housing with thin foam. Further reduces wire rattle on very long keys.
💡 Where to start: wire end lubing plus the band-aid mod plus housing and stem lube are the essential three. Together they account for roughly 90% of the improvement. Everything else is incremental refinement for builds where you want truly exceptional results.
6. Step by step: how to lube keyboard stabilizers
🛠️ Supplies checklist: Krytox 205g0 · Krytox XHT-BDZ or Permatex Dielectric Grease · size-00 brush · tweezers · small Phillips screwdriver · isopropyl alcohol 90%+ · cotton swabs · band-aids · paper towel or desk mat. Total cost: $20 to 30 if starting from scratch.
Step 1. Remove large keycaps and identify all stabilizers
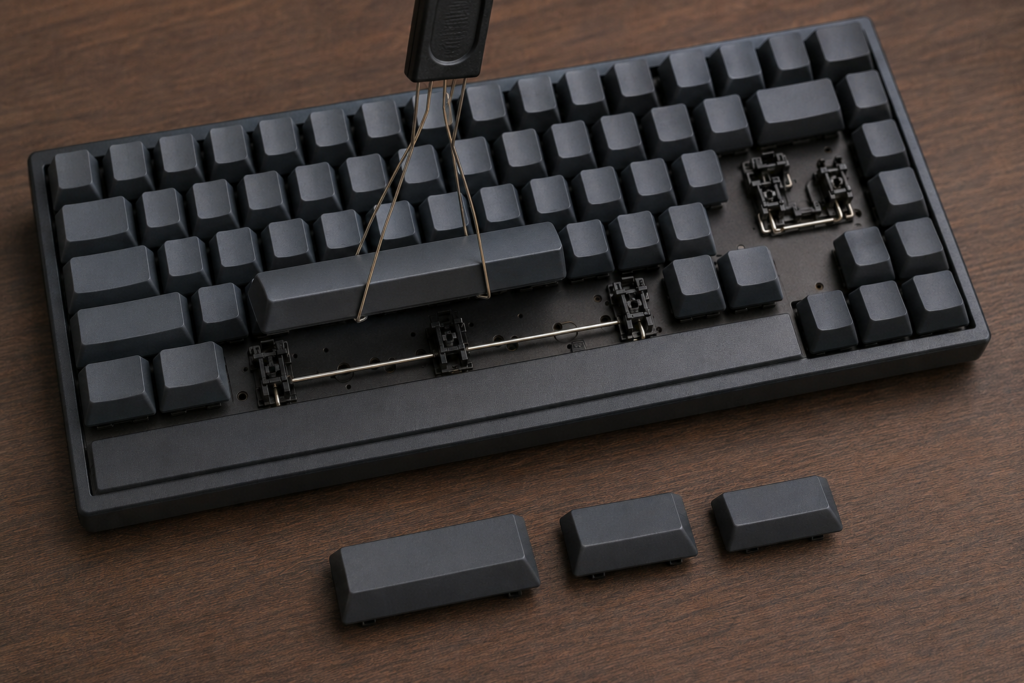
Use a wire keycap puller to remove all stabilized keys: spacebar (typically 6.25u), left and right shift, enter, backspace, plus end-column keys on full-size boards. Lay them aside carefully, as these are the largest keycaps and most prone to scratching. Count your stabilizers before removal so you know what to expect: most 65% keyboards have 3 or 4, full-size boards have 7 to 9.
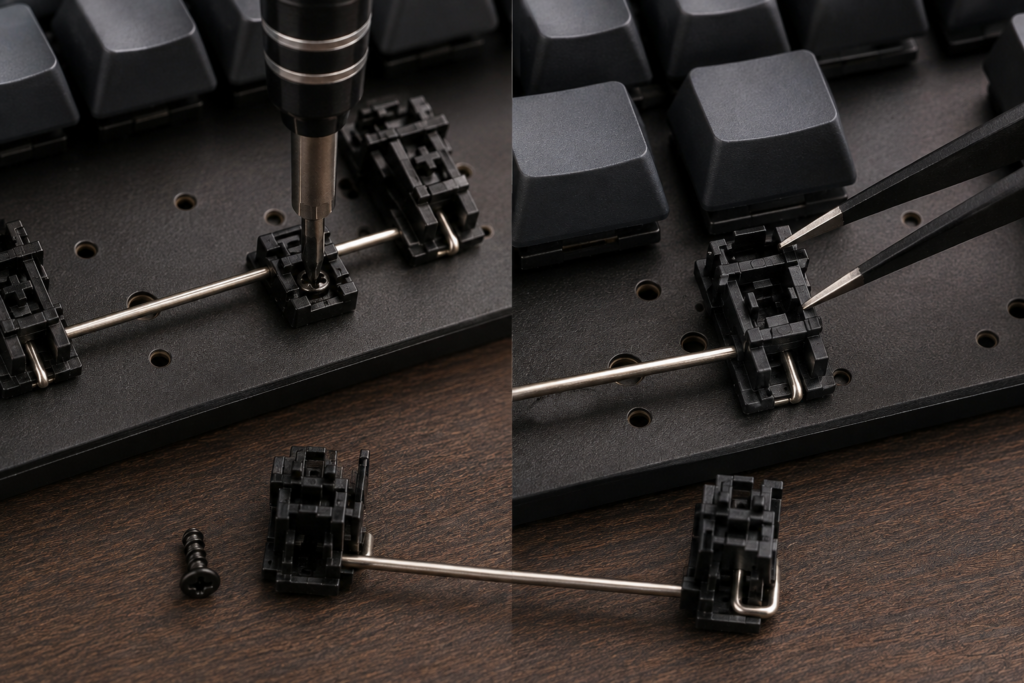
Step 2. Remove stabilizers from the PCB
For screw-in stabilizers: use your small Phillips screwdriver to remove the screw from the top of each housing. Keep screws in a small container and do not mix them with keyboard screws. Tilt the housing slightly and lift free from the PCB.
For clip-in stabilizers: use tweezers or a small flathead to press both plastic tabs simultaneously while lifting upward. Do not force them. If one tab is still engaged, the housing will not release cleanly.
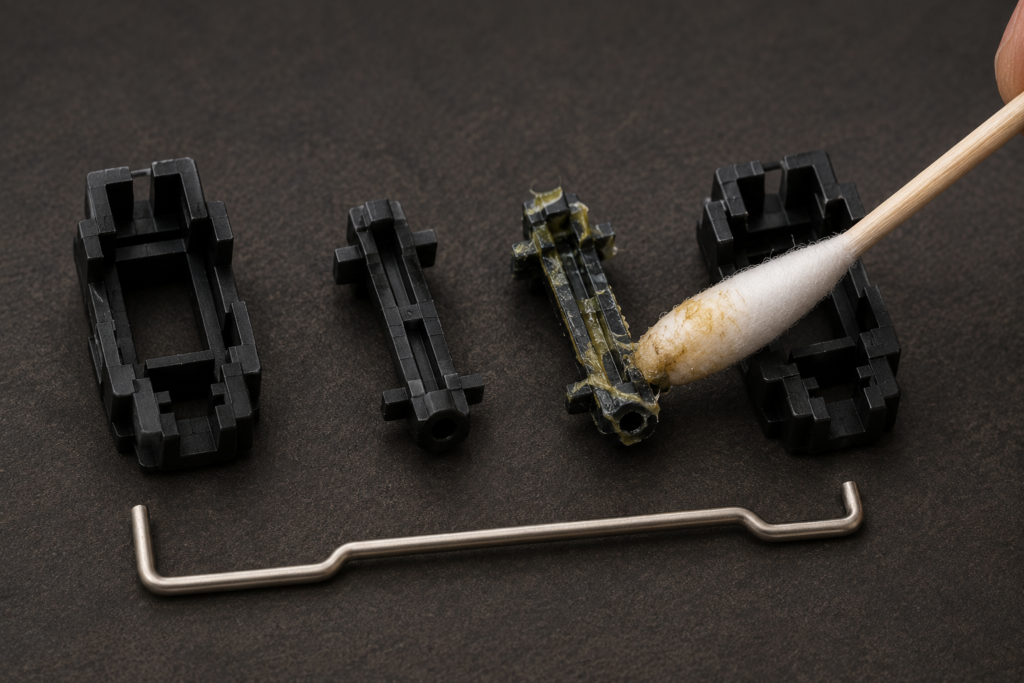
Step 3. Disassemble and clean all components
Separate each stabilizer into its three parts: two housings, two stems, and one wire. To remove the wire, hook it out of the stem channels by rotating each wire end 90 degrees toward you and pulling free. Remove the stems from the housings by pressing and lifting. If your stabilizers are brand new, wipe off any visible factory grease with a dry cotton swab. If they are used, wash the plastic parts in warm soapy water or soak in isopropyl alcohol for 10 minutes to dissolve all previous lubricant. Dry completely, as no moisture should remain before you apply new lube.
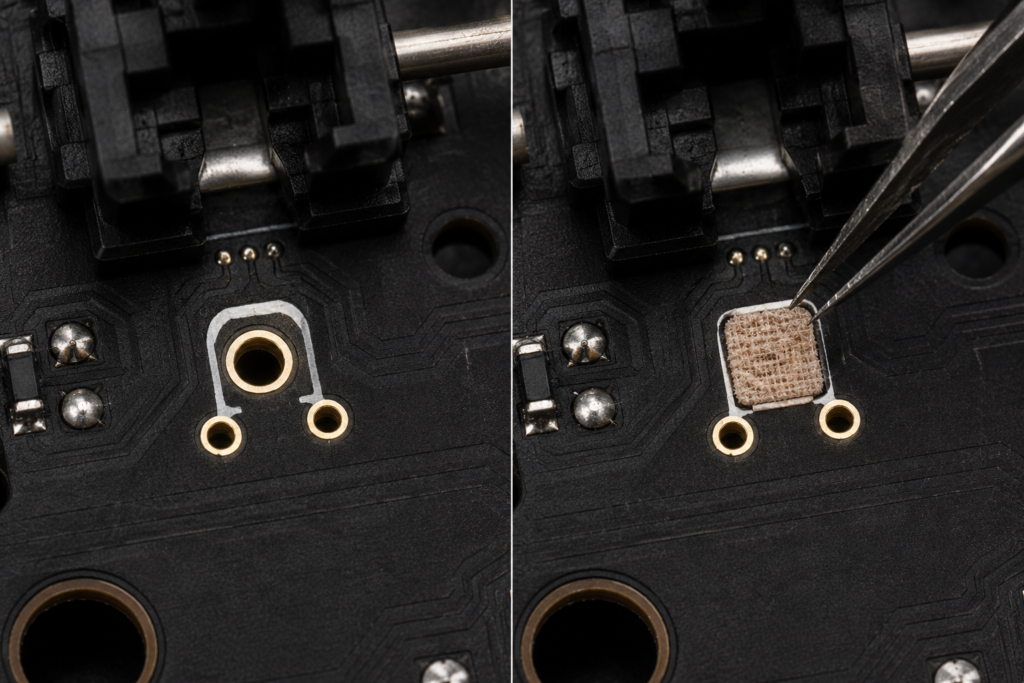
Step 4. Apply the band-aid mod to the PCB
This must be done before reinstalling, as you cannot add the band-aid mod with stabilizers in place. Cut small rectangles (approximately 5mm × 7mm) from the soft padded center of a standard adhesive bandage. Do not use the adhesive side tabs, only the padded gauze section. Place one pad directly on each PCB contact point where the stabilizer housing bottom makes contact. Press firmly to adhere. Trim edges if they extend beyond the housing footprint. For extra cushioning on the spacebar, use two layers.
Step 5. Lube the housing interior
Load your size-00 brush with Krytox 205g0, slightly more generously than you would for a switch housing, but still not dripping. Apply an even coat to all four interior walls of the housing channel that the stem slides through. Cover the full height of the channel, and the bottom of the channel interior as well. Unlike switch lubing, there is no contact leaf in stabilizer housings to avoid, so you can be methodical and thorough without risk of damaging an electrical component.
Step 6. Lube the stabilizer stem thoroughly
Hold the stem between thumb and index finger. Apply 205g0 to all four outer vertical faces, as these contact the housing walls during travel. Apply lube to the top cap face, the flat surface that meets the keycap mount. Most critically, apply lube generously to the interior of the wire hook channel, the small opening at the top of the stem where the wire hook inserts. Push lube inside this channel with your brush tip. This channel, combined with wire end lubing, is what eliminates rattle entirely.
Step 7. Lube the wire hook ends with thick grease
This is the single most important step in the entire process. Using your brush or a cotton swab, apply a generous, packed coat of Krytox XHT-BDZ or Permatex Dielectric Grease to both wire hook ends. Do not be conservative. You want the grease packed into the bend of the wire, surrounding the hook, creating a thick buffer between the steel wire and the plastic stem channel so they never make metal-on-plastic contact. Apply, then apply more. Wipe off any excess that would prevent the hook seating fully, but keep the packed grease inside the bend itself.
Step 8. Reassemble each stabilizer
Insert the lubed stems back into the lubed housings. They should slide in smoothly and seat fully at the bottom. Hook both wire ends into the stem channels: insert each hook into its stem channel opening, then rotate the wire 90 degrees away from you to lock it. You should hear a soft click as each side locks. Press the stem up and down a few times, as it should travel smoothly with no scratching or resistance. If you hear any click or rattle, the wire is not fully seated.
Step 9. Reinstall and replace keycaps
Screw-in: lower the housing onto the PCB mounting holes, insert the screw through the top hole, and tighten firmly. Do not overtighten, as the PCB is fragile and stripped screw holes are a nightmare to fix. One firm quarter-turn past hand-tight is sufficient.
Clip-in: align the two tabs over the PCB cutouts and press firmly until both click into place. Test stability by attempting to pull the housing, and it should not flex or lift.
Reinstall all large keycaps by pressing firmly and evenly onto the switch and stabilizer stems simultaneously. Test each key: press slowly to bottom out, then release. Listen for any rattle or clack.
7. The band-aid mod: deep dive
The band-aid mod is one of the most effective, cheapest, and most widely recommended keyboard modifications in the entire enthusiast community. It costs literally nothing if you have a box of bandages at home.
Why it works
When a stabilized key is pressed to full depth, the stabilizer housing physically contacts the PCB surface. This is a hard plastic-to-PCB impact that creates a sharp, hollow clacking sound distinct from normal keystroke noise. The band-aid pad acts as a shock absorber. It compresses slightly on impact, converting the hard clack into a softer, muted thud. The effect is most dramatic on the spacebar, which is the largest key and receives the hardest typing impact.
Correct execution
Use only the padded gauze center of a standard bandage, not the adhesive strips on the sides
Cut rectangles approximately 5mm × 7mm, enough to cover the housing contact point, not the entire PCB footprint
Apply before reinstalling stabilizers, as this cannot be done with stabs in place
For the spacebar specifically, consider two layers of padding for extra cushioning
Ensure no padding extends into switch cutouts or solder holes on the PCB
Press firmly so the adhesive bonds well. A pad that lifts during use causes inconsistent sound
Alternative materials
The community has experimented with many alternatives. Medical tape with foam is popular. Tempest mod foam, small pieces of EVA foam cut to size, works similarly. Some builders use electrical tape doubled over itself for a slightly firmer feel. The original band-aid method remains the most popular because the material thickness is nearly perfect and the adhesive is reliable without damaging the PCB.
🔬 Band-aid versus foam mod: the band-aid mod cushions the bottom-out impact at the housing-PCB interface. A separate mod, placing foam under the entire stabilizer area, cushions over a wider area and can produce a slightly deeper, more muffled sound. Both are valid. The band-aid mod is faster and more targeted; PCB foam is more comprehensive but requires cutting foam to fit precisely around switch and stabilizer cutouts.
8. Wire balancing: fixing uneven key feel
Wire balancing is an advanced technique rarely discussed in beginner guides, but it makes a noticeable difference on the spacebar and long shift keys. If your spacebar feels like it tilts, or if one side seems to bottom out before the other, the wire is out of balance.
How to diagnose wire imbalance
Press the spacebar slowly and feel whether both ends reach bottom at exactly the same time. Press one end only, and it should bottom out at the same depth as the other. If the key feels like a seesaw, or produces different sounds depending on where you press, the wire needs balancing.
The balancing process
Remove the wire from the stabilizer. Lay it on a flat surface and assess its symmetry. If one side is bent differently from the other, gently apply pressure to correct it, making small adjustments then checking and repeating. The goal is for both wire hook ends to sit at exactly the same height when the wire is laid flat. This ensures both stems reach bottom simultaneously during a keystroke.
⚠️ Wire balancing caution: steel stabilizer wire is forgiving but not infinitely so. Do not attempt aggressive bends, only small and gradual adjustments. If you overbend in either direction, it is very difficult to recover the original geometry. Test frequently and adjust minimally. Cheap stabilizers have softer wire that bends more easily but also loses shape more quickly.
When to upgrade instead
If you are spending more than 15 minutes trying to balance a wire, the stabilizer may simply be a low-quality unit not worth the effort. Budget stabilizers, particularly the plate-mount type found on many keyboards under $50, have thick, stiff wire with inconsistent bends from the factory. Upgrading to aftermarket stabilizers (Durock V2, Owlstab, TX Stabilizers, or Gateron Ink stabilizers) provides much higher baseline quality and dramatically easier modding.
9. Common stabilizer lubing mistakes
🚫 Mistake 1: lubing wire ends with 205g0 instead of thick grease. 205g0 is not viscous enough to stay packed inside the wire hook bends during regular use. It gradually works out of the channel, and rattle returns within weeks or months. Always use XHT-BDZ or Permatex Dielectric Grease on wire hooks, and save 205g0 for housings and stems.
🚫 Mistake 2: not cleaning factory grease before applying new lube. Factory stabilizer grease on cheaper keyboards is often a waxy, low-quality compound that does not mix well with Krytox. Applying 205g0 over it can create a gummy, inconsistent feel worse than either grease alone. Always clean with IPA first.
🚫 Mistake 3: forgetting the wire hook channel inside the stem. Most beginners lube the outer stem surfaces well but miss the small internal channel where the wire hook sits. This channel is where metal-to-plastic contact occurs during lateral movement. Use your brush tip to push lube inside it and do not skip it.
⚠️ Mistake 4: overtightening screw-in stabilizer screws. The PCB material around stabilizer screw holes is thin and fragile. Overtightening cracks the PCB or strips the hole, making the stabilizer permanently loose. Tighten to firm, not forceful. If the screw turns without resistance the hole may already be stripped, and a tiny amount of electrical tape can fill the gap as a temporary fix.
⚠️ Mistake 5: applying the band-aid mod after installing stabilizers. The pad sits between the PCB and the stabilizer housing, so it cannot be inserted once the stab is mounted. Always perform the band-aid mod on a bare PCB before any stabilizer installation. If you forgot, you must remove the stabilizer entirely to add the pad.
💡 Mistake 6: testing with keycaps on immediately after assembly. Before reinstalling keycaps, press each stabilizer stem by hand and listen carefully for any remaining rattle. It is much easier to diagnose and fix with keycaps off. Once they are on, the sound changes and identifying the specific problem becomes harder.
10. Before and after: the difference in sound and feel
❌ Before modding
🔊 Metallic rattle on every spacebar press
💥 Sharp hollow clack on bottom-out
😤 Scratchy stem travel up and down
⚖️ Wobbly, uneven key feel side to side
🎵 High-pitched, thin sound profile
😣 Inconsistent feel across large keys
✅ After the full mod stack
🤫 Complete silence on spacebar press
🎵 Deep, cushioned thud on bottom-out
🧈 Smooth, effortless stem travel
⚡ Even, balanced feel across full key width
🎶 Deep, consistent acoustic character
✨ Premium feel matching $200+ keyboards
11. Frequently asked questions
What is the best lube for keyboard stabilizers?
You need two lubricants. Krytox GPL 205g0 for stabilizer housings and stem surfaces, which provides excellent plastic-on-plastic lubrication lasting years. Krytox XHT-BDZ or Permatex Dielectric Grease for the wire hook ends, as these thick greases stay packed inside the wire bends and prevent metal-to-plastic rattle permanently. Do not use a single lubricant for both, because 205g0 is not viscous enough to stay on wire hooks long-term.
What is the band-aid mod for keyboard stabilizers?
It involves cutting small pieces from the padded center of a standard adhesive bandage and sticking them onto the PCB where stabilizer housings make contact during a full keystroke. This cushions the hard plastic-to-PCB impact that creates the characteristic hollow clacking on spacebar and large modifier keys. It is one of the most effective, free, and universally recommended keyboard modifications. Apply before installing stabilizers, as it cannot be added retroactively.
How do I fix a rattling spacebar?
Spacebar rattle is almost always caused by dry wire hook ends. Remove the spacebar keycap, unscrew or unclip the stabilizer, disassemble it, and apply a generous coat of Krytox XHT-BDZ or Permatex Dielectric Grease to both wire hook ends, packing it into the bend of each hook. Combine this with the band-aid mod on the PCB contact points for complete silence. Also apply Krytox 205g0 to the housing interior and stem surfaces. The full process takes 15 to 20 minutes for a single stabilizer.
What is the difference between screw-in and clip-in stabilizers?
Screw-in stabilizers are anchored to the PCB with a small Phillips screw, making them physically stable and resistant to wobble. Clip-in stabilizers snap into PCB cutouts using plastic tabs, which is easier to install but more prone to movement and rattle under heavy typing. Screw-in are strongly preferred for any build where sound quality matters. If your PCB supports screw-in stabs, the upgrade from clip-in is worth every penny.
Do I need to lube stabilizers if I have already lubed my switches?
Yes, without exception. Switches and stabilizers are completely separate mechanical systems, and lubing your switches has zero effect on stabilizer rattle. On most keyboards the stabilizer rattle on the spacebar is significantly louder and more disruptive than any switch scratchiness. Always address both in the same session: lube your stabilizers first, since it requires a bare PCB for the band-aid mod, then lube your switches.
How often should I re-lube my stabilizers?
Housing and stem lube with Krytox 205g0 typically lasts 2 to 3 years of regular use. Wire end lube with thick grease lasts 1 to 2 years. You will know it is time when rattle begins to return on large keys, which is always the wire end grease wearing out first. Re-lubing wire ends only, without full disassembly, is possible using a thin brush or syringe, but full disassembly gives better results.
Can I lube stabilizers without removing them?
Partially. You can apply lube to some surfaces of an installed stabilizer using a thin brush or syringe, sometimes called in-board or lazy lubing. This is better than nothing but inferior to full disassembly for three reasons: you cannot clean old factory grease first, you cannot reach the full interior of the housing properly, and you cannot perform the band-aid mod. For any build you care about, full disassembly is correct.
Should I upgrade my stabilizers or just lube the stock ones?
If your keyboard has screw-in stabilizers, lube them first, because even mid-quality screw-in stabs perform excellently when properly modded. If it has clip-in stabilizers, lube them and assess, as many are perfectly fine when done properly. If you have plate-mount stabilizers and your PCB supports PCB-mount stabs, upgrading is worthwhile. If you plan to keep the keyboard long-term and clip-in stabs still rattle after proper lubing, aftermarket sets like Durock V2 or TX Stabilizers ($15 to 25) are a meaningful upgrade.
✍️ Elizabeth Blake Founder and Lead Writer, ClickyBoard · Custom keyboard builder since 2019
Elizabeth has completed over 20 custom mechanical keyboard builds and modded stabilizers on everything from stock clip-ins on budget gaming boards to Owlstab and TX Stabilizer sets on high-end aluminium cases. She still remembers the first build where she forgot to lube the stabs, a cautionary tale she now shares with everyone who will listen. ClickyBoard exists to document every lesson learned so you can skip straight to the good part. She currently types on a Satisfaction75 with lubed TX Stabs and lubed Gateron Oil King switches.
Lubing switches is the biggest change you can make to how a keyboard feels, and it costs about ten pounds in supplies. If your board is hot-swappable you can do it without touching a soldering iron. If it is soldered, there is still a lot you can fix, just not at the switch itself.
⚡ Quick answer: Hot-swap board? Pull the switches, open them, brush a thin film on the stem sides and the housing rails, reassemble. Use Krytox 205g0 for linears and Tribosys 3203 for tactiles. Soldered board? You cannot properly lube in place, but tuning the stabilizers gets you most of the sound improvement anyway.
What scratchiness actually is
Inside a switch, a POM stem slides against nylon or polycarbonate housing walls. Neither surface is perfectly smooth at a microscopic level, so as the stem travels it alternately grips and releases against the housing. Engineers call this stick-slip, and it is what you feel as scratchiness and hear as a grainy rasp on the downstroke.
Lubricant puts a thin film between those two surfaces so they never touch directly. The stem glides on the film instead of dragging on the plastic. That is the entire mechanism, and it explains two things that confuse beginners: why lube transforms a cheap scratchy switch but barely improves an already-smooth one, and why the film needs to be thin. You are separating two surfaces by microns, not filling the switch with grease.
The viscosity ladder
This is the part most guides skip, and it is the reason people ruin tactile switches. Krytox 205g0, Tribosys 3204 and Tribosys 3203 are all NLGI Grade 0 greases, so by the standard classification they are the same consistency. What differs is the viscosity of the base oil inside them.
Lube
Relative thickness
Best for
Why
Krytox 205g0
Thickest
Linear
Maximum smoothness and dampening. The buttery feel people describe.
Tribosys 3204
Middle
Either
One step thinner than 205g0. Forgiving if you tend to over-apply.
Tribosys 3203
Thinnest
Tactile and clicky
Smooths travel without filling in the tactile bump.
💡 Why thickness ruins tactiles: a tactile bump exists because the leaf catches on a bulge in the stem. Thick grease fills the space around that bulge and lets the leaf slide over it instead of catching. You do not lose some tactility, you round off the exact feature you paid for. On linears there is no bump to protect, so thicker is simply smoother.
Never use WD-40, sewing machine oil, petroleum jelly or any general-purpose lubricant. They degrade the plastic over time and will ruin the switches. A syringe of the correct product costs less than a set of switches.
First: is your keyboard hot-swappable?
Pull a keycap and look at the switch. If it sits in a socket you can lift it out with a puller, the board is hot-swap and this guide applies fully. If the switch is fixed and you can see solder joints through the case, it is soldered.
Being honest about the soldered case: you cannot properly lube a switch without opening it, and you cannot open it while it is soldered to the board. Spraying lubricant into an assembled switch attracts dust and can cause chattering. Skip to the soldered section below for what genuinely helps.
What you need
Lube matched to your switch type from the table above. One 3ml syringe does several boards.
A size-00 brush or smaller. A cheap art brush is fine.
A switch opener matched to your switch brand.
Keycap puller and switch puller, usually included with hot-swap boards.
Tweezers for handling springs and stems.
Krytox 105 oil, optional, for springs only.
The process
Step 1. Remove the keycaps and switches
Pull each switch straight up with the switch puller. Angling it bends the pins, which is the most common way people damage switches during a swap. Check every switch’s pins are straight before it goes back in later.
Step 2. Open a switch
Press it into the opener to release the four corner clips. The top housing lifts off, leaving the stem and spring sitting in the bottom housing. Work over a tray, because springs escape and are difficult to find on a patterned floor.
Step 3. Lube the stem
Brush a thin coat on the two flat vertical sides that contact the housing rails. Those two faces do almost all the sliding, so they matter most.
On a tactile switch, keep lube off the tactile leg entirely. That is the bulge the leaf rides over, and it is the one surface you must leave dry.
Step 4. Lube the housing rails
A light pass on the vertical channels inside the bottom housing where the stem slides. Avoid the metal contact leaf completely. Lube on the leaf can cause a key that registers intermittently or not at all, which is far more annoying to diagnose than scratchiness.
Step 5. Lube the springs
Optional, and worth it if you can hear spring ping. Ping is the spring itself resonating after a keypress, a faint metallic ring that sits above the thock. A drop of oil damps that resonance.
The efficient method is bag lubing: put all the springs in a zip-lock bag, add a few drops of Krytox 105 oil, and shake for thirty seconds. It coats every spring at once. It is less precise than brushing each one, but for springs precision does not matter.
Step 6. Reassemble and repeat
Snap the top housing back on, press the switch a few times and confirm it travels cleanly with no catching. Then move to the next one.
How much lube is the right amount
Less than you think, by a wide margin. This is the mistake that spoils more switches than any other.
You want a film so thin it barely changes the appearance of the plastic, showing as a faint sheen rather than a visible layer. If you can see grease sitting on the surface, it is too much. Over-lubed switches feel sluggish and muted, they sound dead rather than deep, and fixing them means opening every switch again and wiping it out.
A practical test: load the brush, then wipe most of it off on the syringe or a paper towel before it touches the switch. The brush should look almost clean. That is roughly the right loading.
How long it takes
Budget 60 to 90 minutes for a 65% board on your first attempt, dropping to perhaps 40 once you find a rhythm. A full-size board is closer to two hours. It is repetitive work best done in front of something you are half-watching.
Be honest with yourself about whether it is worth it. On scratchy switches like stock Cherry MX or cheap Outemu, the improvement is dramatic. On factory-lubed switches such as Gateron Yellow Pro or Akko’s V3 Pro line, the gain is marginal and rarely justifies the hours. Our factory-lubed guide covers switches that arrive finished.
If your board is soldered
Three options that genuinely help, none of which require desoldering.
Lube the stabilizers. This is the big one. Stabilizer rattle on the spacebar, enter and shift is usually the loudest and worst-sounding part of a keyboard, and stabilizers come off without desoldering on most boards. Our stabilizer guide walks through it.
Add O-rings. They soften the bottom-out and cut noise, and they fit onto the keycap stem in seconds. See our O-rings guide.
Add case foam. Cheap neoprene or shelf liner in the case reduces hollowness and echo.
If you want the switch-level improvement and your board is soldered, buying factory-lubed switches for your next build is far easier than desoldering 87 switches.
Frequently asked questions
Is lubing actually worth the time?
On scratchy switches, absolutely. Stock Cherry MX and cheaper Outemu switches improve dramatically. On already-smooth or factory-lubed switches the gain is much smaller and often not worth several hours. Judge by how the switch feels now, not by whether lubing is generally recommended.
Can I lube switches without opening them?
Not properly. The surfaces that need lubricant are the stem sides and housing rails, both internal. Products that claim otherwise deposit lube where it does nothing useful and attracts dust. If you cannot open them, tune the stabilizers instead.
Which lube for tactile switches?
Tribosys 3203, the thinnest of the three common options. It smooths the travel without filling in the tactile bump. Use 205g0 on a tactile only if you deliberately want to soften it, and accept you are trading away tactility to do so.
What happens if I use too much?
The switch feels sluggish and sounds muffled rather than deep, and on tactiles the bump softens noticeably. Excess can also migrate onto the contact leaf over time and cause intermittent registration. The fix is opening each switch again and wiping the excess away, so it is worth going light the first time.
Does keyboard lube dry out?
Krytox is very stable and lasts years in normal use. We covered the detail separately in does keyboard lube dry out.
Do I need to lube stabilizers separately?
Yes, and with a different product. Stabilizers need thick grease on the wire ends, which is a separate job from switch lubing and uses Krytox XHT-BDZ rather than 205g0. Lubed switches on rattling stabilizers still sound bad, because the stabilizers dominate.