

We regularly review and update our guides to ensure keyboard recommendations, specs, and software information stay current with the latest releases and updates.
Affiliate disclosure: this article contains Amazon affiliate links. Purchases made through these links support Clickyboard at no extra cost to you.
My first custom keyboard build did not go smoothly. I bent six switch pins trying to rush the PCB installation, forgot to lube the stabilizers entirely, and assembled the whole thing before realising I had never flashed the firmware. I had to take it apart three times. By the end of that Saturday, I had a keyboard that sounded like rattling coins in a tin can.
I also could not stop typing on it.
There is something that changes when you use a keyboard you built yourself. Every keystroke carries the memory of the work you put in, the hours of prep, the satisfaction of hearing that first clean thock when everything finally came together. That feeling is what drives people to build their second, third, and fifteenth board.
This guide is the one I wish I had for that first build. Every mistake I made is documented here as a warning, and every step is sequenced the right way. Whether you are spending $120 or $400, hot-swapping or soldering, building a 60% or a TKL, this guide covers it.
⚡ Quick Answer
To build a custom mechanical keyboard you need six core parts: a case, a PCB (hot-swap recommended), a plate, switches, stabilizers, and keycaps. Lube your stabilizers and switches before assembly, test the PCB before installing switches, then assemble case, plate, and keycaps in sequence. A beginner build takes 3–4 hours and costs $100–200 for a solid entry-level result.
1. Why Build a Custom Keyboard Instead of Just Buying One?
This is a fair question, and it deserves an honest answer. A pre-built keyboard from Keychron or Logitech can be genuinely excellent. You do not need to build a keyboard to get a great typing experience. So why do thousands of people go through the effort?
🎛️ Total Control
Every element (case material, switch feel, sound profile, keycap colours) is your choice. No compromises forced by a manufacturer.
💰 Better Value
A $200 custom build usually outperforms a $200 off-the-shelf board because you choose the exact switches and keycaps.
🔄 Fully Upgradeable
Swap switches without a new board. Change keycaps seasonally. Add foam mods later. A good case and PCB are a platform.
🎓 Deep Understanding
You learn how every part works, which makes troubleshooting, modding, and future builds far easier.
ℹ️ Honest caveat: If you want a great keyboard for under $80 right now with zero effort, a pre-built like the Keychron V series is genuinely good. Custom builds make the most sense in the $120–400 range where the quality gap becomes significant.
2. Choose Your Layout First, and Everything Else Follows
Your layout choice determines which cases, PCBs, plates, and keycap sets are compatible with your build. Choose the wrong layout and you will find yourself with limited part options. Choose before you buy anything else.
60%
~61 keys
Compact
65%
~68 keys
⭐ Best for beginners
75%
~84 keys
Function row
TKL
~87 keys
No numpad
Full Size
104 keys
With numpad
Why 65% Is the Best First Layout
The 65% layout hits the sweet spot that no other size quite matches. It keeps the arrow keys, which you will miss far more than you expect on a 60%, while removing the function row and numpad most people rarely use. The result is a board that fits on any desk, supports an enormous range of keycap sets, and has more kit options than any other non-standard layout. If you are genuinely unsure, pick 65% and do not second-guess it.
💡 Keycap compatibility tip: Before committing to any layout, check that your chosen keycap set covers it. Most sets support full-size, TKL, and 65%. Some do not include 75% modifiers or 60% bottom rows. Always verify compatibility on the keycap listing before purchasing.
3. Budget Planning: Three Realistic Tiers
Custom keyboard budgets vary wildly. Here is an honest breakdown of what each tier actually gets you, based on real builds, not aspirational marketing.
Entry Level
$100–180
KBD67 Lite kit + Gateron switches + budget keycap set. Polycarbonate or acrylic case, hot-swap PCB. Excellent performance for the price, this tier still feels premium.
Mid Range
$200–350
Keychron Q2 Pro or Zoom65 kit + quality switches (Gateron Oil King, Boba U4T) + GMK or Domikey keycaps. Aluminum case, gasket mount. Where most enthusiasts live.
Enthusiast
$400–800+
Group buy boards (Mode Eighty, Satisfaction75) + hand-lubed premium switches + premium GMK keycaps. Brass or aluminum plate, POM gaskets. The diminishing-returns tier.
💡 Spend most on keycaps and switches, least on the case. A $90 KBD67 Lite case with $50 Gateron Oil Kings and an $80 GMK keycap set will sound and feel better than a $200 aluminum case with stock switches and cheap keycaps. Prioritise what touches your fingers.
4. Every Part Explained
Every custom keyboard build requires exactly six components. Miss any one and the build cannot be completed. The table below breaks down each part, what to look for, and where to buy.
| Part | What It Does | Beginner Pick | Where to Buy | Budget |
|---|---|---|---|---|
| Case | Houses all components; defines sound, weight, aesthetics | Polycarbonate or aluminum, gasket mount | KBDfans, Keychron, Divinikey | $50–200 |
| PCB | Registers keystrokes; hot-swap sockets allow switch swapping | Hot-swap, USB-C, QMK/VIA support | KBDfans, Cannonkeys, Ringerkeys | $30–80 |
| Plate | Sits between PCB and switches; affects sound and feel | Polycarbonate (flexible, absorbs sound) | Bundled with most kits | $15–50 |
| Switches | Moving mechanical parts under each key; defines typing feel | Gateron G Pro 3.0 linear or Boba U4 tactile | Divinikey, Ringerkeys, KBDfans | $20–60 / 70 |
| Stabilizers | Support larger keys to prevent wobble | Durock V2 or TX screw-in | Divinikey, KBDfans | $15–30 |
| Keycaps | Visible tops of each key; defines look and feel | PBT doubleshot or dye-sublimated | Divinikey, KBDfans, Drop | $30–150 |
Switches: The Decision That Matters Most
Of all six parts, your switch choice has the greatest impact on how the finished keyboard feels. Switches fall into three categories: linear (smooth, no bump), tactile (a bump at the actuation point), and clicky (tactile bump plus an audible click). For a first build, linear or tactile are strongly recommended, as they are more forgiving to lube and more universally pleasant.
To go deeper before choosing, read our guide to tactile vs linear switches. For the best switches at each price point, see our best linear switches roundup.
Keycaps: ABS vs PBT
Keycaps come in two main plastics: ABS (smooth, vivid colours, develops shine over time) and PBT (slightly textured, more durable, resistant to shine). For a first build, PBT doubleshot or dye-sublimated keycaps offer the best durability and value.
5. Case Mount Types Explained
The mount type determines how the plate and PCB assembly connects to the case, which directly affects sound and typing feel.
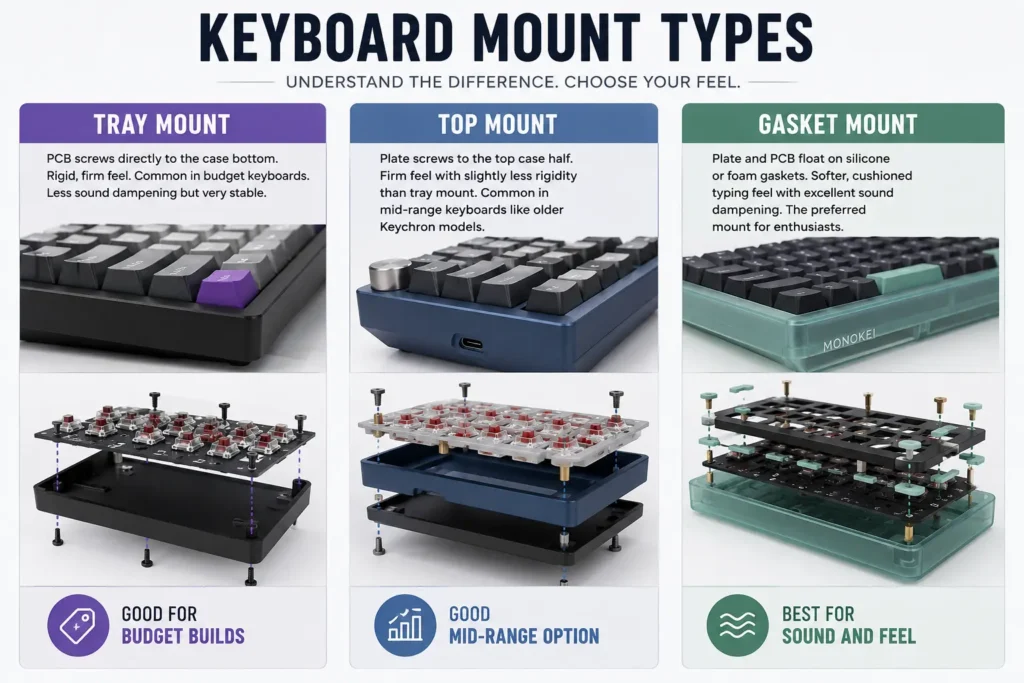
ℹ️ For a first build: Gasket mount is worth paying for if your budget allows, the improvement in sound and feel is immediately noticeable. The KBD67 Lite ($90) offers gasket mount at an entry-level price and is the best-value starting point in 2026.
6. Tools You Need
Most of these are one-time purchases that carry across every future build. The switch opener and switch puller are the two items worth buying specifically for this hobby.
- Phillips screwdriver (#0 and #1), for case screws. A precision set covers both, under $10.
- Switch opener, for opening switches before lubing. Never use a flathead; it cracks housings. (~$5–8)
- Fine-tip brush (size 00), for applying lube precisely. (~$3–5)
- Switch puller, removes and installs hot-swap switches without bending pins. (~$5–8)
- Wire keycap puller, always wire, never ring-style, to avoid scratches. (~$5)
- Tweezers, for springs, stabilizer parts, and small components. (~$4)
- USB-C cable, for PCB testing and firmware flashing.
- Isopropyl alcohol (90%+), for cleaning parts and fixing lube mistakes.
7. Step-by-Step: How to Build Your Keyboard
This sequence applies to any hot-swappable 65% kit build. The order matters: stabilizers go in before switches, and the PCB is tested before both. Follow it and you will avoid the mistakes that forced me to disassemble my first board three times.
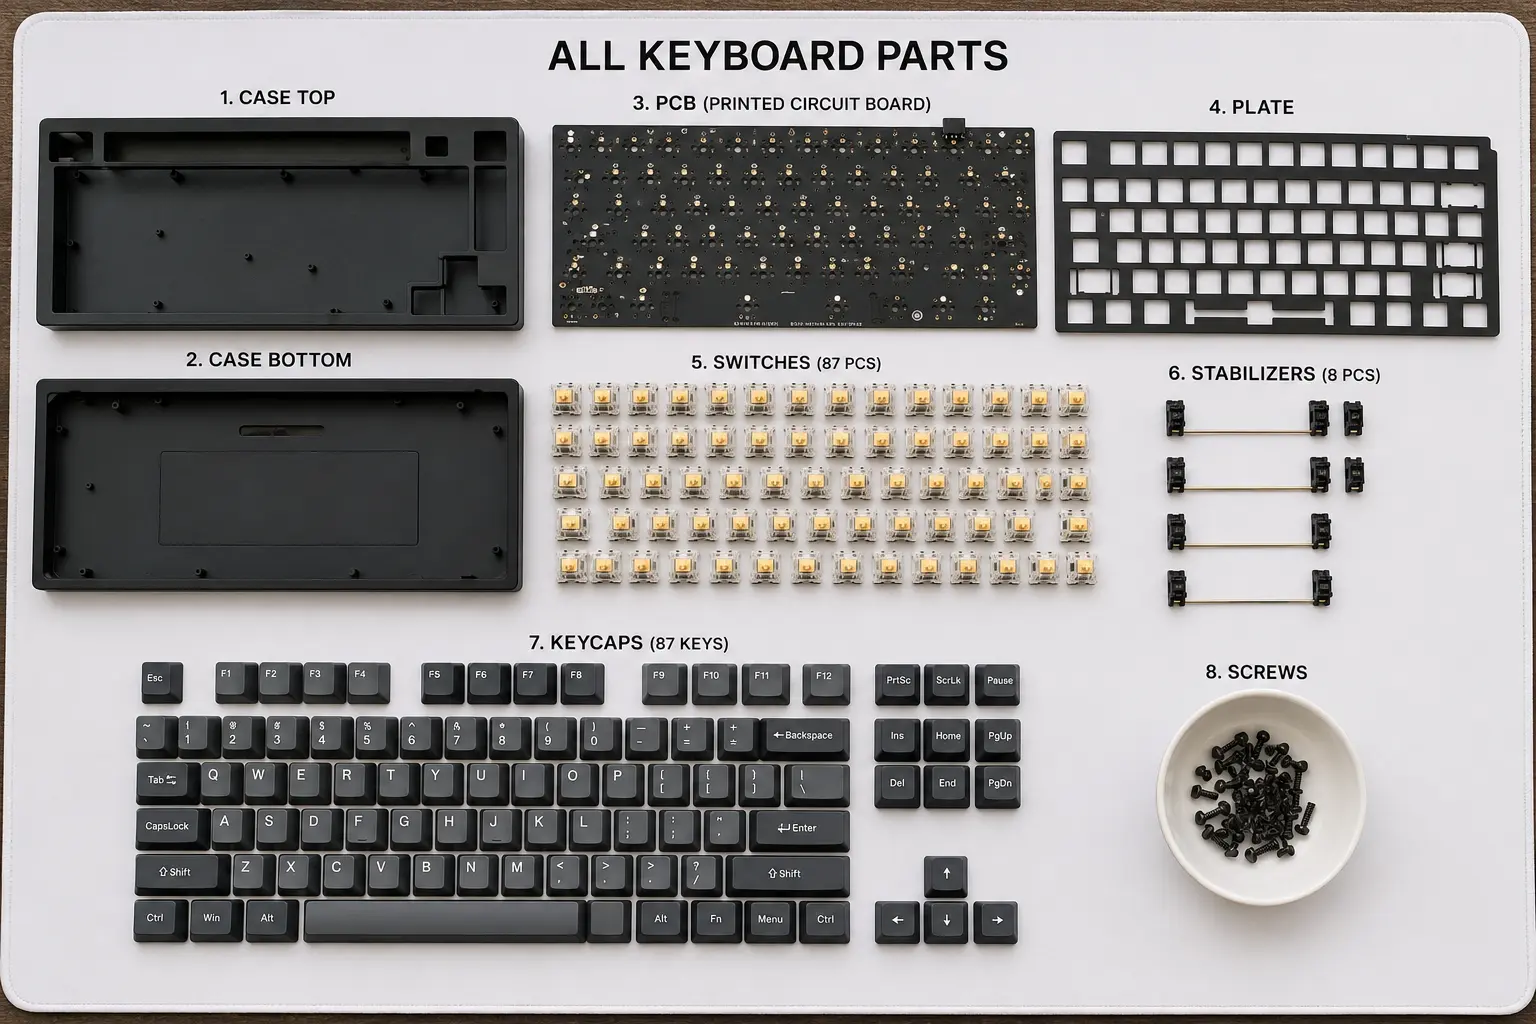
Step 1: Unbox and inventory all parts
Lay everything out on a clean mat. Account for every component: case halves, PCB, plate, all screws, the stabilizer set, foam sheets, and the USB cable. Count your switches, most 65% boards need 68–70. Check keycaps against a layout diagram. It is far better to find a missing part now than three hours into the build.
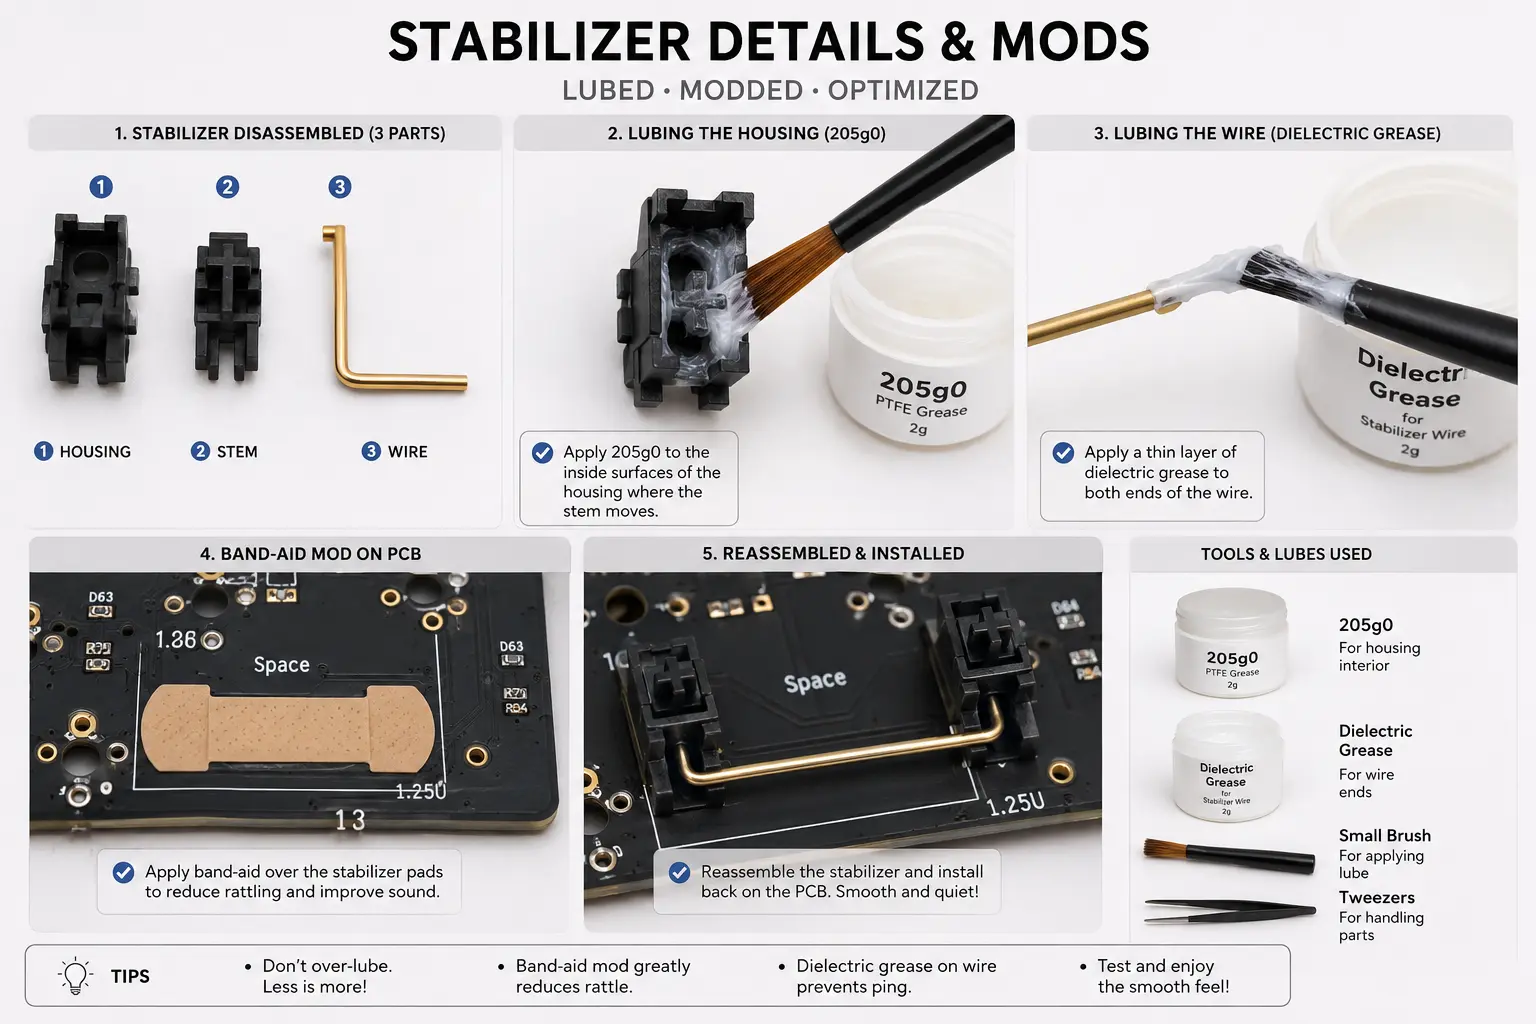
Step 2: Lube and prepare stabilizers
This takes 30–45 minutes and is the single most impactful thing you can do for final sound quality. Disassemble each stabilizer into housing, stem, and wire. Apply Krytox 205g0 to the housing interior and stem sides. Apply dielectric grease to both wire ends to eliminate rattle. Apply the band-aid mod to the PCB stabilizer pads. Full instructions in our stabilizer guide.
Step 3: Install stabilizers onto the PCB
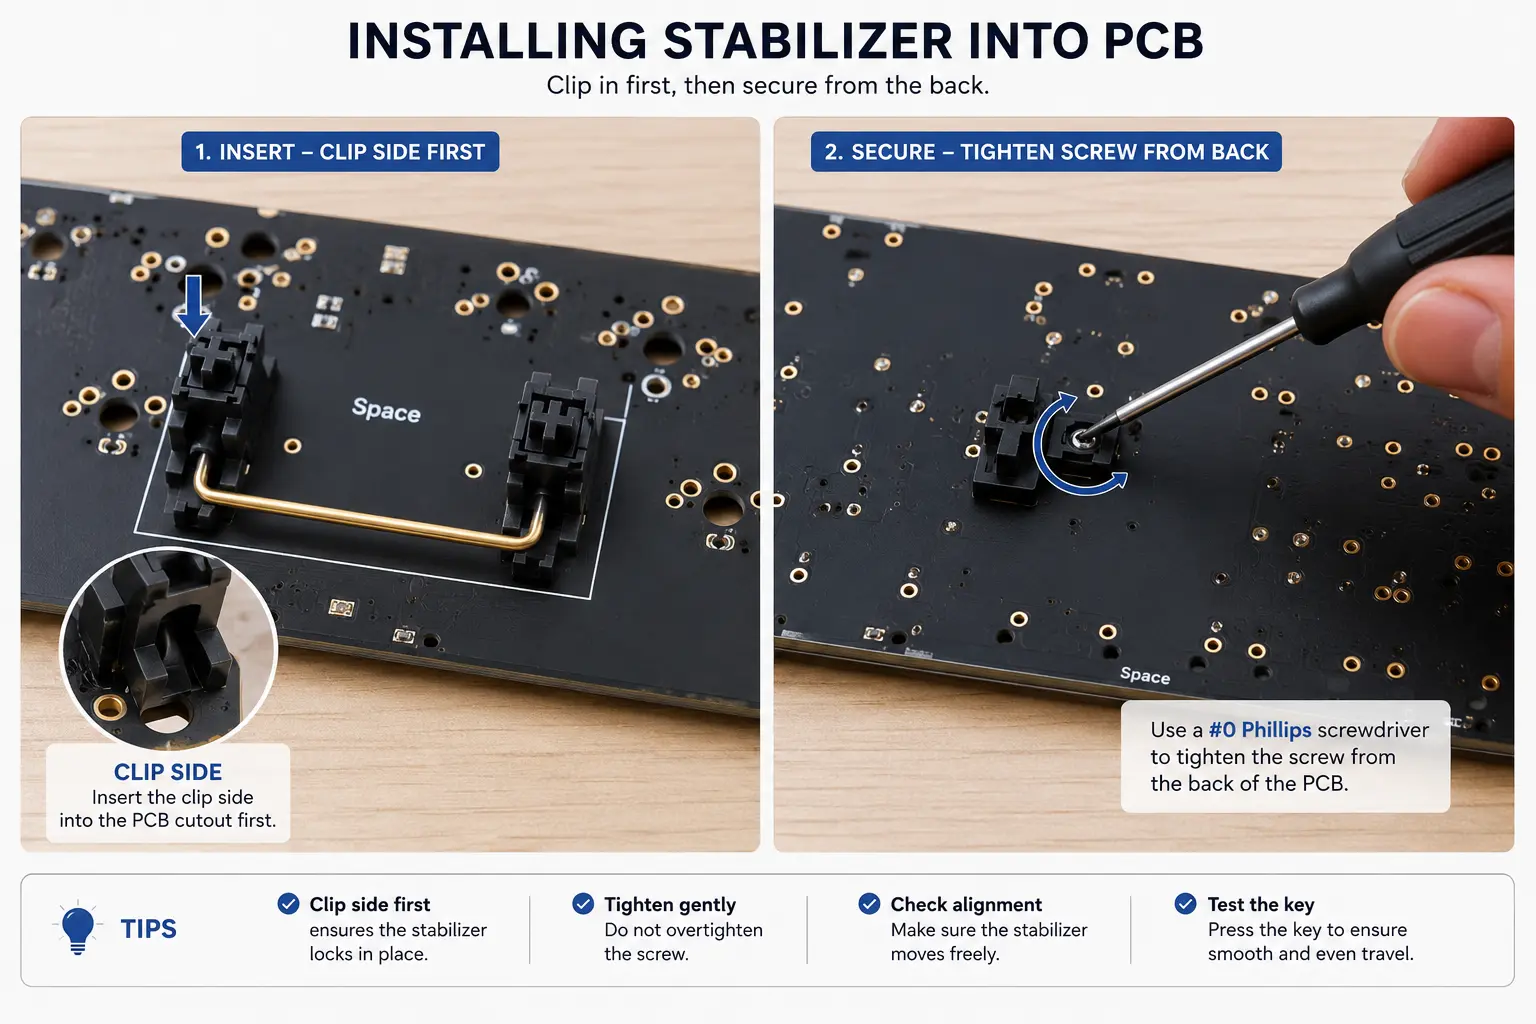
Screw-in stabilizers install through the PCB with a screw on the back and a clip on the front. Insert the clip side first, then thread the screw from the back with a #0 screwdriver. Tighten until snug, but do not overtighten, as PCBs can crack. Wiggle the housings and press the stems; there should be minimal rattle.
Step 4: Test the PCB before installing switches
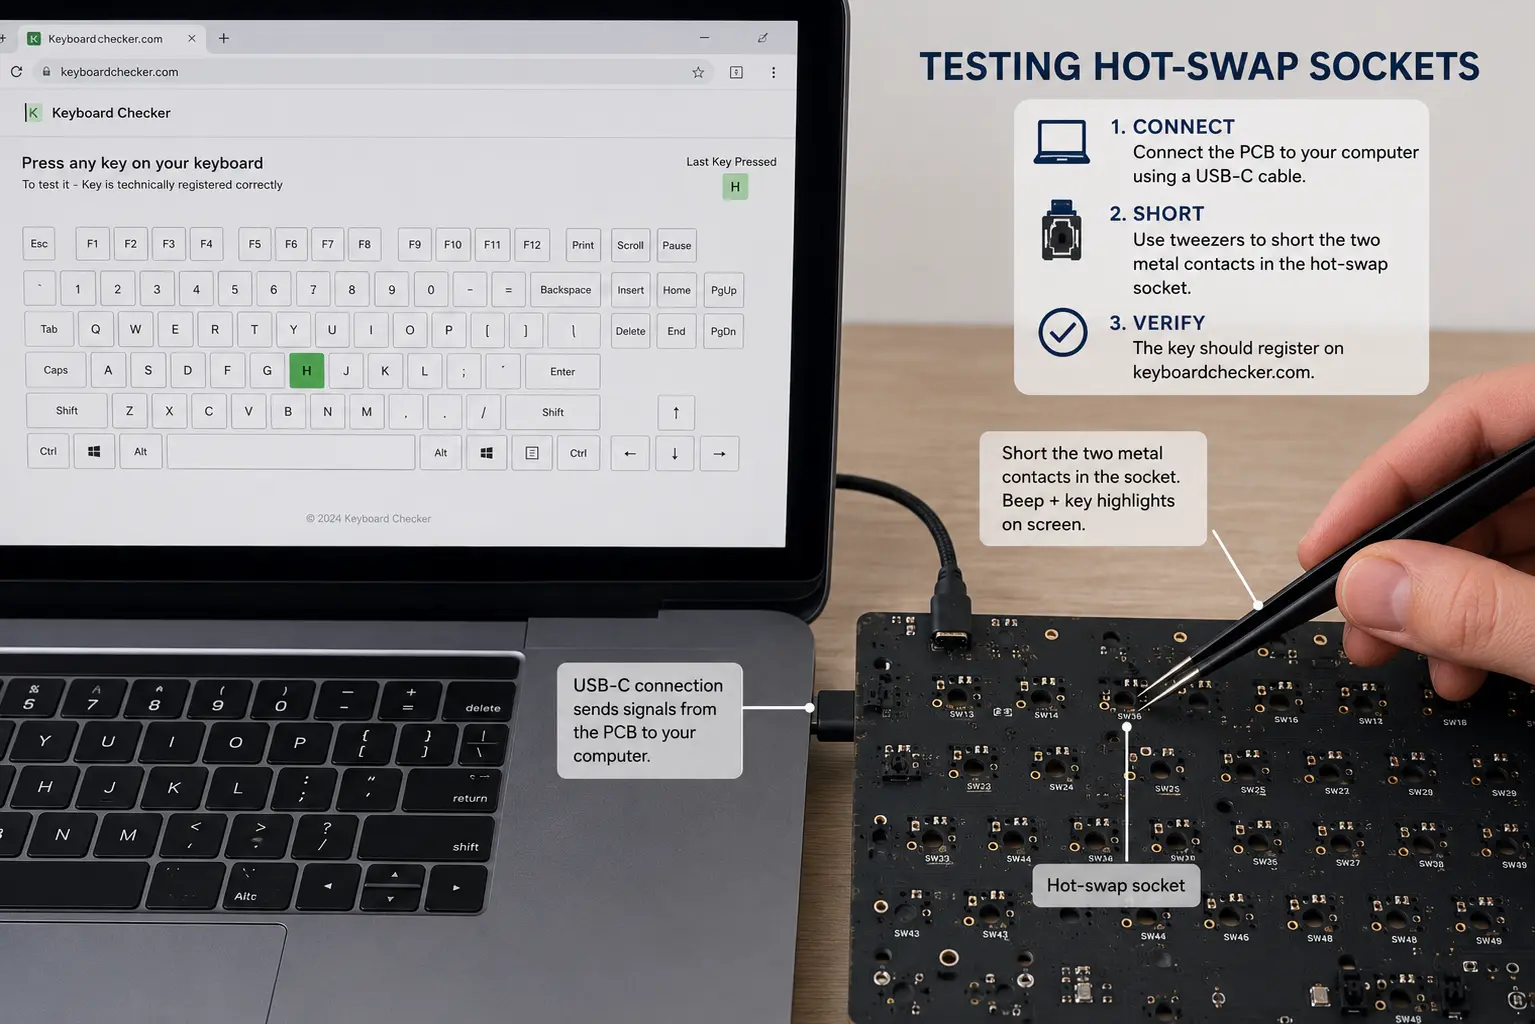
This saves enormous time. Connect the PCB via USB-C and open a key tester in Chrome. Use metal tweezers to briefly short each hot-swap socket, and every position should register on screen. If one does not, check for debris, a bent socket pin, or a solder bridge. Fix issues now, before switches and keycaps are on.
Step 5: Lube your switches
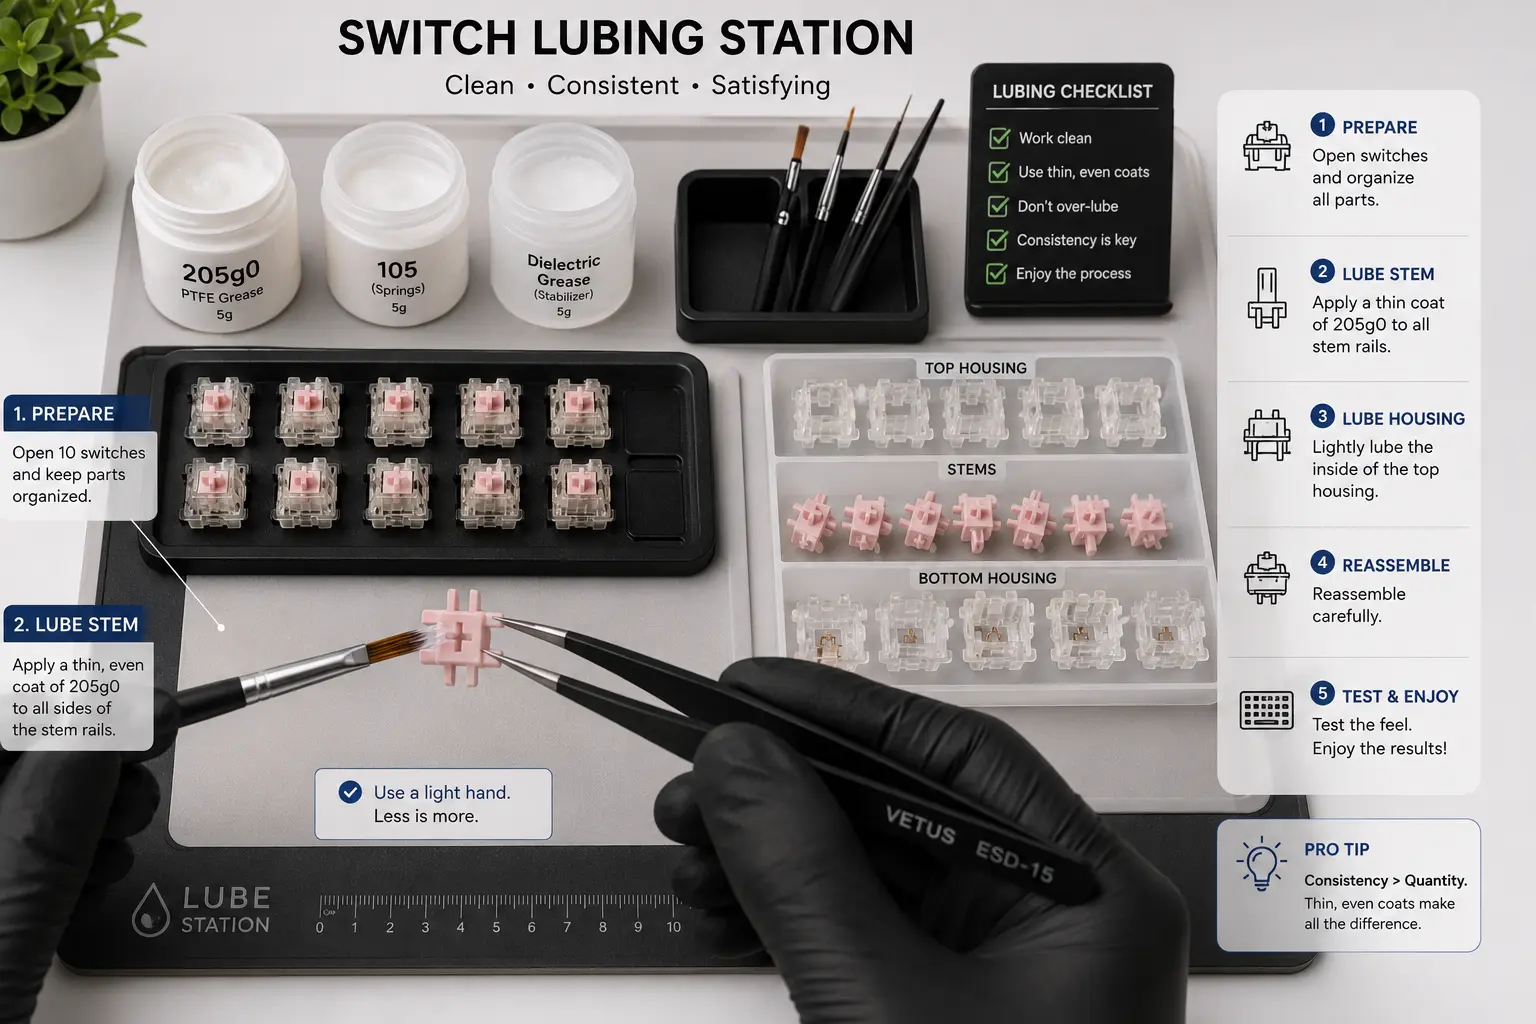
Open each switch, apply Krytox 205g0 (linear) or Tribosys 3203 (tactile) to the stem and housing rails, lube the springs, and reassemble. This adds 1–2 hours but transforms the result, the difference between lubed and unlubed is immediately audible. Full technique: How to Lube Keyboard Switches.
Step 6: Seat switches into the plate, then press onto PCB
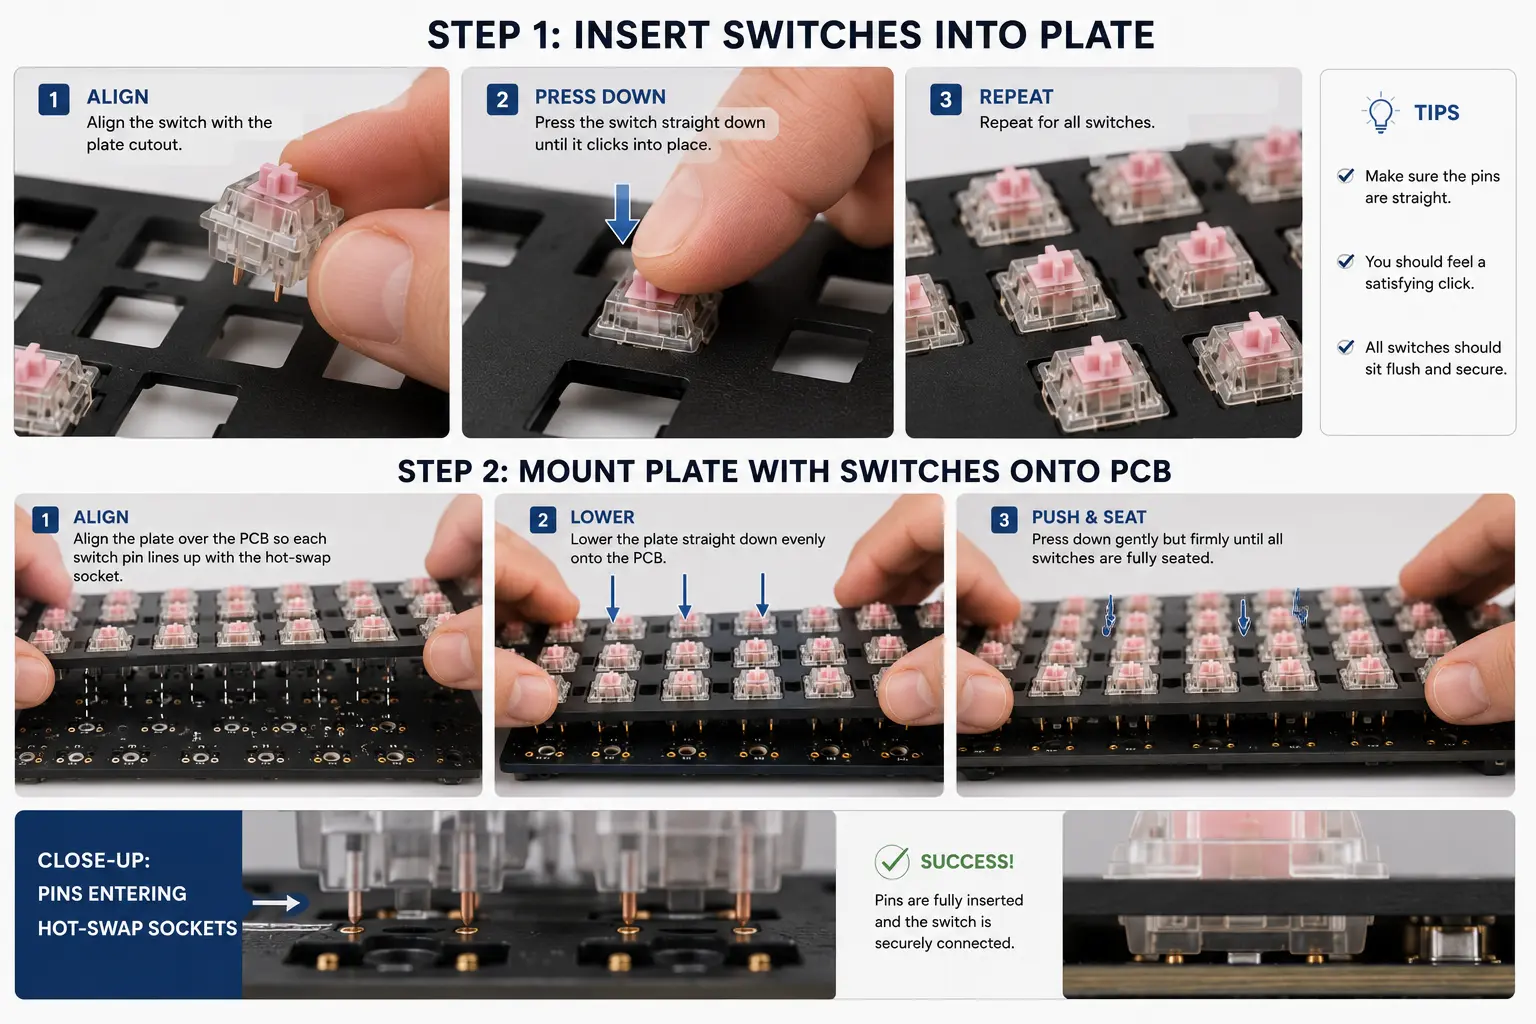
Insert each switch through the plate cutouts until the tabs click. Install all switches into the plate first, then align the assembly above the PCB, making sure every pin lines up with a socket. Press down firmly and evenly from the center outward. Do not force switches in at an angle; that bends pins.
Step 7: Add foam dampening (optional but recommended)
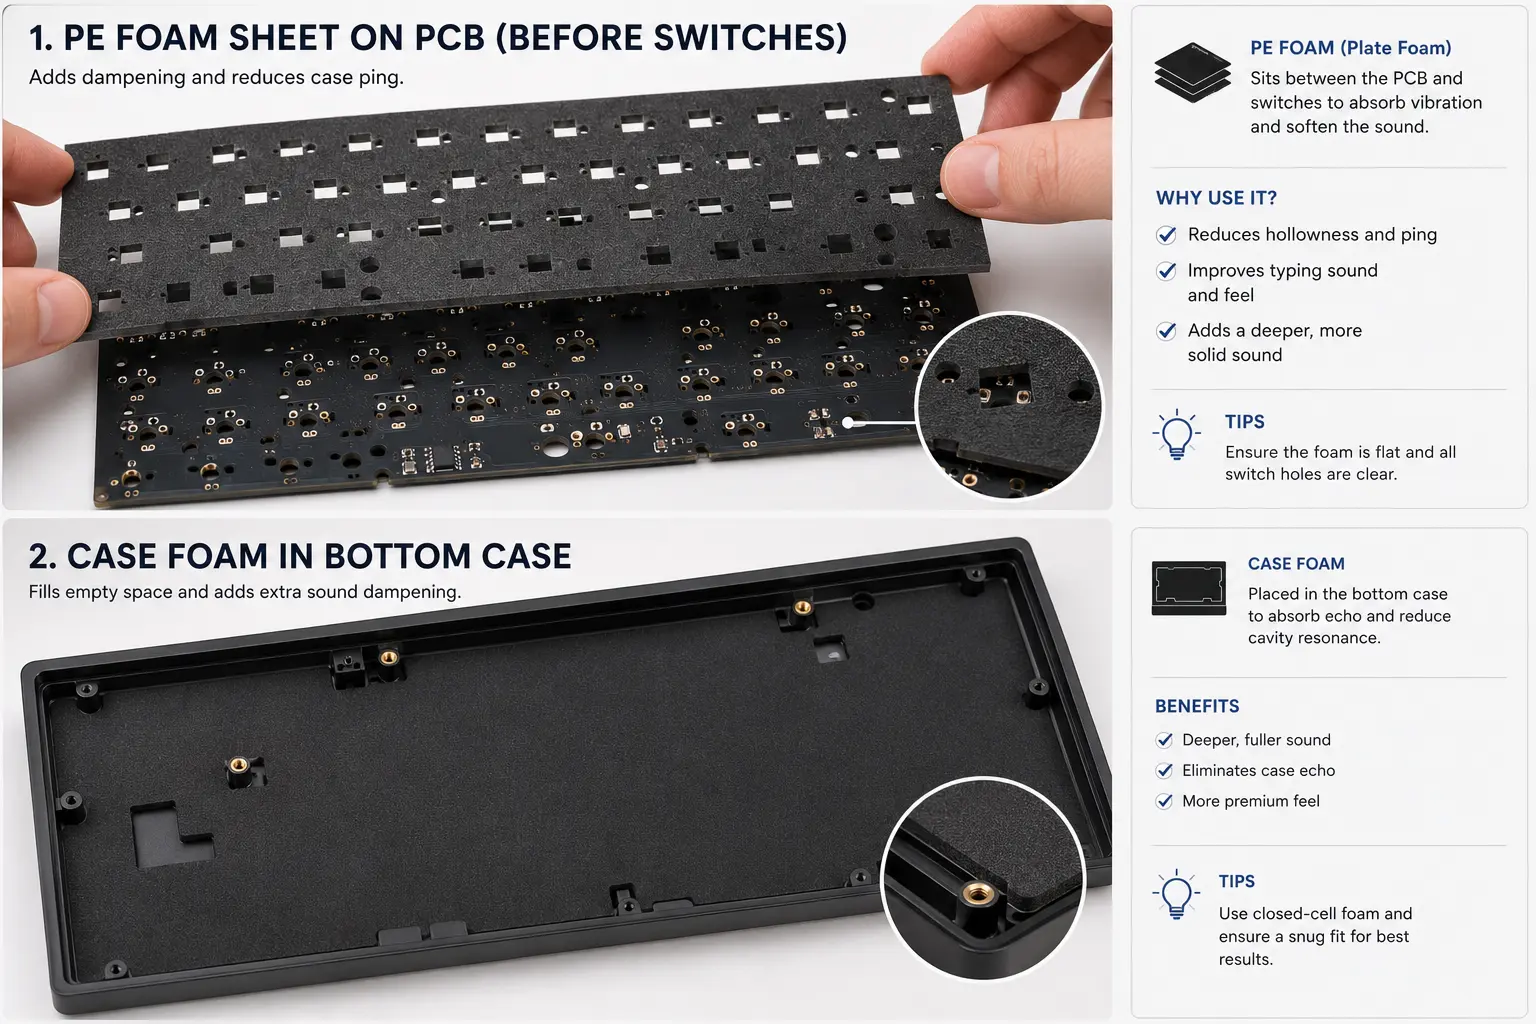
Before closing the case, add sound dampening. Case foam reduces hollowness. PCB foam tightens the sound. The PE foam mod (a thin sheet on top of the PCB before switches) produces the warm, poppy sound popular in 2024–2026. Cut foam to your PCB layout and place it before the next step.
Step 8: Assemble the case
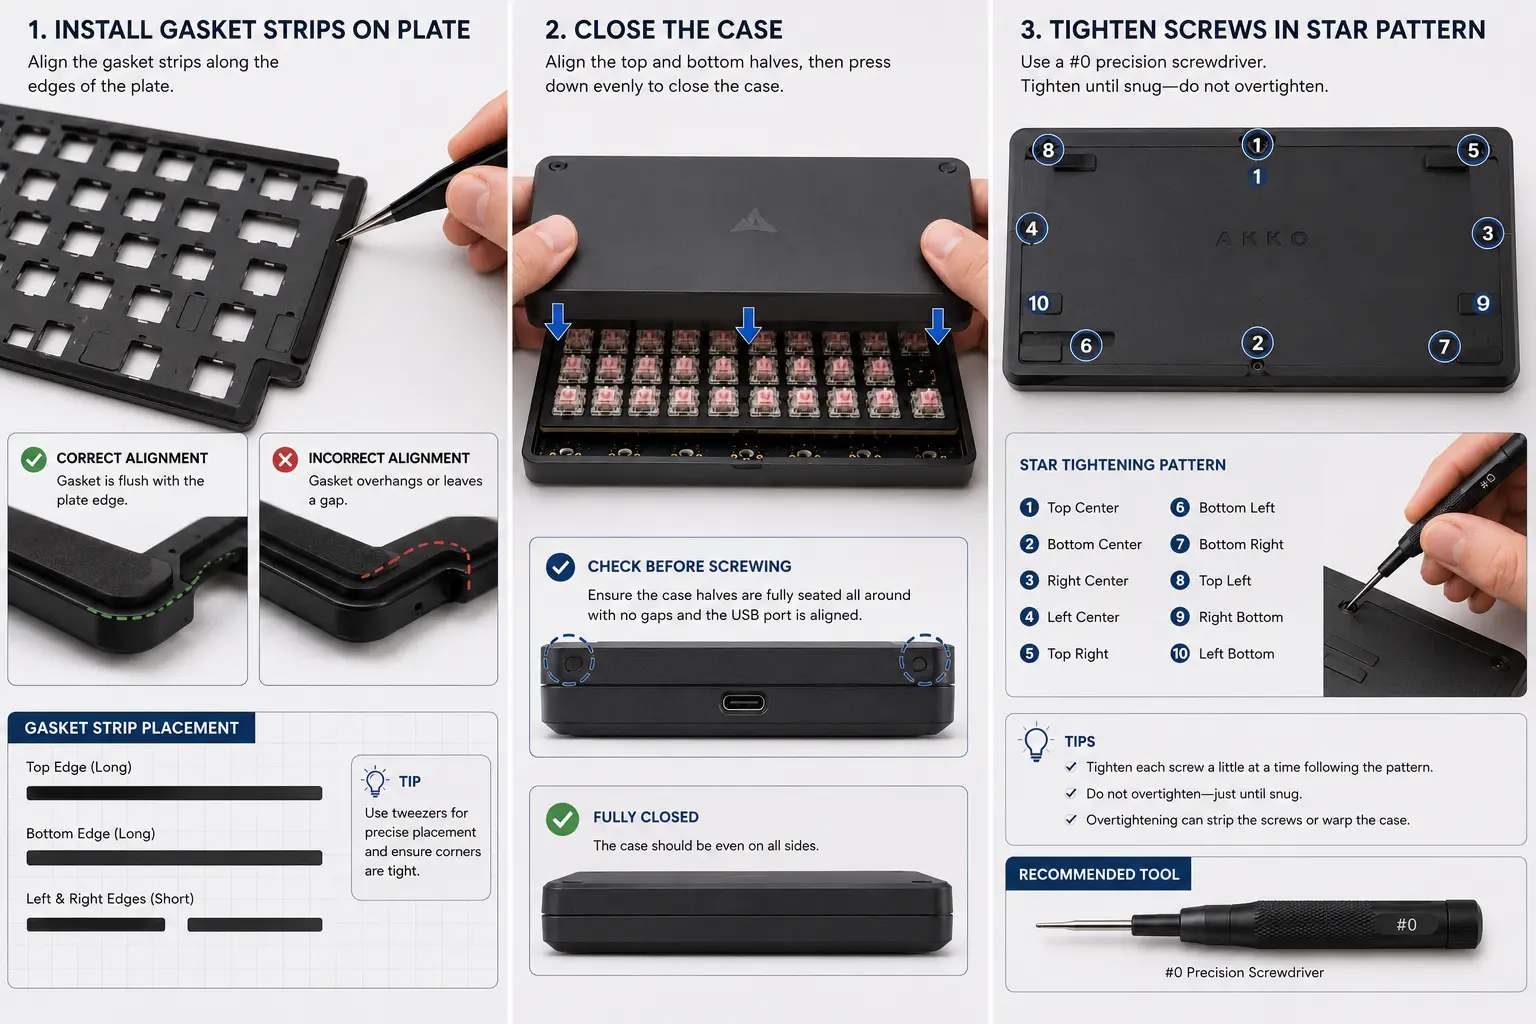
For gasket mount, align the gasket strips with the case channels before pressing the halves together. Thread all case screws by hand first, then tighten in a star pattern for even pressure. Finger-tight plus a quarter turn is enough. Overtightening warps PCBs and strips threads.
Step 9: Install keycaps and run final test
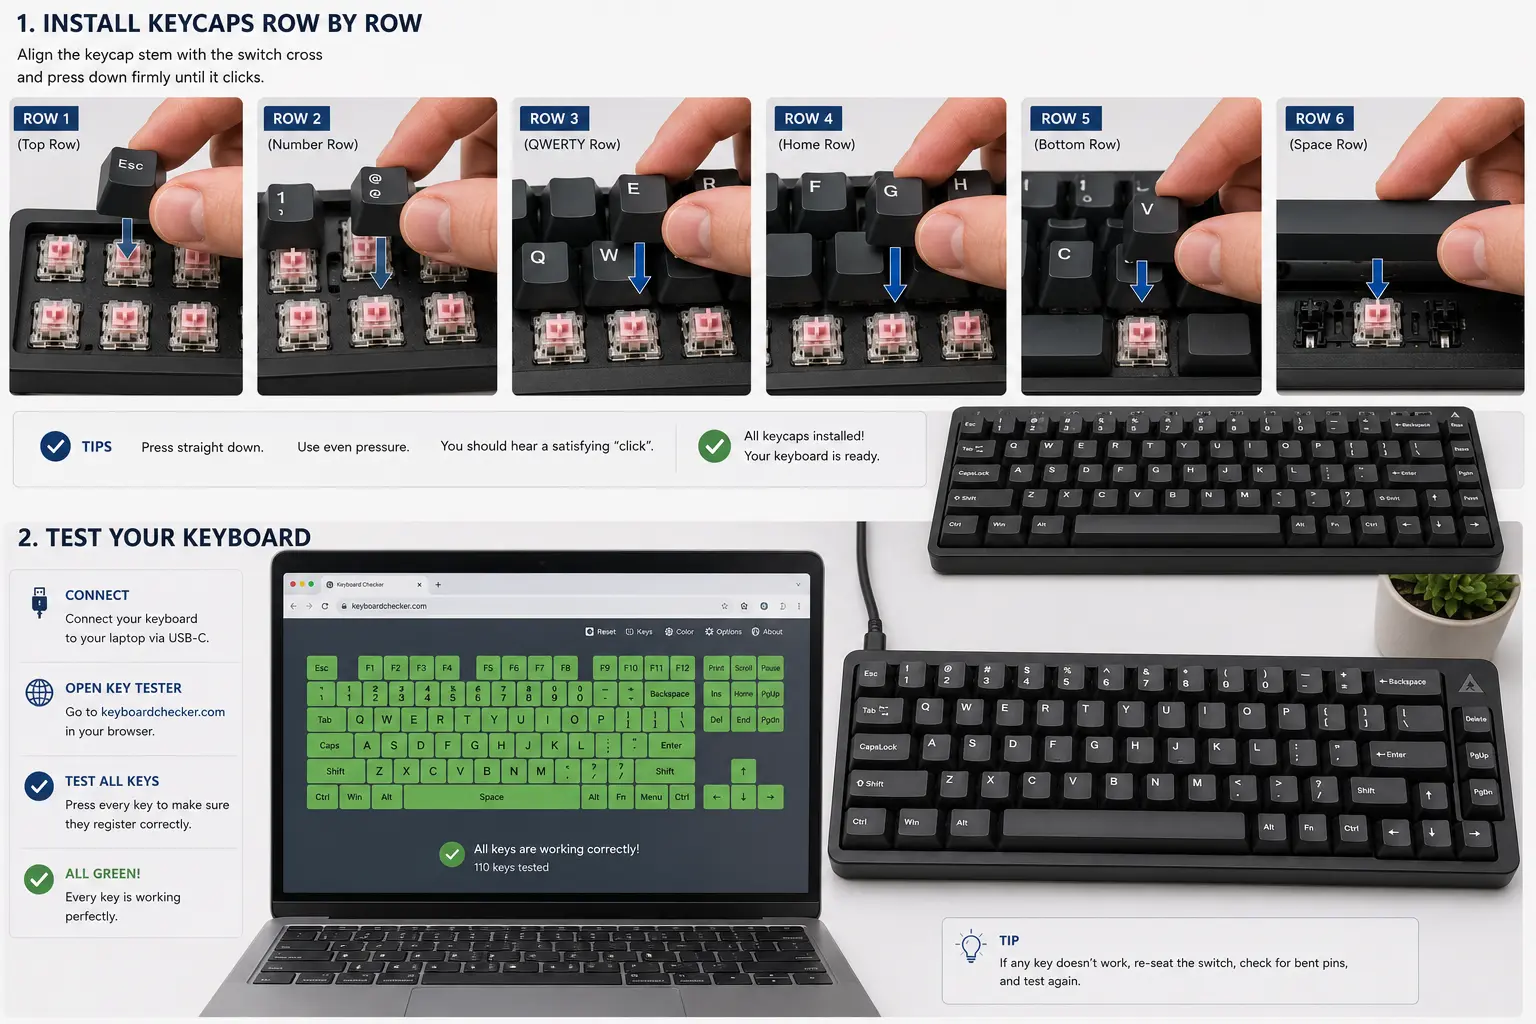
Press keycaps onto the stems, alphas first, then modifiers, then special keys. Once all are on, connect the board and open a key tester. Press every key and confirm it registers. Test stabilized keys and listen for rattle. If a key is dead, pull the switch, check for a bent pin, straighten, and reinstall.
8. Common Beginner Mistakes
🚫 Not testing the PCB first. A dead key found after assembly means removing keycaps and switches to diagnose, 20 minutes. Testing takes 5 minutes before assembly. Always test first.
🚫 Skipping stabilizer lubing. An unlubed spacebar in an otherwise great build sounds like a rattling tin can. Budget 30–45 minutes and do it properly, it cannot be shortcut.
⚠️ Overtightening case screws. Screws only need to be snug. Overtightening warps PCBs, strips threads, and can crack polycarbonate cases. Finger-tight plus a quarter turn is correct.
💡 Buying cheap stabilizers. This is the one place where spending $5 more makes a disproportionate difference. Durock V2 or TX stabilizers ($15–25) are dramatically better than generic bundled ones. Upgrade these before anything else.
9. Firmware: VIA and QMK
Most modern PCBs ship with QMK pre-flashed and VIA enabled, so you can remap keys on first connection, no coding required.
Using VIA (recommended for beginners)
VIA is a browser-based tool that connects over USB and lets you remap keys, create layers, and assign macros visually, no install, no code. It requires Chrome (Web USB). Changes save to the keyboard’s onboard memory and persist unplugged. Learn more in our guide to QMK and VIA.
Using QMK (advanced)
QMK is the open-source firmware underneath VIA, giving access to per-key RGB, tap-dance, combos, and custom functions. The trade-off is compiling from source. The official QMK docs are excellent, but for a first build, use VIA.
10. Frequently Asked Questions
How much does it cost to build a custom mechanical keyboard?
A solid entry-level build costs $100–180. A mid-range build with gasket-mount case, premium switches, and quality keycaps costs $200–350. Enthusiast builds start at $400 and climb. The sweet spot for most beginners is $150–200.
Is building a custom keyboard hard for beginners?
A hot-swap build is beginner-friendly, no soldering. If you can follow instructions and assemble flat-pack furniture, you can build a keyboard. Budget 3–4 hours, work carefully, and test the PCB before installing switches.
Do I need to solder to build a custom keyboard?
No, hot-swap PCBs require zero soldering. Switches press into metal sockets on the PCB. Look specifically for “hot-swap” in the product listing.
What switches should I choose for my first build?
For linear, Gateron G Pro 3.0 or Gateron Oil King. For tactile, Boba U4 (silent) or Gateron Brown Pro 3.0. Unsure? Read our full comparison first.
What is a gasket mount keyboard and should I buy one?
A gasket mount suspends the plate and PCB on gaskets instead of screwing them rigidly to the case, creating a softer feel and better dampening. Worth choosing if sound and feel are priorities. The KBD67 Lite offers it at $90.