Keycaps

What Are OEM Keycap Profiles?

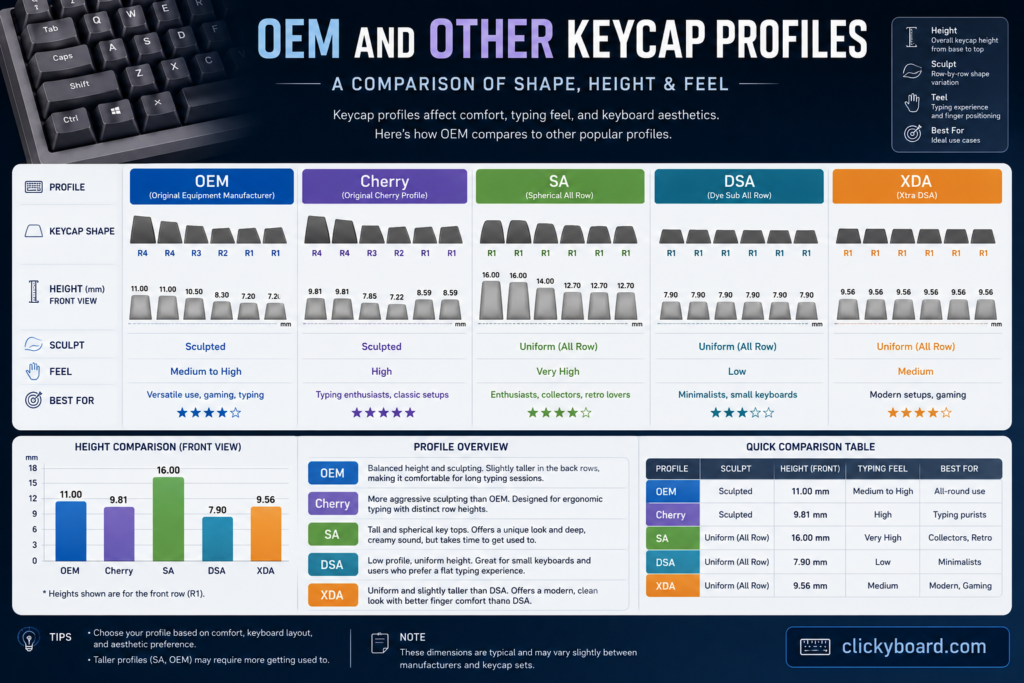
OEM (Original Equipment Manufacturer) keycap profiles represent the most widely used keycap shape in the mechanical keyboard world. These keycaps feature a cylindrical shape with a gentle curve that naturally follows the contour of your fingertips, making them the gold standard for both pre-built and custom mechanical keyboards.

The term “OEM” indicates these keycaps are designed as the original standard that most keyboard manufacturers adopt. This widespread adoption makes OEM profiles the most compatible and accessible option for keyboard enthusiasts.

Key Characteristics of OEM Profile

  • Cylindrical top surface with slight curvature
  • Medium height (taller than Cherry, shorter than SA)
  • Row-specific sculpting for optimal finger positioning
  • Stepped height design from bottom to top rows
  • Wide compatibility across keyboard layouts

OEM Profile Specifications

Physical Dimensions
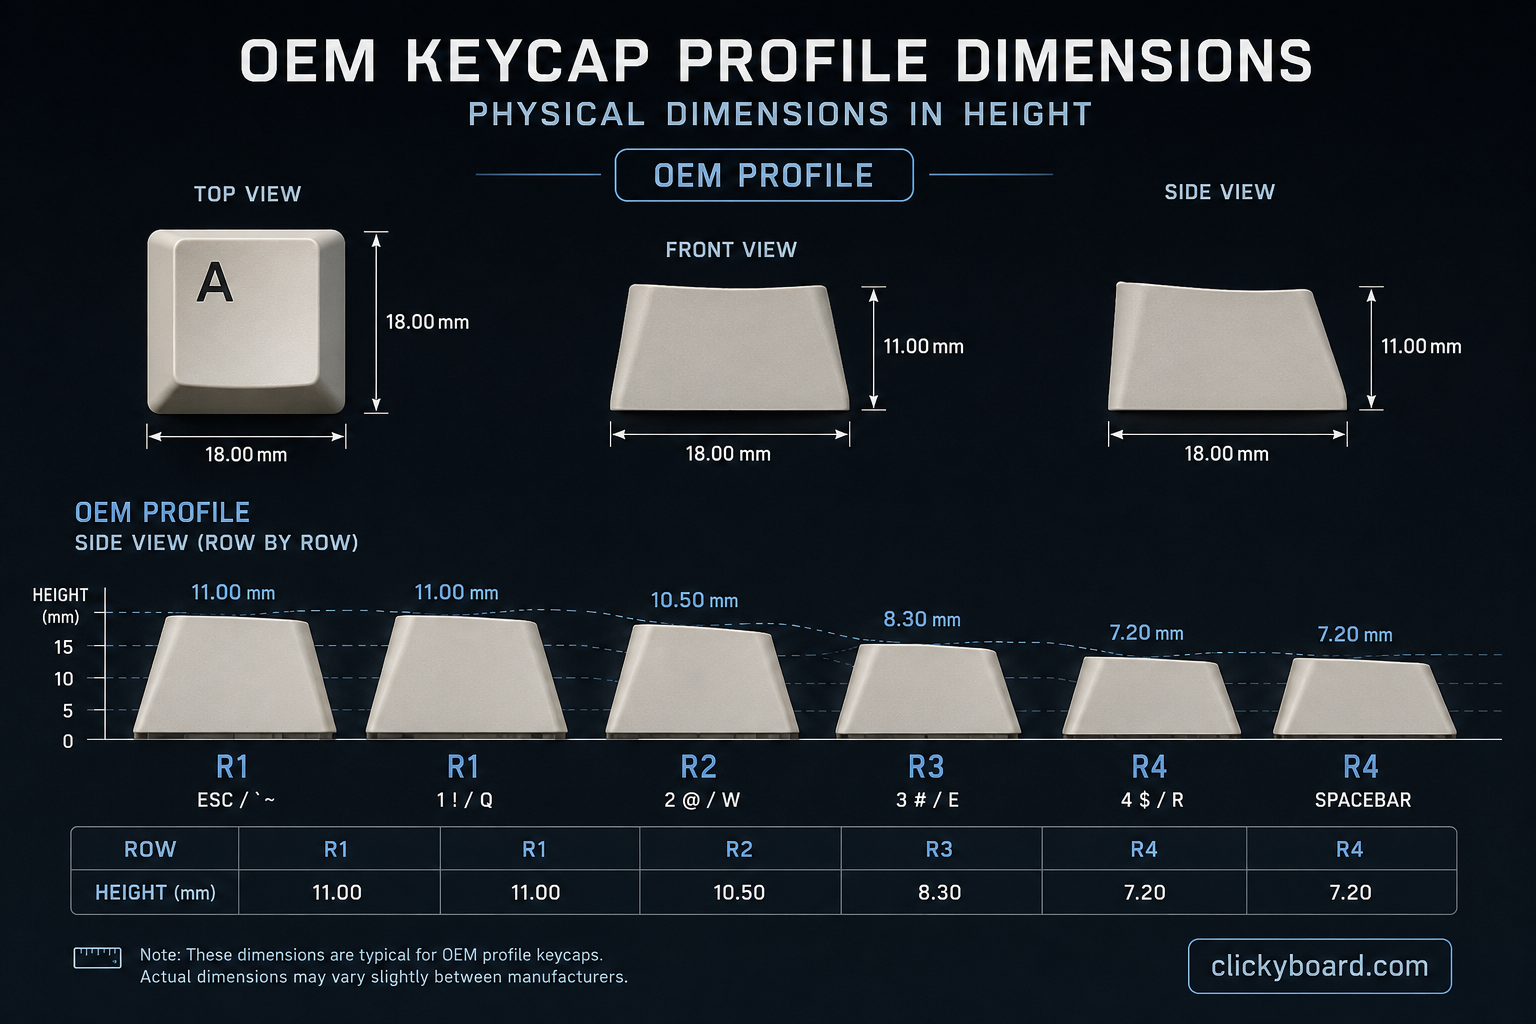
OEM KEycap profile dimensions

Design Features

Sculpting: Each row has a different angle and height to create a natural typing arc

Top Surface: Cylindrical with approximately 1mm depth curve

Wall Thickness: Typically 1.2-1.5mm for durability

Stem: Compatible with Cherry MX and clone switches

Why Choose OEM Profile Keycaps

1. Ergonomic Excellence

The sculpted design of OEM keycaps reduces finger strain during extended typing sessions. The cylindrical curve provides a larger surface area for your fingertips, distributing pressure more evenly than flat profiles.

2. Typing Accuracy

OEM’s row-specific heights create natural finger positioning that reduces typos. Your fingers naturally land in the correct position without conscious effort, improving both speed and accuracy.

3. Universal Compatibility

As the most common profile, OEM keycaps fit 99% of mechanical keyboards without compatibility issues. This makes upgrading simple and worry-free.

4. Balanced Feel

OEM strikes the perfect middle ground between comfort and tactile feedback. It’s not too high (like SA) or too low (like Cherry), making it ideal for both typing and gaming.

5. Cost-Effective Options

Due to widespread manufacturing, OEM keycaps offer the best value for money, with quality sets available at various price points.
 OEM-and-Other-Keycap-Profiles

Keyboard Compatibility

Layout Compatibility

OEM keycaps work with all standard layouts:

Switch Compatibility

Compatible with all major switch types:

  • Cherry MX and clones
  • Gateron switches
  • Kailh switches
  • Akko switches
  • Most 3-pin and 5-pin switches

Layout Considerations

ANSI vs ISO: Most OEM sets support ANSI layout standard. ISO-specific keys may require separate purchase. Bottom Row: Verify spacebar size (6.25u is standard) and modifier key sizes match your keyboard.

Installation Guide

Tools Needed

  • Keycap puller (wire or plastic)
  • Clean workspace
  • Soft cloth for cleaning

Step-by-Step Installation

Removing Old Keycaps

  1. Power off your keyboard and disconnect it
  2. Take a photo of your current layout for reference
  3. Use keycap puller to gently remove keys, starting from corners
  4. Work systematically row by row to avoid confusion
  5. Clean the switches with compressed air

Installing OEM Keycaps

  1. Identify row positions using the sculpted design
  2. Start with corner keys (Escape, Enter, Shift)
  3. Press down firmly until you hear/feel the click
  4. Test each key to ensure proper seating
  5. Install spacebar last – align stabilizers carefully

Pro Installation Tips

  • Row 1: Function keys have the steepest angle
  • Home row: Row 3 (ASDF) should feel most natural
  • Spacebar: Ensure even pressure on both sides
  • Stabilized keys: Check Enter, Shift, and Spacebar movement

Best OEM Keycap Sets
Best OEM Keycap Sets

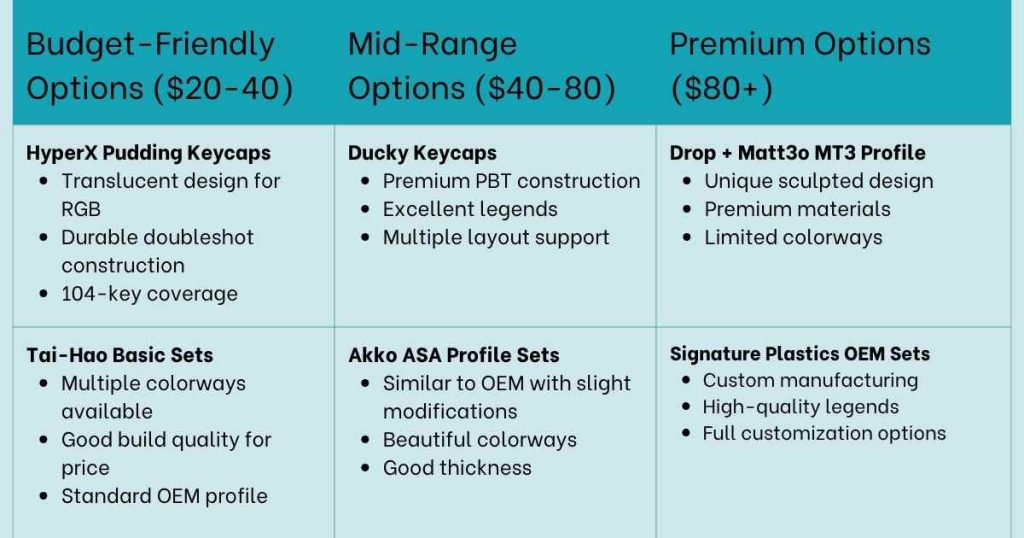
OEM is the cheapest profile to buy into, because the volume manufacturers produce drives prices down. That is good news, but it also means the range includes a lot of sets that look similar and are not. Four things separate a set worth buying from one that will disappoint you.

1. Legend method matters more than price

Doubleshot legends are moulded from a second piece of plastic, so they physically cannot wear off. Dye-sublimated legends are dyed into the plastic and are nearly as durable. Pad-printed legends sit on the surface and will rub away, sometimes within months on the keys you use most.

If a listing does not say which method it uses, assume pad-printed. This single specification separates sets that last years from sets that look shabby by spring.

2. PBT over ABS, usually

PBT resists the shine that develops where your fingers rest, and it has a slightly textured feel. ABS is smoother and often has sharper colours, but it develops a gloss on the most-used keys within months. Our ABS vs PBT guide covers when ABS is still the right call.

3. Check the kit covers your layout

This is where most keycap purchases go wrong. A set built for a full-size board may not include the odd-sized keys a compact layout needs, particularly the right shift and the modifiers beside the arrow keys.

Count the keys on your board and compare against the set’s kit list before ordering. On a 65% or 75% board this check takes two minutes and saves an expensive mistake.

4. Shine-through only if you use RGB

Pudding-style caps have a translucent lower half so lighting glows through. They look striking on an RGB board and slightly odd on one without. If your board has no per-key lighting, a solid set will almost always look better.

💡 The short version: look for doubleshot or dye-sub PBT, confirm the kit covers your bottom row, and only choose shine-through if you actually run RGB. A set meeting those three conditions at a sensible price is a good buy regardless of brand.

Three sets worth buying

HyperX Pudding PBT is the default shine-through set. Translucent lower halves let RGB glow through, the plastic is PBT so it resists shine, and it is priced low enough to be an easy first upgrade. Only worth it if your board actually has per-key lighting.

Ducky PBT Doubleshot is the quality pick. Doubleshot legends cannot wear off because they are moulded from a second piece of plastic, and Ducky’s tolerances are consistently good. This is the set to buy if you want to stop thinking about keycaps.

Akko OEM sets are the ones to look at for colourways. Akko produces far more themed sets than anyone else at this price, they are PBT, and kit coverage for compact layouts is usually better than generic budget sets.

Maintenance Tips
cleaning and maintaing keycaps

Daily Care

  • Wipe down keycaps with dry microfiber cloth
  • Use compressed air weekly to remove debris
  • Avoid eating/drinking over keyboard

Deep Cleaning (Monthly)

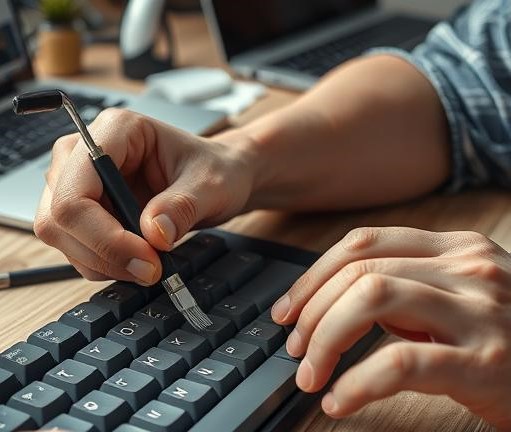
  • Remove keycaps using proper technique
  • Soak in warm soapy water for 30 minutes
  • Scrub gently with soft brush
  • Rinse thoroughly and air dry completely
  • Clean keyboard base while keycaps dry

Long-Term Preservation

  • Rotate keycap sets to prevent uneven wear
  • Store unused sets in original packaging
  • Avoid harsh chemicals that can damage legends
  • Keep away from direct sunlight to prevent fading

Frequently Asked Questions

Are OEM keycaps good for gaming?

Yes, OEM keycaps work excellently for gaming. Their medium height provides good tactile feedback without being too tall to affect gaming performance. Many professional gamers use OEM profile keyboards.

Can I mix OEM keycaps with other profiles?

While technically possible, mixing profiles creates an inconsistent typing experience. It’s recommended to use a complete OEM set for optimal ergonomics and aesthetics.

Do OEM keycaps work on low-profile keyboards?

No, standard OEM keycaps are designed for regular mechanical switches. Low-profile keyboards require specific low-profile keycaps.

How long do OEM keycaps last?

High-quality OEM keycaps can last 5-10 years with regular use. The lifespan depends on material quality, usage intensity, and maintenance.

Are expensive OEM keycaps worth it?

Premium OEM keycaps offer better materials, more durable legends, and superior manufacturing quality. For heavy users, the investment is worthwhile for longevity and feel.

Can I get custom OEM keycaps made?

Yes, several manufacturers offer custom OEM keycap services. Signature Plastics, WASD, and other companies provide custom printing and molding services.

Do OEM keycaps affect typing speed?

Most users maintain or improve their typing speed with OEM keycaps due to the ergonomic design and familiar feel. The sculpted rows help with finger positioning.

What’s the difference between ABS and PBT OEM keycaps?

The profile shape remains the same – the difference is in material properties. (Check ABS vs PBT guide for detailed comparison)

Conclusion

OEM keycap profiles represent the perfect balance of ergonomics, compatibility, and accessibility in the mechanical keyboard world. Their widespread adoption, comfortable typing experience, and universal compatibility make them an excellent choice for both beginners and experienced enthusiasts.

Whether you’re upgrading your first mechanical keyboard or building a custom setup, OEM profile keycaps provide a reliable foundation that enhances your typing experience without requiring an adjustment period.

The sculpted design, proven ergonomics, and extensive availability make OEM keycaps a smart investment for anyone serious about their mechanical keyboard setup.

ABS and PBT are the two plastics almost every keycap set is made from, and the one you pick changes how your keyboard feels, sounds, and ages. Here is the short version, then the detail that actually matters when you are choosing a set.

⚡ Quick Answer

Buy PBT if you want keycaps that stay matte, resist the greasy shine that develops with use, and give a deeper sound. It is the better daily driver and the default recommendation for most people. Buy ABS if you want the brightest colors, the best RGB shine-through, or the lowest price, and you do not mind the tops polishing to a shine over time. Neither is strictly better; they suit different priorities.

ABS vs PBT keycaps quick comparison

ABS vs PBT at a Glance

ABSPBT
Feel when newSmooth, slightly slickLightly textured, grippy
Over timeDevelops a glossy shineStays matte for years
SoundBrighter, higher-pitchedDeeper, more muted (“thock”)
DurabilityGoodBetter
Color & RGBVivid colors, great shine-throughMore muted, less vivid
PriceCheaperRoughly 20–50% more
Best forBright themes, RGB builds, budgetsLong-term daily drivers

How They Feel (And the Shine Problem)

Fresh out of the box, ABS keycaps feel smooth and a little slick, almost glassy. PBT feels slightly textured, closer to fine sandpaper, which gives your fingers more grip. That difference is subtle when both sets are new.

The gap opens up with use. ABS has a lower melting point and is softer, so the oils and friction from your fingers gradually polish the most-used keys into a glossy “shine.” Some people like that broken-in look; many do not, since it shows up first on the keys you touch most. PBT is harder and far more resistant to this, so it keeps its even matte texture for years. If shine is the thing you are trying to avoid, PBT is the answer.

Close-up of shine developing on used ABS keycaps

How They Sound

Keycap material changes the sound of every keystroke. PBT is denser and dampens vibration, so it tends to sound deeper and more muted, the “thock” enthusiasts chase. ABS is a touch more resonant, giving a brighter, clackier sound that some gamers and typists actually prefer. Neither is right or wrong. Listen to both and pick the profile you like.

PBT keycap typing sound
ABS keycap typing sound

Durability and Cost

PBT wins on longevity. It resists wear, holds its texture, and shrugs off the UV fading and yellowing that can affect ABS left in sunlight. It also stands up better to the oils and cleaning agents a keyboard meets over its life. ABS is still perfectly durable for normal use; it just shows its age sooner.

That quality costs more. PBT sets usually run 20–50% above a comparable ABS set because the material is pricier and harder to mold well. If you keep a keyboard for years, that premium often pays for itself by outlasting a cheaper set you would otherwise replace. If you swap keycaps often or are on a tight budget, ABS gives you good quality for less.

Color, RGB, and Legends

ABS takes bright, saturated color better and is the go-to for vivid or translucent (shine-through) keycaps that show off RGB backlighting. PBT colors tend to look more muted, though PBT holds its color longer without fading.

For legends that never wear off on either material, look for double-shot keycaps, where the letter is a separate piece of plastic molded into the cap rather than printed on top. Double-shot PBT is the gold standard for durability; double-shot ABS is common on bright, RGB-friendly sets.

Which Should You Buy?

  • Buy PBT if you type for hours daily, keep keyboards long-term, hate keycap shine, or want a deeper sound. This covers most people, which is why PBT is our default pick.
  • Buy ABS if you want the brightest colors or the best RGB shine-through, you change keycaps often, or price is the deciding factor.
  • Either is fine if you are new to the hobby and just want a solid set. Both feel great when matched well to your switches and board.

Keycaps are only one part of the picture. How they sound and feel also depends on your keyboard, switches, and case, so think about the whole build, not just the plastic.

Frequently Asked Questions

Is PBT always better than ABS?

No. PBT is more durable and stays matte, which suits most people, but ABS takes bright colors and RGB shine-through better and costs less. The right choice depends on your priorities.

Why do my ABS keycaps look shiny?

ABS is a softer plastic, so friction and skin oils gradually polish the surface of your most-used keys into a glossy shine. It is normal and does not affect function, but it is the main reason people switch to PBT.

Do PBT keycaps really sound better?

PBT tends to sound deeper and more muted because it is denser, while ABS sounds brighter and clackier. “Better” is personal. Listen to the two samples above and choose the one you prefer.

Are PBT keycaps worth the extra money?

For a long-term daily keyboard, usually yes, since they outlast ABS and keep their look. If you change keycaps often or are on a budget, a good ABS set is still a smart buy.

How can I tell if keycaps are ABS or PBT?

Check the product listing first, as reputable sellers state the material. By feel, PBT is slightly textured and matte while ABS is smoother and glossier. PBT also tends to sound a little deeper when tapped.


We keep our keycap guides updated as new sets and materials reach the market.

The world of mechanical keyboards has evolved beyond traditional manufacturing, opening doors to unlimited customization through 3D printed keycaps. This technology empowers enthusiasts to create unique, personalized keycaps that reflect their individual style while maintaining the functionality and durability expected from premium keyboard components.

3D printing keycaps represents a revolutionary approach to keyboard customization, offering unprecedented design freedom and the ability to prototype ideas rapidly. Whether you’re seeking ergonomic improvements, artistic expression, or functional enhancements, 3D printed keycaps provide solutions that traditional manufacturing cannot match.

Understanding 3D Printed Keycaps: Technology and Possibilities

What Makes 3D Printed Keycaps Special?

3D printed keycaps utilize additive manufacturing to create keycaps layer by layer from digital designs. This process eliminates the constraints of traditional injection molding, enabling complex geometries, integrated features, and personalized designs that would be impossible or prohibitively expensive using conventional methods.

The technology allows for rapid prototyping and iteration, making it ideal for testing ergonomic improvements or aesthetic concepts before committing to larger production runs. Designers can incorporate functional elements like integrated legends, textured surfaces, or specialized ergonomic features directly into the keycap structure.

Key Advantages of 3D Printed Keycaps:

  • Unlimited design freedom with complex geometries
  • Rapid prototyping for testing concepts
  • Personalization options impossible with injection molding
  • Cost-effective small batches and one-off designs
  • Integrated features like legends and textures
  • Ergonomic customization for individual hand shapes

Current Limitations to Consider:

  • Surface finish may require post-processing
  • Material properties differ from injection-molded plastics
  • Production speed slower for large quantities
  • Layer lines may affect tactile experience
  • Color options limited to available filaments

3D Printing Technologies for Keycap Production

Fused Deposition Modeling (FDM)

FDM represents the most accessible 3D printing technology for keycap production, using thermoplastic filaments heated and extruded through a nozzle. This method offers excellent material variety and cost-effectiveness for experimental designs and functional prototypes.

FDM Advantages for Keycaps:

  • Wide material selection including PLA, PETG, and ABS
  • Affordable equipment and operation costs
  • Excellent for functional testing and prototypes
  • Strong layer adhesion with proper settings
  • Compatible with standard desktop printers

FDM Considerations:

  • Layer lines may require post-processing
  • Support material needed for overhangs
  • Nozzle size affects detail resolution
  • Print orientation impacts surface quality

Stereolithography (SLA)

SLA technology uses UV light to cure liquid resin layer by layer, producing keycaps with exceptional surface finish and fine detail resolution. This method excels at creating smooth surfaces and intricate features that approach injection-molded quality.

SLA Advantages for Keycaps:

  • Superior surface finish with minimal post-processing
  • High detail resolution for legends and textures
  • Smooth tactile experience comparable to traditional keycaps
  • Excellent dimensional accuracy
  • Capable of transparent and translucent materials

SLA Considerations:

  • Limited material selection compared to FDM
  • Requires post-curing and cleaning processes
  • Higher equipment and material costs
  • Toxic resin handling requires safety precautions

Selective Laser Sintering (SLS)

SLS technology fuses powdered materials using laser energy, creating keycaps without support structures and enabling complex internal geometries. This industrial-grade process produces functional parts with excellent mechanical properties.

SLS Advantages for Keycaps:

  • No support structures required
  • Complex internal geometries possible
  • Excellent mechanical properties
  • Professional-grade surface finish
  • Multiple materials in single print

SLS Considerations:

  • High equipment costs limit accessibility
  • Powder handling requires specialized facilities
  • Limited color options without post-processing
  • Professional service bureau typically required

Materials for 3D Printed Keycaps

PLA (Polylactic Acid) – Beginner Friendly

PLA offers the easiest introduction to 3D printed keycaps, providing good print quality with minimal warping or adhesion issues. While not as durable as other options, PLA works well for prototyping and temporary use applications.

PLA Characteristics:

  • Easy printing with minimal warping
  • Good surface finish out of the box
  • Available in numerous colors and specialty variants
  • Biodegradable and environmentally friendly
  • Lower heat resistance than alternatives

Best Use Cases:

  • Prototype development and testing
  • Artistic or display keycaps
  • Temporary replacements
  • Learning 3D printing techniques

PETG (Polyethylene Terephthalate Glycol) – Balanced Performance

PETG strikes an excellent balance between printability and durability, offering superior toughness compared to PLA while maintaining reasonable printing requirements. This material works well for functional keycaps intended for regular use.

PETG Characteristics:

  • Excellent impact resistance and flexibility
  • Chemical resistance superior to PLA
  • Clear variants available for backlit applications
  • Good layer adhesion and print quality
  • Higher temperature resistance than PLA

Best Use Cases:

  • Daily-use functional keycaps
  • Backlit applications requiring transparency
  • Keycaps requiring flexibility or impact resistance
  • Chemical-resistant applications

ABS (Acrylonitrile Butadiene Styrene) – Traditional Alternative

ABS provides properties similar to injection-molded keycaps, offering excellent durability and post-processing capabilities. The material requires more advanced printing techniques but delivers professional-grade results when properly executed.

ABS Characteristics:

  • Similar properties to commercial keycaps
  • Excellent post-processing capabilities
  • High-temperature resistance
  • Good chemical resistance
  • Requires heated bed and enclosure

Best Use Cases:

  • Professional-grade custom keycaps
  • High-temperature applications
  • Keycaps requiring extensive post-processing
  • Long-term durability requirements

Specialty Materials for Advanced Applications

Flexible Filaments (TPU)

Create keycaps with unique tactile properties and shock absorption characteristics. Flexible materials enable designs impossible with rigid plastics.

Wood-Filled Filaments

Combine plastic properties with natural wood aesthetics, offering unique textures and the ability to stain or finish like real wood.

Metal-Filled Filaments

Achieve metallic appearance and increased weight while maintaining printability. Bronze, copper, and steel-filled variants available.

Design Principles for 3D Printed Keycaps

Ergonomic Considerations

Successful 3D printed keycaps must balance aesthetic appeal with functional requirements. Understanding finger mechanics and typing patterns informs design decisions that enhance rather than hinder the typing experience.

Key Ergonomic Factors:

  • Fingertip contact area optimization
  • Natural finger curvature accommodation
  • Row-appropriate height and angle
  • Tactile feedback through surface texture
  • Weight distribution for balanced feel

Structural Design Requirements

3D printed keycaps must withstand repeated mechanical stress while maintaining dimensional stability. Design features should account for material properties and printing limitations.

Critical Design Elements:

  • Wall thickness minimum of 1.2mm for durability
  • Stem attachment point reinforcement
  • Internal geometry optimization for strength
  • Support structure consideration during design
  • Post-processing access for cleanup

Switch Compatibility Standards

Ensuring proper fit with mechanical switches requires precise dimensional control and understanding of manufacturing tolerances.

Compatibility Requirements:

  • Cherry MX stem dimensions (5.5mm x 4.0mm cross)
  • Stem socket tolerance (+/-0.1mm for proper fit)
  • Keycap mounting depth considerations
  • Stabilizer compatibility for larger keys
  • Switch travel clearance requirements

Design Software and Workflow

CAD Software Options

Fusion 360 – Professional Features

Autodesk Fusion 360 provides comprehensive CAD capabilities with excellent parametric modeling tools ideal for keycap design. The software includes simulation features for stress analysis and manufacturing preparation tools.

Tinkercad – Beginner Friendly

Browser-based design tool offering intuitive interface for basic keycap modifications and simple custom designs. Excellent starting point for beginners learning 3D design concepts.

Blender – Artistic Focus

Open-source software excelling at organic shapes and artistic designs. Particularly useful for sculptural keycaps and complex surface textures.

Design Workflow Best Practices

  1. Concept Development
    • Sketch initial ideas and ergonomic requirements
    • Research existing keycap profiles for baseline measurements
    • Consider manufacturing constraints early in design
  2. 3D Modeling Process
    • Start with basic keycap profile as foundation
    • Add custom features incrementally
    • Maintain proper stem socket dimensions throughout
  3. Prototype Testing
    • Print initial design in inexpensive material
    • Test fit and ergonomic feel
    • Iterate design based on physical testing
  4. Final Optimization
    • Optimize print orientation and support requirements
    • Refine surface details for chosen printing method
    • Prepare final files with appropriate tolerances

Printing Process and Optimization

Pre-Print Preparation

Success with 3D printed keycaps begins with proper file preparation and printer setup. Attention to detail during this phase prevents print failures and ensures consistent quality.

Essential Preparation Steps:

  • Verify model dimensions and tolerances
  • Optimize print orientation for surface quality
  • Generate appropriate support structures
  • Calibrate printer for chosen material
  • Prepare print bed for optimal adhesion

Print Settings Optimization

Layer Height Selection

  • 0.1-0.15mm: Highest quality for detailed features
  • 0.2mm: Standard setting balancing quality and speed
  • 0.3mm: Faster printing for prototypes and testing

Infill Considerations

  • 10-20%: Adequate for most keycap applications
  • 30-50%: Enhanced durability for heavy-use keys
  • 100%: Maximum strength for specialized applications

Support Structure Strategy

  • Minimize supports to reduce post-processing
  • Use water-soluble supports for complex geometries
  • Orient prints to eliminate support requirements when possible

Quality Control During Printing

Monitor prints for common issues that affect keycap quality:

  • Layer adhesion problems causing weak points
  • Stringing or oozing affecting surface finish
  • Dimensional accuracy for proper switch fit
  • Support removal accessibility

Post-Processing Techniques

Surface Finishing Methods

Sanding and Polishing

Progressive sanding from coarse to fine grits eliminates layer lines and achieves smooth surfaces comparable to injection-molded keycaps.

Sanding Process:

  1. Start with 220-grit to remove major layer lines
  2. Progress through 400, 800, and 1200-grit papers
  3. Finish with polishing compound for glossy surfaces
  4. Use rotary tools for detail areas and curves

Chemical Smoothing

Vapor smoothing with appropriate solvents can eliminate layer lines on compatible materials like ABS, creating glass-smooth surfaces.

Safety Requirements:

  • Adequate ventilation or fume extraction
  • Personal protective equipment
  • Proper chemical storage and disposal
  • Fire safety precautions

Legend Creation Methods

Multi-Color Printing

Design keycaps with pause points allowing filament changes for integrated color legends that won’t wear away.

Post-Print Legend Addition

  • Paint filling for recessed legends
  • Vinyl decal application
  • Laser engraving for permanent marking
  • UV printing for complex graphics

Durability Enhancement

Surface Coatings

Apply protective coatings to enhance wear resistance and maintain appearance:

  • Clear acrylic coatings for UV protection
  • Textured coatings for improved grip
  • Anti-static treatments for dust resistance

Heat Treatment

Controlled annealing can improve material properties and reduce internal stresses in printed parts.

Troubleshooting Common Issues

Print Quality Problems

Layer Lines and Poor Surface Finish

Causes: Incorrect layer height, poor calibration, suboptimal print settings Solutions: Reduce layer height, calibrate extruder, optimize temperature settings

Warping and Dimensional Accuracy

Causes: Inadequate bed adhesion, thermal expansion, improper cooling Solutions: Improve bed preparation, use enclosure, adjust cooling fan settings

Support Removal Difficulties

Causes: Excessive support density, poor support interface settings Solutions: Optimize support parameters, use breakaway support materials

Functional Issues

Poor Switch Fit

Causes: Dimensional inaccuracy, material shrinkage, design tolerances Solutions: Adjust tolerances, post-process stem socket, verify printer calibration

Keycap Cracking or Breaking

Causes: Insufficient wall thickness, material limitations, stress concentration Solutions: Increase wall thickness, modify design geometry, choose stronger materials

Design Optimization Challenges

Complex Geometries Not Printing Well

Causes: Overhangs exceeding printer capabilities, insufficient supports Solutions: Redesign geometry, add supports, split complex parts

Advanced Techniques and Applications

Multi-Material Printing

Combine different materials in single keycaps for enhanced functionality:

  • Hard base with soft-touch surface overlay
  • Transparent legends with opaque keycap body
  • Flexible gaskets integrated with rigid structures

Embedded Components

Integrate electronic components directly into keycap designs:

  • LED strips for custom backlighting
  • Pressure sensors for advanced input detection
  • Wireless modules for smart keycap functionality

Parametric Design Systems

Develop scalable design systems allowing rapid customization:

  • Variable profile heights and angles
  • Adjustable surface textures and patterns
  • Scalable legend sizes and positions

Cost Analysis and Economics

Equipment Investment

Entry-Level Setup ($200-500)

  • Basic FDM printer (Ender 3, Prusa MINI)
  • Essential tools and materials
  • Basic design software (Tinkercad, Fusion 360 personal)

Professional Setup ($1000-5000)

  • High-quality FDM or entry SLA printer
  • Professional CAD software licenses
  • Complete post-processing equipment
  • Material inventory and storage

Per-Keycap Costs

Material Costs

  • PLA keycaps: $0.10-0.30 each
  • PETG keycaps: $0.15-0.40 each
  • Specialty materials: $0.25-1.00 each

Time Investment

  • Design time: 2-8 hours per unique design
  • Print time: 30-90 minutes per keycap
  • Post-processing: 10-30 minutes per keycap

Economic Viability

3D printed keycaps become cost-effective for:

  • Custom one-off designs
  • Small batch productions (5-50 units)
  • Prototype development
  • Specialized ergonomic requirements

Traditional manufacturing remains more economical for large quantities due to economies of scale.

Community and Resources

Online Communities

Reddit Communities

  • r/MechanicalKeyboards for general discussion
  • r/3Dprinting for technical printing advice
  • r/functionalprint for practical design ideas

Discord Servers

  • Mechanical keyboard enthusiast servers
  • 3D printing community channels
  • Design collaboration platforms

Design Resources

File Repositories

  • Thingiverse keycap collections
  • MyMiniFactory premium designs
  • Prusaprinters community uploads

Educational Content

  • YouTube channels focused on keycap design
  • Online courses for CAD software
  • Blog tutorials for specific techniques

Professional Services

For users lacking equipment or expertise, professional services offer:

  • Custom design development
  • High-quality printing services
  • Post-processing and finishing
  • Small batch production runs

Future Trends and Innovations

Material Developments

Advancing material science continues expanding possibilities:

  • Bio-based plastics with improved properties
  • Conductive filaments for integrated electronics
  • Shape-memory alloys for adaptive keycaps
  • Recycled plastics supporting sustainability

Technology Improvements

Printing technology evolution enhances capabilities:

  • Multi-material printing becoming mainstream
  • Improved surface finish reducing post-processing
  • Faster printing speeds enabling production scaling
  • Lower-cost professional-grade equipment

Design Evolution

Software and design methodologies advance rapidly:

  • AI-assisted design optimization
  • Generative design for performance enhancement
  • Real-time collaboration tools
  • Automated tolerance optimization

Conclusion

3D printed keycaps represent a paradigm shift in keyboard customization, offering unprecedented design freedom and personalization opportunities. While the technology requires learning and investment, the ability to create truly unique keycaps tailored to individual preferences makes it an invaluable tool for keyboard enthusiasts.

Success with 3D printed keycaps depends on understanding the interplay between design, materials, printing processes, and post-processing techniques. Each element contributes to the final product quality and user experience, requiring careful consideration and optimization.

As 3D printing technology continues advancing, the gap between home-printed and professionally manufactured keycaps narrows. Early adopters who master these techniques today will be best positioned to leverage future improvements and push the boundaries of what’s possible in keyboard customization.

Whether creating artistic statement pieces, ergonomic improvements, or functional enhancements, 3D printed keycaps offer a direct path from imagination to reality. The combination of accessible technology, supportive communities, and unlimited design possibilities makes this an exciting time to explore custom keycap creation.

The journey from digital design to physical keycap may require patience and practice, but the satisfaction of typing on personally designed and manufactured keycaps makes every step worthwhile. Embrace the learning process, experiment with different approaches, and discover the unique possibilities that 3D printed keycaps bring to mechanical keyboard customization.

Every keycap has three shape decisions built into it: how tall it is, whether all the rows are the same height, and what the top surface does to your fingertip. Those three things together are what people mean by a keycap profile, and they change how a keyboard feels and sounds more than most people expect before they try a second set.

This guide covers every profile you are likely to encounter, what each one is actually like to use, and how to pick one without buying three sets to find out.

Quick answer: for a first upgrade, buy Cherry. It is low, sculpted, available in every colourway and needs no adaptation. Pick SA or MT3 if you want something tall and dramatic and will accept a week of adjusting. Pick XDA or DSA if you want a flat set whose keys you can rearrange freely.

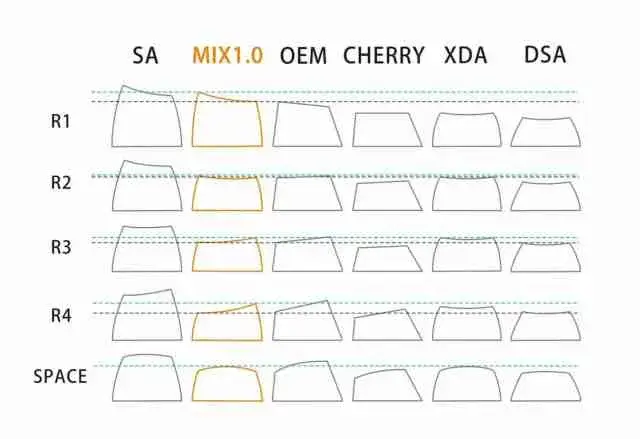
Keycap profiles compared side by side

What a keycap profile actually decides

Height. How far the top of the cap sits above the board. Taller caps put your fingers further from the case and give the keyboard a bigger internal air chamber, which is why height affects sound as well as feel.

Sculpt. A sculpted profile gives each row its own height and angle, so the number row leans back towards you and the bottom row leans forward. The rows are not interchangeable. A uniform profile makes every key identical, so any cap fits any position and you can rearrange the whole set.

Top surface. A cylindrical top curves in one direction only, front to back, forming a shallow trough. A spherical top curves in every direction, forming a dish. Spherical dishes cradle the fingertip and feel more locating; cylindrical tops let the finger slide between keys more easily, which is why fast gaming setups tend to prefer them.

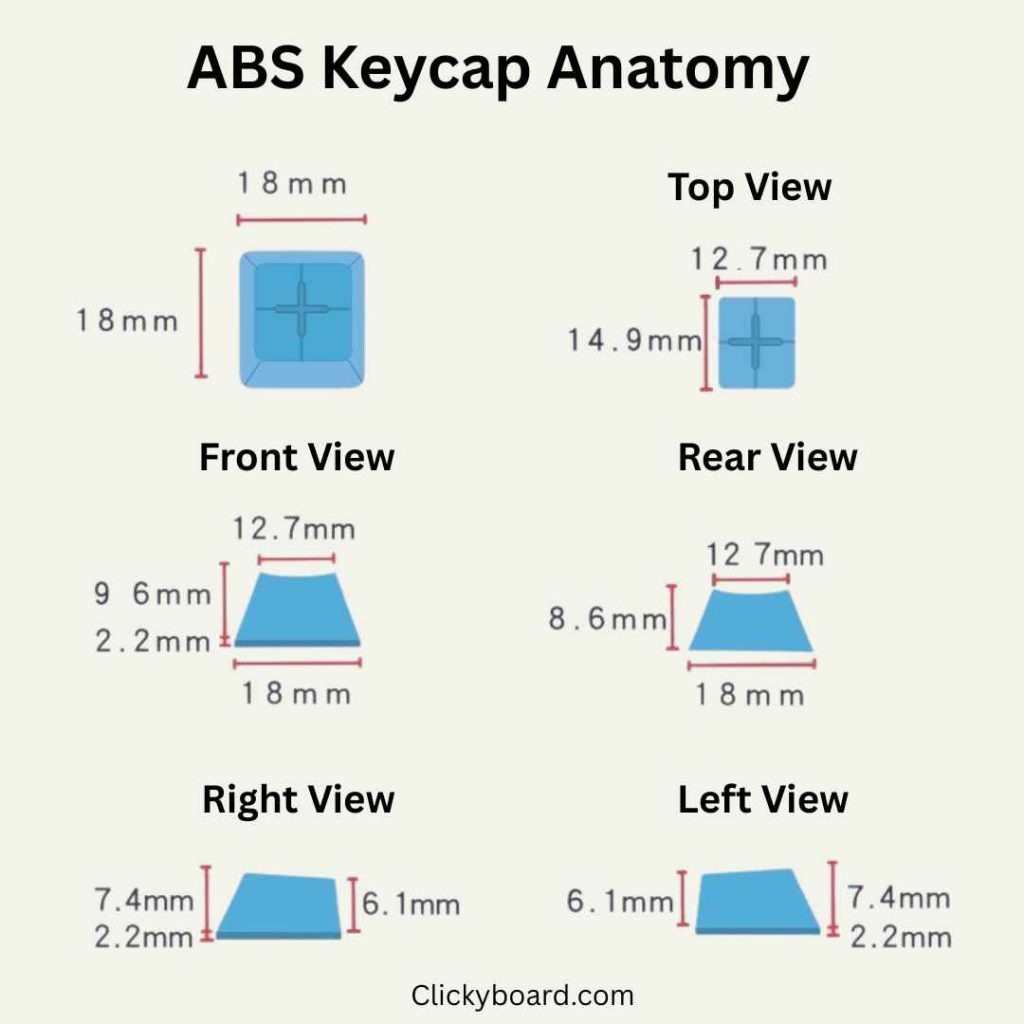
Keycap anatomy showing height, wall, stem and dish

Every major profile compared

ProfileSculptTopHeightSoundAdjustingBest for
OEMSculptedCylindricalMediumNeutralNoneWhatever came on your board
CherrySculptedCylindricalLowSlightly higher pitchedNoneFirst upgrade, typing, gaming
SASculptedSphericalVery tallDeep and loud1 to 2 weeksRetro looks, dramatic sound
DSAUniformSphericalLowBright, clackyA few daysOrtholinear, 40%, macropads
XDAUniformSphericalMediumFuller than DSAA few daysCheap uniform sets, colourways
MT3SculptedDeep sphericalTallDeep, muted1 to 3 weeksLong typing sessions
KAMUniformSphericalTallDeepAbout a weekTall caps without the sculpt
ChocUniformFlat-ishVery lowThin, sharpImmediateLow-profile boards only
Published row heights vary between manufacturers and between production runs, so treat height as a class rather than a fixed figure. The ordering above is consistent across every maker.

OEM: the one you already own

Before the enthusiast profiles, it is worth starting with the one almost everybody already has. OEM is the default profile fitted to the overwhelming majority of prebuilt mechanical keyboards, and unless you have deliberately bought a keycap set, it is what is on your board right now.

It is sculpted, with a cylindrical top, and it sits slightly taller than Cherry with a more upright front face. That extra height is the main practical difference between the two, and it is why a Cherry set feels noticeably lower to type on when you switch.

OEM matters for two reasons beyond ubiquity. It is the cheapest profile to buy into, because volume drives the price down, and it is the reference point everything else gets described against: if you are unsure whether you want something taller or flatter, OEM is the middle you are comparing to.

We cover it in full, including row heights, compatibility and the best sets to buy, in our dedicated OEM keycap profile guide.

Cherry: the safe default

Cherry profile was designed by Cherry for its own boards and has since become the standard the enthusiast market builds around. It is sculpted and cylindrical like OEM, but roughly a millimetre lower per row, with a flatter front face.

That lower height is the whole appeal. Your wrists sit closer to the desk, you can often type without a wrist rest, and the shorter travel between the top of the cap and the switch makes the board feel quicker. Because it is sculpted, your fingers still get positional feedback from the row angles, so there is essentially no adaptation period coming from OEM.

The practical argument for Cherry is availability. Nearly every group buy and every in-stock vendor set is offered in Cherry, which means comprehensive kits for odd layouts, spare novelties, and easy replacement if you break a cap. If you have a 65%, an Alice board or anything with a non-standard bottom row, Cherry is the profile most likely to have the keys you need.

The downsides are mild. Short walls mean less acoustic body than a tall profile, so Cherry sets sound a little higher pitched and a little thinner. And it is so common that it does not make a board look distinctive.

SA: tall, spherical and loud

SA is the tall, retro-looking profile, originally from Signature Plastics and modelled on the spherical caps used on 1970s terminals and typewriters. It is heavily sculpted, with a deep spherical dish and thick walls, usually in ABS.

It is the most dramatic profile to type on. The dish locates each fingertip firmly, the rows are separated by a lot of height, and the sheer size of the cap gives a big internal air volume. That volume is why SA sounds the way it does: deep, resonant and loud, with a distinctive hollow character that people either love or find obnoxious.

Living with it takes commitment. The height means you almost certainly want a wrist rest, the caps are heavy enough to be noticeable when the board is moved, and the adjustment period is real: expect a week or two before you stop misfiring on the bottom row. On compact boards with tight key spacing it can feel cramped, because the tall walls sit closer together at the top than the plate does.

Uniform variants exist, usually sold as SA R3, where every row uses the home-row shape. That gets you the height and the sound without the sculpt.

DSA: flat, uniform and rearrangeable

DSA is the low uniform profile, also from Signature Plastics. Every key is the same shape and height with a shallow spherical dish, so any cap fits any position on the board.

That single property drives most of its use. If you run an ortholinear board, a split ergonomic layout, a 40%, a macropad, or a non-QWERTY layout like Colemak or Dvorak, DSA lets you place keys wherever they need to go without hunting for a matching row. It is also why DSA sets tend to be cheaper per key: manufacturers only need one mould.

Typing on it is a different experience from anything sculpted. With no row heights to feel for, your fingers lose the positional cues they were using, and touch typists usually overshoot the number row for the first few days. Once that passes, most people find it comfortable, and the low height is easy on the wrists.

DSA is typically thin PBT, which combined with the low walls gives a bright, clacky sound with little resonance. If you want a quiet, high-pitched board it works well; if you are chasing depth it is the wrong profile.

XDA: the middle of the uniform group

XDA is uniform and spherical like DSA, but taller with a wider, flatter top surface. The larger landing area is the main functional difference, and it is the reason some people find XDA more forgiving than DSA when they first move away from sculpted caps.

The extra height also adds body to the sound. XDA sits between DSA and the tall profiles: fuller and lower pitched than DSA, nowhere near SA. Combined with wide availability from budget vendors and an enormous range of colourways, that makes it the easiest uniform profile to buy into cheaply.

The trade-off is that the wide, near-flat top reduces the locating effect of the dish, so it gives you less feedback about where your finger has landed than either DSA or a sculpted profile.

MT3: deeply scooped and polarising

MT3 is Drop’s profile, designed by Matteo Spinelli and modelled on old DEC and IBM terminal keycaps. It is tall, aggressively sculpted, and has by far the deepest spherical dish of any common profile, with high walls surrounding each key.

The feel is unlike anything else. Your fingertips sit down inside each cap rather than on top of it, and the walls physically guide them back to centre. For slow, deliberate typing that is genuinely comfortable, and it is the profile most often recommended by people who type all day and care about fatigue.

It is also the profile people most often bounce off. The same walls that centre your fingers get in the way when you want to slide between keys, which makes it a poor fit for gaming and for anyone with a fast, light typing style. Adjustment takes longer than any other profile, commonly one to three weeks.

Sound is deep and comparatively muted. The caps are thick, so you get the low pitch of a tall profile without the hollow ring that SA is known for.

KAM: tall without the sculpt

KAM comes from Keyreative and answers a specific question: what if you want SA’s height and sound but the freedom of a uniform set? It is uniform, spherical, and considerably taller than XDA.

The result keeps the deep sound that comes from a large cap volume while letting you rearrange keys freely, which makes it a good match for ergonomic and ortholinear boards that would otherwise be stuck with low profiles. The catch is that tall plus uniform means your fingers stretch further to the top row than they would on a sculpted set of the same height, so the number row can feel like a reach.

Low profile: check the stem, not the name

Low-profile boards are the one place where profile compatibility can fail outright, and the reason is the stem rather than the shape.

Kailh Choc switches use a completely different stem: two rectangular posts instead of a single MX cross. No standard keycap fits, no adapter makes it fit, and you must buy caps sold specifically for Choc. Choc also uses tighter key spacing than MX, so even the footprint differs.

Cherry MX Low Profile and most low-profile switches from Gateron keep the MX cross stem, so caps are cross-compatible in principle. In practice a full-height cap on a low-profile switch defeats the purpose and can bottom out against the case, so you still want caps made for the shorter travel.

💡 Before you buy anything: confirm your switches use an MX cross stem. Almost every mechanical keyboard sold today does, which is why profile is usually the only question. Choc, Topre and older proprietary switches are the exceptions, and on those the profile name tells you nothing about whether a set will fit.

How much does profile change the sound?

Enough to hear clearly, but less than the case, the plate and whether the board has foam in it. Two things about the cap matter.

Internal volume. A taller cap encloses more air, and more air means a lower resonant pitch. This is the main reason SA and MT3 sound deep and DSA sounds bright, and it holds regardless of what the cap is made of.

Wall thickness. Thin walls flex and ring on impact, adding a hollow, plasticky component to the sound. Thick walls damp that out. This is where profile and material overlap, since the profiles known for thick walls are also the ones usually moulded in thick ABS.

Profile and material are separate choices

Profile is the shape. Material is the plastic. They are independent, and you can get almost any profile in either of the two common plastics, so decide them separately rather than assuming a profile commits you to a material.

Briefly: ABS is smoother, produces a deeper sound, and develops a shine where your fingers land, usually within months of daily use. PBT is more textured, sounds higher pitched, and resists shine almost indefinitely. Our ABS vs PBT guide covers the legend printing methods and durability differences in detail.

Which profile should you buy?

Your first keycap set: Cherry. No adaptation, widest availability, and it will teach you whether you want something taller or flatter next.

Gaming, especially fast lateral movement: Cherry or OEM. Low, sculpted and cylindrical, so your fingers slide between keys instead of climbing walls.

Ortholinear, split or a custom layout: DSA or XDA. Uniform is not a preference here, it is a requirement if you want keys in arbitrary positions.

You want the board to look and sound dramatic: SA. Nothing else has the same presence, and the sound is the reason most people buy it.

Eight hours of typing a day: MT3 if you will commit to the adjustment period, Cherry if you would rather not think about it.

A 40% board or a macropad: DSA. Cheap, uniform, and the low height suits boards where you are already using layers rather than reaching.

A low-profile board: work out the stem type first, then buy whatever fits it.

Adapting to a new profile

The mistake people make is switching back and forth. If you install a tall or uniform set, keep it on for at least a week of normal use. Alternating between two profiles keeps resetting the muscle memory you are trying to build, and the frustration is what makes people conclude a profile is bad when they have simply not finished learning it.

Expect the errors to cluster in two places. The bottom row, because your thumb and little finger travel furthest and are least precise, and the number row, because on a uniform set there is no height change telling you that you have reached the top. Both settle within days once you stop looking down.

Frequently asked questions

Can I mix different profiles on one keyboard?

Physically yes, and one combination is common: a uniform alpha set with a sculpted function row, or SA R3 uniform keys mixed into a sculpted set. Mixing profiles of different heights across the main alphas is a different matter, because the height jumps break the finger positioning both profiles were designed around.

Will any profile fit my switches?

If your switches use the standard MX cross stem, which nearly all do, then yes, profile has no bearing on whether a cap fits. The exceptions are Kailh Choc, Topre and a few proprietary designs, which use their own stems and need caps made for them.

Which profile is most comfortable for long typing sessions?

MT3 if you are willing to adapt to it, because the deep dish and high walls hold your fingers in position and reduce the small corrections you make all day. Cherry is the answer if you want comfort without an adjustment period, since its low height keeps your wrists flat.

How long does it take to get used to a new profile?

Moving between similar profiles such as OEM to Cherry takes no time at all. Sculpted to uniform, such as Cherry to XDA, takes a few days. The big jumps, Cherry to SA or to MT3, commonly take one to three weeks of daily use.

What is the difference between cylindrical and spherical tops?

Cylindrical tops curve in one direction only, forming a trough that runs left to right, so your finger can slide along it. Spherical tops curve in every direction, forming a dish that cups the fingertip and resists sliding. Spherical feels more locating, cylindrical feels faster.

Are expensive keycap sets actually better?

Price mostly buys thicker walls, tighter moulding tolerances and better legend printing, all of which you can feel and hear. What it does not buy is a better profile for you specifically. A cheap set in the right profile will suit you more than an expensive set in the wrong one, which is a good argument for trying a budget set in an unfamiliar profile before committing.