


We regularly review and update our guides to ensure keyboard recommendations, specs, and software information stay current with the latest releases and updates.
Affiliate disclosure: this article contains Amazon affiliate links. Purchases made through these links support Clickyboard at no extra cost to you.
⚡ Quick answer: To lube keyboard stabilizers, remove all large keycaps and stabilizers from your PCB, disassemble each stabilizer into its housing, stem, and wire, then apply Krytox GPL 205g0 to the housing interior and stem surfaces. Apply Krytox XHT-BDZ (or Permatex Dielectric Grease) generously to both wire hook ends. Optionally perform the band-aid mod on the PCB contact points. Reassemble, reinstall, and the rattle is gone. The full process takes 45 to 90 minutes and costs under $25 in supplies.
There is a specific sound that every keyboard builder dreads: that hollow, metallic clatter on the spacebar that makes an otherwise excellent keyboard sound like a toy. You lube your switches, you foam the case, you install a nice brass weight, and then you press the spacebar and it goes clack-rattle-clank. All of that careful work undone by two bent pieces of wire.
Stabilizers are the most underappreciated component in a mechanical keyboard build. They are not glamorous. Nobody posts about them on social media. There are no enthusiast-grade stabilizer colorways or artisan wire-bending studios. And yet they are responsible for a disproportionate amount of the acoustic character of your finished board, for better or worse.
I have modded stabilizers on more than 20 builds, from cheap boards with factory clip-ins to high-end ones with Durock V2s and Gateron Inks, and every last one needed proper lubing to sound right. Everything I have picked up along the way is here: which lubes actually work, how to apply them, the order that matters, and the optional mods that take a decent stab job to a genuinely silent one.
1. Why stabilizers rattle (and why it is not the switches)
Rattle is not one problem, it is four, and each one has its own fix. Figuring out which you are actually hearing saves you from lubing the wrong part and wondering why the noise will not go away.
🔗 Wire-to-stem contact
The most common cause. The bent metal wire hooks rattle inside the plastic stem channel during every keystroke. Fix: generous thick grease on both wire hook ends eliminates all metal-on-plastic contact.
🏠 Stem-to-housing friction
The plastic stem slides up and down inside the housing with inadequate lubrication. This creates scratchiness and a slight clatter on return. Fix: Krytox 205g0 on all stem surfaces and inner housing walls.
💥 Bottom-out impact
The housing makes hard plastic-on-PCB contact at full keystroke depth. This creates a sharp, hollow clack separate from any rattle. Fix: the band-aid mod cushions this contact point with a soft pad.
⚖️ Wire imbalance
If the wire is not perfectly centered, one side of the keycap bottoms out before the other, creating a wobbly, inconsistent feel and sound. Fix: wire balancing, gently bending the wire until both sides are level.
💡 Worth knowing: lubing your switches does nothing for stabilizer rattle. These are entirely separate systems. You can have perfectly lubed switches on a board with rattling stabilizers, and the stabilizers will dominate the sound profile completely. Always address both in the same session.
2. Types of stabilizers: which one do you have?
The modding process is nearly identical across all stabilizer types, but you need to know what you are working with before you start removing anything. The wrong removal method can damage your PCB or break the stabilizer tabs.
⭐ Recommended
🔩 Screw-in (PCB mount)
Secured to the PCB with a small Phillips screw through a mounting hole. The most stable design, with zero wobble and zero flex during keystrokes. Found on most quality boards over $60. Look for a small screw at the top of each housing. These are the gold standard and worth upgrading to if your board supports them.
Common
📎 Clip-in (PCB mount)
Snap into cutouts in the PCB using two small plastic tabs. No screws required, but more prone to movement under heavy use. Found on most budget keyboards and some mid-range boards. Removal requires pressing both tabs inward simultaneously. Can be upgraded to screw-in on compatible PCBs.
Less common
🔧 Plate-mount
Clips into holes in the keyboard plate rather than the PCB. Common on older keyboards and some budget gaming boards. Significantly less stable than PCB-mount types and generally considered inferior for modding. The lubing process is identical, but the band-aid mod cannot be applied since the stabs do not contact the PCB.
Custom builds
🏗️ Integrated / custom
Some premium custom keyboards use proprietary stabilizer designs: Topre rubber domes, Alps-style stabs, or plate-integrated solutions. These require different lubricants and techniques. This guide covers standard MX-compatible stabilizers, which account for the vast majority of the market.
⚠️ Not sure which type you have? Remove the spacebar keycap and look at the stabilizer. A screw at the top of the housing means screw-in. Two small plastic clips on the sides means clip-in. Attached to the metal plate rather than the circuit board means plate-mount. When in doubt, check your keyboard’s product page or Reddit’s r/MechanicalKeyboards.
3. Stabilizer anatomy: what to lube, what to avoid
A standard MX-compatible stabilizer has three components. Unlike switch lubing where you must avoid the contact leaf at all costs, stabilizers are more forgiving, but the two parts that need the most attention are the ones most beginners under-lube or skip entirely.
🏠 Housing (×2) · Lube: 205g0
The outer plastic shell that mounts to the PCB or plate. Contains the vertical channel the stem slides through. Apply Krytox 205g0 to all interior walls. Lube generously: unlike switch housings, there is no contact leaf to avoid here.
🔲 Stem (×2) · Lube: 205g0
The white or clear plastic piece that slides inside the housing, with a hook channel at the top for the wire. Lube all four outer sides, the top cap face, and crucially the interior of the hook channel where the wire sits.
〰️ Wire (×1) · Lube: XHT-BDZ
The steel wire connecting both housings and stabilizing the keycap. The two bent hook ends are the primary source of rattle. These must be coated in thick grease, not standard 205g0, but XHT-BDZ or dielectric grease. This is the step most beginners under-do.
🔩 Mounting screw · Do not lube
The small Phillips screw that secures screw-in stabilizers to the PCB. Do not apply lubricant to it: it can cause the screw to slip, loosen over time, or damage the mounting hole. Tighten firmly but do not overtighten, as the PCB material is fragile.
4. Best lubes for stabilizers: the complete comparison
Stabilizers need two different lubricants for two different jobs. Using a single lube for everything is the most common stabilizer modding mistake. It produces results that are better than stock but nowhere near optimal.
| Lubricant | Viscosity | Use on | Why it works | Price | Verdict |
|---|---|---|---|---|---|
| Krytox GPL 205g0 | Medium grease | Housing interior, stem surfaces | Excellent plastic lubrication, long-lasting, will not attract dust | $10 to 12 / 5ml | Best for housing and stem |
| Krytox XHT-BDZ | Very thick grease | Wire hook ends only | Thick enough to stay packed in wire bends, prevents metal-on-plastic rattle permanently | $8 to 12 / 3ml | Best for wire ends |
| Permatex Dielectric Grease | Very thick grease | Wire hook ends (budget option) | Nearly identical performance to XHT-BDZ at a fraction of the cost, available at any auto parts store | $5 to 8 / tube | Best budget wire lube |
| Tribosys 3203 / 3204 | Thin to medium grease | Housing and stem (alternative) | Works well but slightly thinner than optimal for stabilizer housings, better suited to switches | $8 to 10 / 5ml | Acceptable alternative |
| Krytox GPL 105 oil | Thin oil | Do not use on stabilizers | Too thin, wears off wire ends within weeks. Use only on switch springs. | $8 to 10 / 5ml | Avoid on stabs |
| WD-40 / petroleum jelly / machine oil | Various | Never | Degrades plastic over time, attracts dust, causes long-term damage to stabilizer components | n/a | Never use |
🔬 Why thick grease for wire ends specifically: the wire hook sits inside a small channel in the plastic stem and moves slightly with every keystroke. A thin lubricant like 205g0 will not stay packed inside that hook channel, and it gradually works its way out through normal use. XHT-BDZ and Permatex Dielectric Grease are thick enough to remain compressed inside the bend, maintaining a permanent buffer between metal and plastic. This is why people who use 205g0 on wire ends often report rattle returning within a few months, while those using thick grease report permanent results.
5. The full stabilizer mod stack, ranked
Lubing is just one part of achieving perfect stabilizers. Here is every commonly used stabilizer modification ranked by impact, so you know which ones are worth your time and which are optional.
| Mod | Impact | What it does |
|---|---|---|
| 🧴 Wire end lubing | 🔥 Highest | Thick grease on wire hooks. Eliminates the primary source of rattle permanently. Never skip this. |
| 🩹 Band-aid mod | 🔥 Highest | Padding on PCB contact points. Eliminates hollow bottom-out impact sound. Free if you have band-aids. |
| 🏠 Housing and stem lube | 🔥 High | 205g0 on all sliding surfaces. Removes stem scratchiness and ensures smooth, consistent travel. |
| ⚖️ Wire balancing | ⚡ Medium | Adjusting wire bend symmetry so both sides bottom out simultaneously. Fixes wobbly spacebar feel. |
| 🔇 Foam under stabs | ⚡ Medium | Thin foam strips under stab housings add cushioning. Similar to the band-aid mod but more consistent coverage. |
| 🌊 Tempest mod | ⚡ Medium | Filling the space between stab wire and housing with thin foam. Further reduces wire rattle on very long keys. |
💡 Where to start: wire end lubing plus the band-aid mod plus housing and stem lube are the essential three. Together they account for roughly 90% of the improvement. Everything else is incremental refinement for builds where you want truly exceptional results.
6. Step by step: how to lube keyboard stabilizers
🛠️ Supplies checklist: Krytox 205g0 · Krytox XHT-BDZ or Permatex Dielectric Grease · size-00 brush · tweezers · small Phillips screwdriver · isopropyl alcohol 90%+ · cotton swabs · band-aids · paper towel or desk mat. Total cost: $20 to 30 if starting from scratch.
Step 1. Remove large keycaps and identify all stabilizers
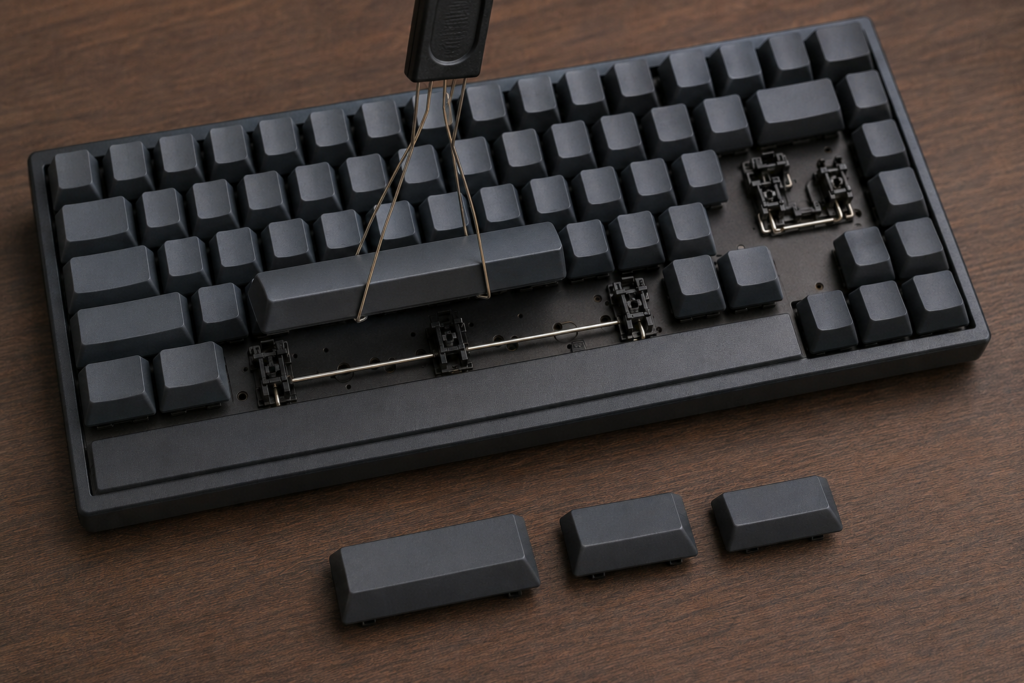
Use a wire keycap puller to remove all stabilized keys: spacebar (typically 6.25u), left and right shift, enter, backspace, plus end-column keys on full-size boards. Lay them aside carefully, as these are the largest keycaps and most prone to scratching. Count your stabilizers before removal so you know what to expect: most 65% keyboards have 3 or 4, full-size boards have 7 to 9.
Step 2. Remove stabilizers from the PCB
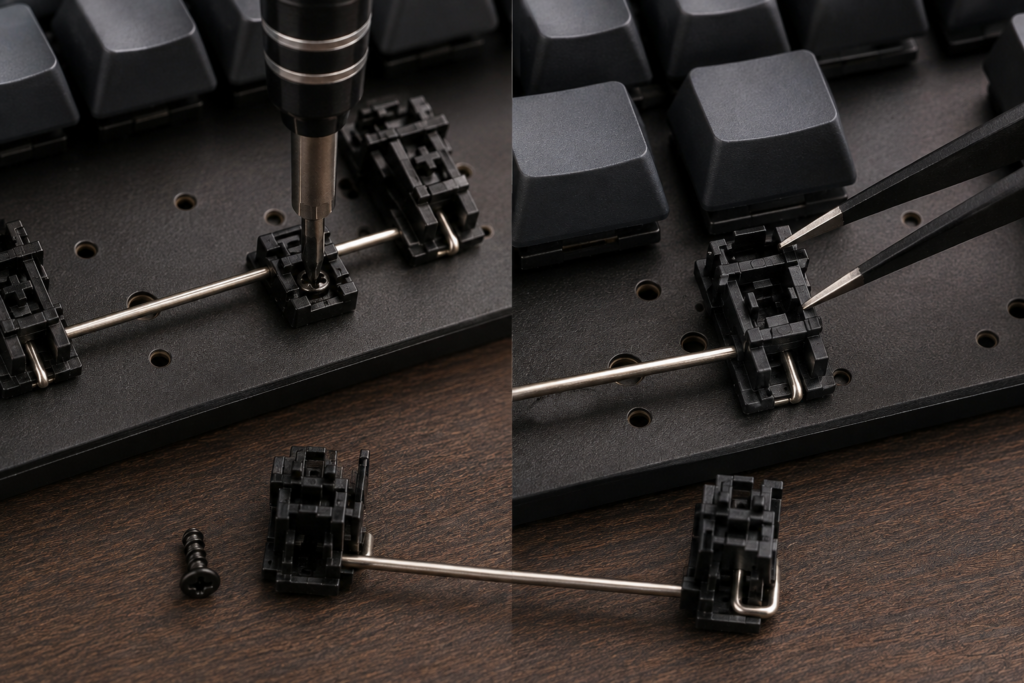
For screw-in stabilizers: use your small Phillips screwdriver to remove the screw from the top of each housing. Keep screws in a small container and do not mix them with keyboard screws. Tilt the housing slightly and lift free from the PCB.
For clip-in stabilizers: use tweezers or a small flathead to press both plastic tabs simultaneously while lifting upward. Do not force them. If one tab is still engaged, the housing will not release cleanly.
Step 3. Disassemble and clean all components
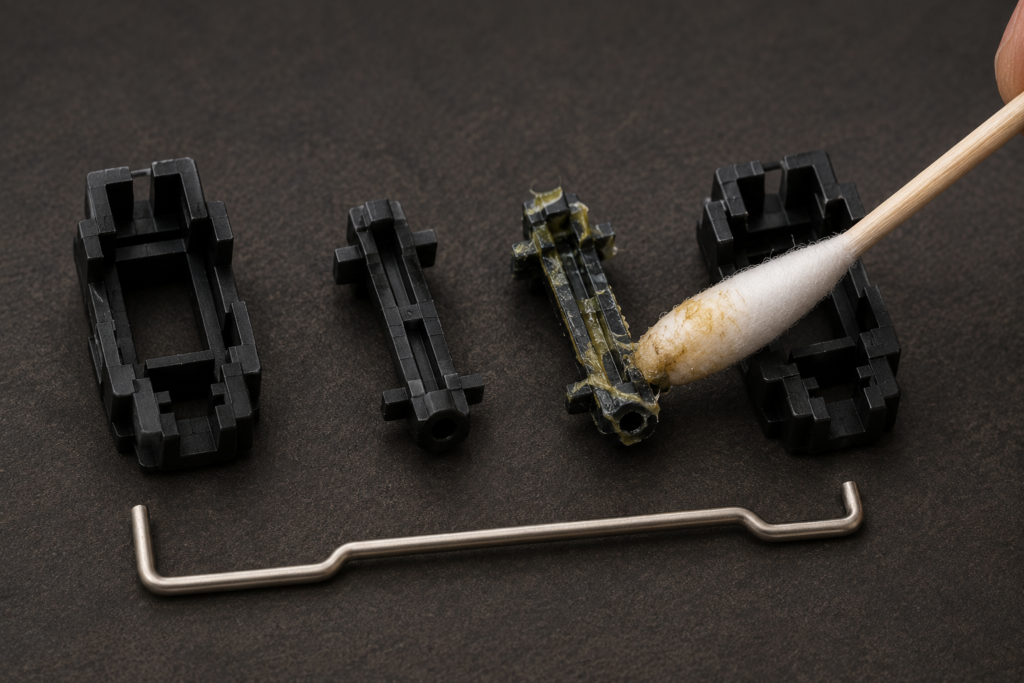
Separate each stabilizer into its three parts: two housings, two stems, and one wire. To remove the wire, hook it out of the stem channels by rotating each wire end 90 degrees toward you and pulling free. Remove the stems from the housings by pressing and lifting. If your stabilizers are brand new, wipe off any visible factory grease with a dry cotton swab. If they are used, wash the plastic parts in warm soapy water or soak in isopropyl alcohol for 10 minutes to dissolve all previous lubricant. Dry completely, as no moisture should remain before you apply new lube.
Step 4. Apply the band-aid mod to the PCB
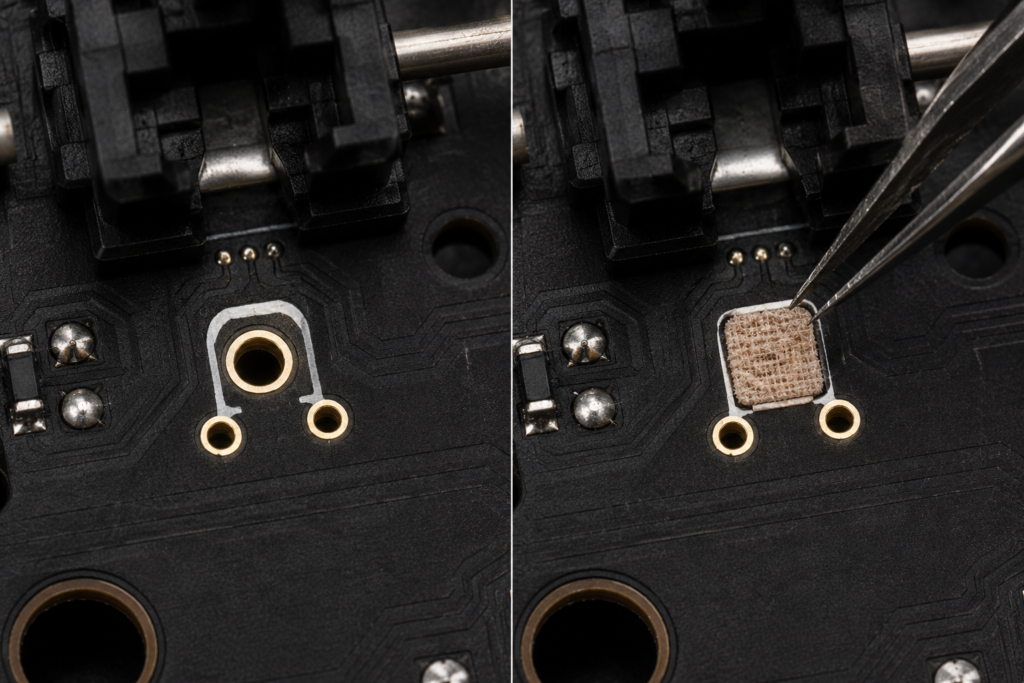
This must be done before reinstalling, as you cannot add the band-aid mod with stabilizers in place. Cut small rectangles (approximately 5mm × 7mm) from the soft padded center of a standard adhesive bandage. Do not use the adhesive side tabs, only the padded gauze section. Place one pad directly on each PCB contact point where the stabilizer housing bottom makes contact. Press firmly to adhere. Trim edges if they extend beyond the housing footprint. For extra cushioning on the spacebar, use two layers.
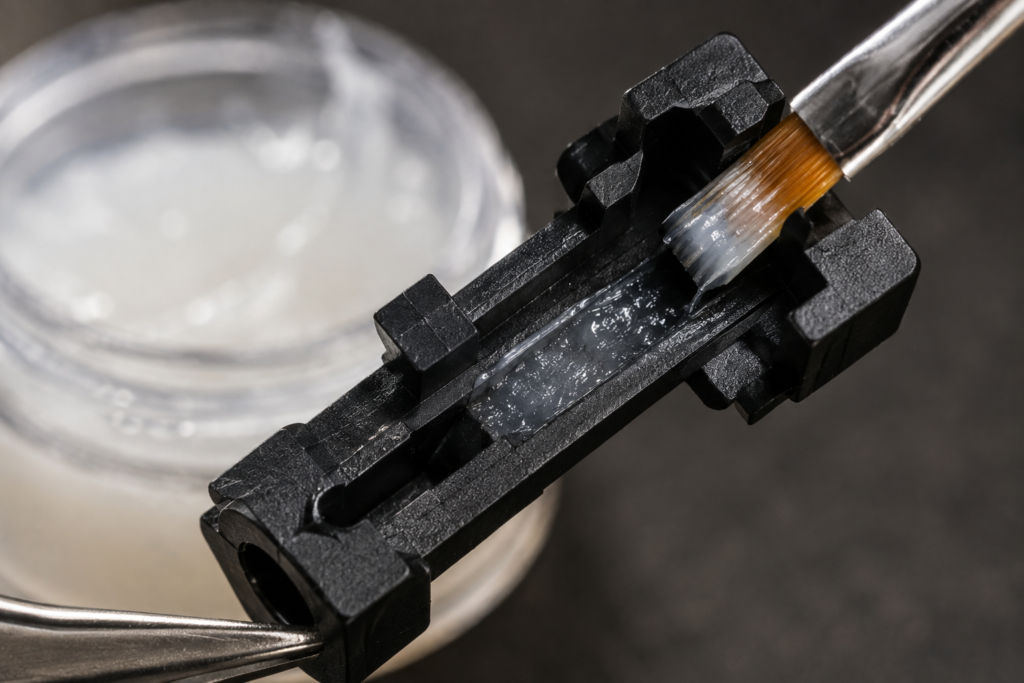
Step 5. Lube the housing interior
Load your size-00 brush with Krytox 205g0, slightly more generously than you would for a switch housing, but still not dripping. Apply an even coat to all four interior walls of the housing channel that the stem slides through. Cover the full height of the channel, and the bottom of the channel interior as well. Unlike switch lubing, there is no contact leaf in stabilizer housings to avoid, so you can be methodical and thorough without risk of damaging an electrical component.
Step 6. Lube the stabilizer stem thoroughly
Hold the stem between thumb and index finger. Apply 205g0 to all four outer vertical faces, as these contact the housing walls during travel. Apply lube to the top cap face, the flat surface that meets the keycap mount. Most critically, apply lube generously to the interior of the wire hook channel, the small opening at the top of the stem where the wire hook inserts. Push lube inside this channel with your brush tip. This channel, combined with wire end lubing, is what eliminates rattle entirely.

Step 7. Lube the wire hook ends with thick grease
This is the single most important step in the entire process. Using your brush or a cotton swab, apply a generous, packed coat of Krytox XHT-BDZ or Permatex Dielectric Grease to both wire hook ends. Do not be conservative. You want the grease packed into the bend of the wire, surrounding the hook, creating a thick buffer between the steel wire and the plastic stem channel so they never make metal-on-plastic contact. Apply, then apply more. Wipe off any excess that would prevent the hook seating fully, but keep the packed grease inside the bend itself.

Step 8. Reassemble each stabilizer
Insert the lubed stems back into the lubed housings. They should slide in smoothly and seat fully at the bottom. Hook both wire ends into the stem channels: insert each hook into its stem channel opening, then rotate the wire 90 degrees away from you to lock it. You should hear a soft click as each side locks. Press the stem up and down a few times, as it should travel smoothly with no scratching or resistance. If you hear any click or rattle, the wire is not fully seated.

Step 9. Reinstall and replace keycaps
Screw-in: lower the housing onto the PCB mounting holes, insert the screw through the top hole, and tighten firmly. Do not overtighten, as the PCB is fragile and stripped screw holes are a nightmare to fix. One firm quarter-turn past hand-tight is sufficient.
Clip-in: align the two tabs over the PCB cutouts and press firmly until both click into place. Test stability by attempting to pull the housing, and it should not flex or lift.
Reinstall all large keycaps by pressing firmly and evenly onto the switch and stabilizer stems simultaneously. Test each key: press slowly to bottom out, then release. Listen for any rattle or clack.

7. The band-aid mod: deep dive
The band-aid mod is one of the most effective, cheapest, and most widely recommended keyboard modifications in the entire enthusiast community. It costs literally nothing if you have a box of bandages at home.
Why it works
When a stabilized key is pressed to full depth, the stabilizer housing physically contacts the PCB surface. This is a hard plastic-to-PCB impact that creates a sharp, hollow clacking sound distinct from normal keystroke noise. The band-aid pad acts as a shock absorber. It compresses slightly on impact, converting the hard clack into a softer, muted thud. The effect is most dramatic on the spacebar, which is the largest key and receives the hardest typing impact.
Correct execution
- Use only the padded gauze center of a standard bandage, not the adhesive strips on the sides
- Cut rectangles approximately 5mm × 7mm, enough to cover the housing contact point, not the entire PCB footprint
- Apply before reinstalling stabilizers, as this cannot be done with stabs in place
- For the spacebar specifically, consider two layers of padding for extra cushioning
- Ensure no padding extends into switch cutouts or solder holes on the PCB
- Press firmly so the adhesive bonds well. A pad that lifts during use causes inconsistent sound
Alternative materials
The community has experimented with many alternatives. Medical tape with foam is popular. Tempest mod foam, small pieces of EVA foam cut to size, works similarly. Some builders use electrical tape doubled over itself for a slightly firmer feel. The original band-aid method remains the most popular because the material thickness is nearly perfect and the adhesive is reliable without damaging the PCB.
🔬 Band-aid versus foam mod: the band-aid mod cushions the bottom-out impact at the housing-PCB interface. A separate mod, placing foam under the entire stabilizer area, cushions over a wider area and can produce a slightly deeper, more muffled sound. Both are valid. The band-aid mod is faster and more targeted; PCB foam is more comprehensive but requires cutting foam to fit precisely around switch and stabilizer cutouts.
8. Wire balancing: fixing uneven key feel
Wire balancing is an advanced technique rarely discussed in beginner guides, but it makes a noticeable difference on the spacebar and long shift keys. If your spacebar feels like it tilts, or if one side seems to bottom out before the other, the wire is out of balance.
How to diagnose wire imbalance
Press the spacebar slowly and feel whether both ends reach bottom at exactly the same time. Press one end only, and it should bottom out at the same depth as the other. If the key feels like a seesaw, or produces different sounds depending on where you press, the wire needs balancing.
The balancing process
Remove the wire from the stabilizer. Lay it on a flat surface and assess its symmetry. If one side is bent differently from the other, gently apply pressure to correct it, making small adjustments then checking and repeating. The goal is for both wire hook ends to sit at exactly the same height when the wire is laid flat. This ensures both stems reach bottom simultaneously during a keystroke.
⚠️ Wire balancing caution: steel stabilizer wire is forgiving but not infinitely so. Do not attempt aggressive bends, only small and gradual adjustments. If you overbend in either direction, it is very difficult to recover the original geometry. Test frequently and adjust minimally. Cheap stabilizers have softer wire that bends more easily but also loses shape more quickly.
When to upgrade instead
If you are spending more than 15 minutes trying to balance a wire, the stabilizer may simply be a low-quality unit not worth the effort. Budget stabilizers, particularly the plate-mount type found on many keyboards under $50, have thick, stiff wire with inconsistent bends from the factory. Upgrading to aftermarket stabilizers (Durock V2, Owlstab, TX Stabilizers, or Gateron Ink stabilizers) provides much higher baseline quality and dramatically easier modding.
9. Common stabilizer lubing mistakes
🚫 Mistake 1: lubing wire ends with 205g0 instead of thick grease. 205g0 is not viscous enough to stay packed inside the wire hook bends during regular use. It gradually works out of the channel, and rattle returns within weeks or months. Always use XHT-BDZ or Permatex Dielectric Grease on wire hooks, and save 205g0 for housings and stems.
🚫 Mistake 2: not cleaning factory grease before applying new lube. Factory stabilizer grease on cheaper keyboards is often a waxy, low-quality compound that does not mix well with Krytox. Applying 205g0 over it can create a gummy, inconsistent feel worse than either grease alone. Always clean with IPA first.
🚫 Mistake 3: forgetting the wire hook channel inside the stem. Most beginners lube the outer stem surfaces well but miss the small internal channel where the wire hook sits. This channel is where metal-to-plastic contact occurs during lateral movement. Use your brush tip to push lube inside it and do not skip it.
⚠️ Mistake 4: overtightening screw-in stabilizer screws. The PCB material around stabilizer screw holes is thin and fragile. Overtightening cracks the PCB or strips the hole, making the stabilizer permanently loose. Tighten to firm, not forceful. If the screw turns without resistance the hole may already be stripped, and a tiny amount of electrical tape can fill the gap as a temporary fix.
⚠️ Mistake 5: applying the band-aid mod after installing stabilizers. The pad sits between the PCB and the stabilizer housing, so it cannot be inserted once the stab is mounted. Always perform the band-aid mod on a bare PCB before any stabilizer installation. If you forgot, you must remove the stabilizer entirely to add the pad.
💡 Mistake 6: testing with keycaps on immediately after assembly. Before reinstalling keycaps, press each stabilizer stem by hand and listen carefully for any remaining rattle. It is much easier to diagnose and fix with keycaps off. Once they are on, the sound changes and identifying the specific problem becomes harder.
10. Before and after: the difference in sound and feel
❌ Before modding
- 🔊 Metallic rattle on every spacebar press
- 💥 Sharp hollow clack on bottom-out
- 😤 Scratchy stem travel up and down
- ⚖️ Wobbly, uneven key feel side to side
- 🎵 High-pitched, thin sound profile
- 😣 Inconsistent feel across large keys
✅ After the full mod stack
- 🤫 Complete silence on spacebar press
- 🎵 Deep, cushioned thud on bottom-out
- 🧈 Smooth, effortless stem travel
- ⚡ Even, balanced feel across full key width
- 🎶 Deep, consistent acoustic character
- ✨ Premium feel matching $200+ keyboards
11. Frequently asked questions
What is the best lube for keyboard stabilizers?
You need two lubricants. Krytox GPL 205g0 for stabilizer housings and stem surfaces, which provides excellent plastic-on-plastic lubrication lasting years. Krytox XHT-BDZ or Permatex Dielectric Grease for the wire hook ends, as these thick greases stay packed inside the wire bends and prevent metal-to-plastic rattle permanently. Do not use a single lubricant for both, because 205g0 is not viscous enough to stay on wire hooks long-term.
What is the band-aid mod for keyboard stabilizers?
It involves cutting small pieces from the padded center of a standard adhesive bandage and sticking them onto the PCB where stabilizer housings make contact during a full keystroke. This cushions the hard plastic-to-PCB impact that creates the characteristic hollow clacking on spacebar and large modifier keys. It is one of the most effective, free, and universally recommended keyboard modifications. Apply before installing stabilizers, as it cannot be added retroactively.
How do I fix a rattling spacebar?
Spacebar rattle is almost always caused by dry wire hook ends. Remove the spacebar keycap, unscrew or unclip the stabilizer, disassemble it, and apply a generous coat of Krytox XHT-BDZ or Permatex Dielectric Grease to both wire hook ends, packing it into the bend of each hook. Combine this with the band-aid mod on the PCB contact points for complete silence. Also apply Krytox 205g0 to the housing interior and stem surfaces. The full process takes 15 to 20 minutes for a single stabilizer.
What is the difference between screw-in and clip-in stabilizers?
Screw-in stabilizers are anchored to the PCB with a small Phillips screw, making them physically stable and resistant to wobble. Clip-in stabilizers snap into PCB cutouts using plastic tabs, which is easier to install but more prone to movement and rattle under heavy typing. Screw-in are strongly preferred for any build where sound quality matters. If your PCB supports screw-in stabs, the upgrade from clip-in is worth every penny.
Do I need to lube stabilizers if I have already lubed my switches?
Yes, without exception. Switches and stabilizers are completely separate mechanical systems, and lubing your switches has zero effect on stabilizer rattle. On most keyboards the stabilizer rattle on the spacebar is significantly louder and more disruptive than any switch scratchiness. Always address both in the same session: lube your stabilizers first, since it requires a bare PCB for the band-aid mod, then lube your switches.
How often should I re-lube my stabilizers?
Housing and stem lube with Krytox 205g0 typically lasts 2 to 3 years of regular use. Wire end lube with thick grease lasts 1 to 2 years. You will know it is time when rattle begins to return on large keys, which is always the wire end grease wearing out first. Re-lubing wire ends only, without full disassembly, is possible using a thin brush or syringe, but full disassembly gives better results.
Can I lube stabilizers without removing them?
Partially. You can apply lube to some surfaces of an installed stabilizer using a thin brush or syringe, sometimes called in-board or lazy lubing. This is better than nothing but inferior to full disassembly for three reasons: you cannot clean old factory grease first, you cannot reach the full interior of the housing properly, and you cannot perform the band-aid mod. For any build you care about, full disassembly is correct.
Should I upgrade my stabilizers or just lube the stock ones?
If your keyboard has screw-in stabilizers, lube them first, because even mid-quality screw-in stabs perform excellently when properly modded. If it has clip-in stabilizers, lube them and assess, as many are perfectly fine when done properly. If you have plate-mount stabilizers and your PCB supports PCB-mount stabs, upgrading is worthwhile. If you plan to keep the keyboard long-term and clip-in stabs still rattle after proper lubing, aftermarket sets like Durock V2 or TX Stabilizers ($15 to 25) are a meaningful upgrade.
✍️ Elizabeth Blake
Founder and Lead Writer, ClickyBoard · Custom keyboard builder since 2019
Elizabeth has completed over 20 custom mechanical keyboard builds and modded stabilizers on everything from stock clip-ins on budget gaming boards to Owlstab and TX Stabilizer sets on high-end aluminium cases. She still remembers the first build where she forgot to lube the stabs, a cautionary tale she now shares with everyone who will listen. ClickyBoard exists to document every lesson learned so you can skip straight to the good part. She currently types on a Satisfaction75 with lubed TX Stabs and lubed Gateron Oil King switches.