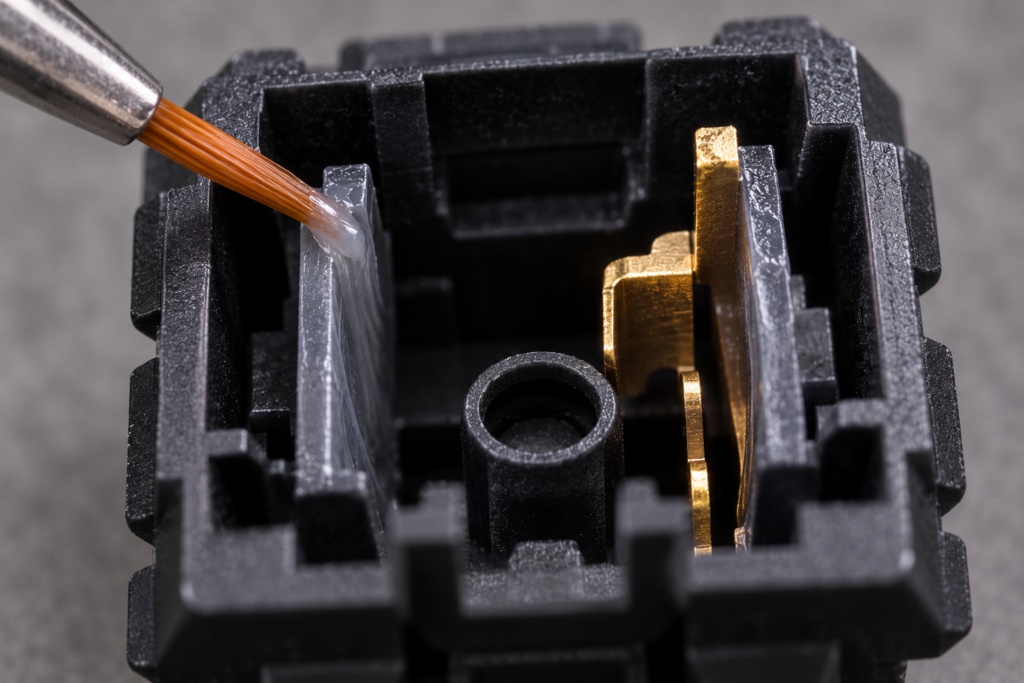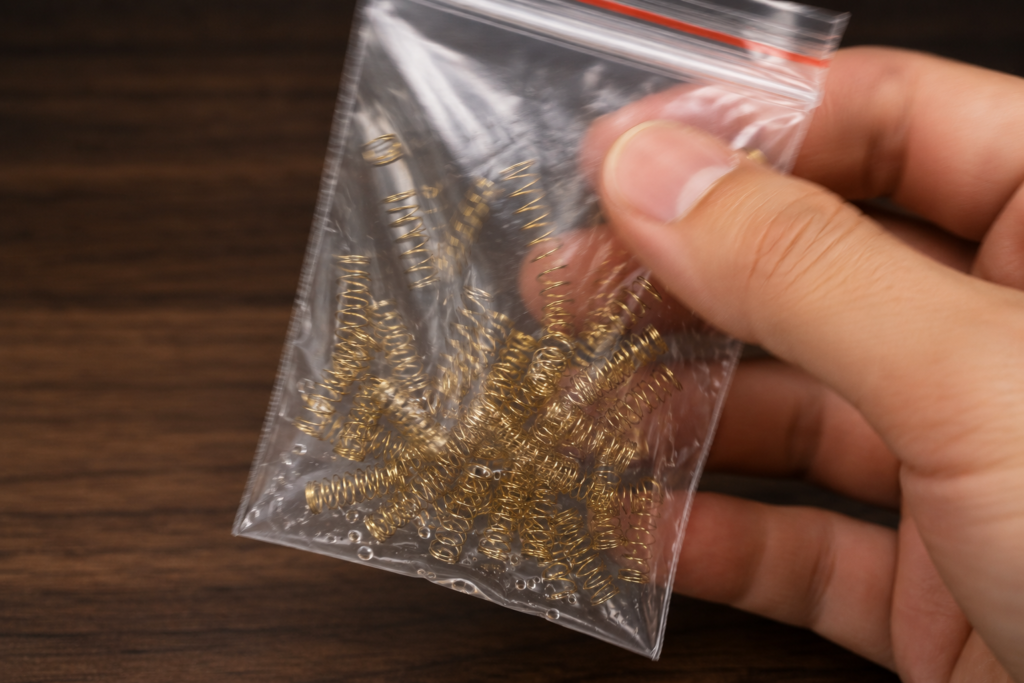
Modding & Lubing

My first custom keyboard build did not go smoothly. I bent six switch pins trying to rush the PCB installation, forgot to lube the stabilizers entirely, and assembled the whole thing before realising I had never flashed the firmware. I had to take it apart three times. By the end of that Saturday, I had a keyboard that sounded like rattling coins in a tin can.

I also could not stop typing on it.

There is something that changes when you use a keyboard you built yourself. Every keystroke carries the memory of the work you put in, the hours of prep, the satisfaction of hearing that first clean thock when everything finally came together. That feeling is what drives people to build their second, third, and fifteenth board.

This guide is the one I wish I had for that first build. Every mistake I made is documented here as a warning, and every step is sequenced the right way. Whether you are spending $120 or $400, hot-swapping or soldering, building a 60% or a TKL, this guide covers it.

⚡ Quick Answer

To build a custom mechanical keyboard you need six core parts: a case, a PCB (hot-swap recommended), a plate, switches, stabilizers, and keycaps. Lube your stabilizers and switches before assembly, test the PCB before installing switches, then assemble case, plate, and keycaps in sequence. A beginner build takes 3–4 hours and costs $100–200 for a solid entry-level result.

1. Why Build a Custom Keyboard Instead of Just Buying One?

This is a fair question, and it deserves an honest answer. A pre-built keyboard from Keychron or Logitech can be genuinely excellent. You do not need to build a keyboard to get a great typing experience. So why do thousands of people go through the effort?

💰 Better Value

A $200 custom build usually outperforms a $200 off-the-shelf board because you choose the exact switches and keycaps.

🔄 Fully Upgradeable

Swap switches without a new board. Change keycaps seasonally. Add foam mods later. A good case and PCB are a platform.

🎓 Deep Understanding

You learn how every part works, which makes troubleshooting, modding, and future builds far easier.

ℹ️ Honest caveat: If you want a great keyboard for under $80 right now with zero effort, a pre-built like the Keychron V series is genuinely good. Custom builds make the most sense in the $120–400 range where the quality gap becomes significant.

2. Choose Your Layout First, and Everything Else Follows

Your layout choice determines which cases, PCBs, plates, and keycap sets are compatible with your build. Choose the wrong layout and you will find yourself with limited part options. Choose before you buy anything else.

60%
~61 keys
Compact

65%
~68 keys
⭐ Best for beginners

75%
~84 keys
Function row

TKL
~87 keys
No numpad

Full Size
104 keys
With numpad

Why 65% Is the Best First Layout

The 65% layout hits the sweet spot that no other size quite matches. It keeps the arrow keys, which you will miss far more than you expect on a 60%, while removing the function row and numpad most people rarely use. The result is a board that fits on any desk, supports an enormous range of keycap sets, and has more kit options than any other non-standard layout. If you are genuinely unsure, pick 65% and do not second-guess it.

💡 Keycap compatibility tip: Before committing to any layout, check that your chosen keycap set covers it. Most sets support full-size, TKL, and 65%. Some do not include 75% modifiers or 60% bottom rows. Always verify compatibility on the keycap listing before purchasing.

3. Budget Planning: Three Realistic Tiers

Custom keyboard budgets vary wildly. Here is an honest breakdown of what each tier actually gets you, based on real builds, not aspirational marketing.

Entry Level
$100–180

KBD67 Lite kit + Gateron switches + budget keycap set. Polycarbonate or acrylic case, hot-swap PCB. Excellent performance for the price, this tier still feels premium.

Mid Range
$200–350

Keychron Q2 Pro or Zoom65 kit + quality switches (Gateron Oil King, Boba U4T) + GMK or Domikey keycaps. Aluminum case, gasket mount. Where most enthusiasts live.

Enthusiast
$400–800+

Group buy boards (Mode Eighty, Satisfaction75) + hand-lubed premium switches + premium GMK keycaps. Brass or aluminum plate, POM gaskets. The diminishing-returns tier.

💡 Spend most on keycaps and switches, least on the case. A $90 KBD67 Lite case with $50 Gateron Oil Kings and an $80 GMK keycap set will sound and feel better than a $200 aluminum case with stock switches and cheap keycaps. Prioritise what touches your fingers.

4. Every Part Explained

Every custom keyboard build requires exactly six components. Miss any one and the build cannot be completed. The table below breaks down each part, what to look for, and where to buy.

PartWhat It DoesBeginner PickWhere to BuyBudget
CaseHouses all components; defines sound, weight, aestheticsPolycarbonate or aluminum, gasket mountKBDfans, Keychron, Divinikey$50–200
PCBRegisters keystrokes; hot-swap sockets allow switch swappingHot-swap, USB-C, QMK/VIA supportKBDfans, Cannonkeys, Ringerkeys$30–80
PlateSits between PCB and switches; affects sound and feelPolycarbonate (flexible, absorbs sound)Bundled with most kits$15–50
SwitchesMoving mechanical parts under each key; defines typing feelGateron G Pro 3.0 linear or Boba U4 tactileDivinikey, Ringerkeys, KBDfans$20–60 / 70
StabilizersSupport larger keys to prevent wobbleDurock V2 or TX screw-inDivinikey, KBDfans$15–30
KeycapsVisible tops of each key; defines look and feelPBT doubleshot or dye-sublimatedDivinikey, KBDfans, Drop$30–150

Switches: The Decision That Matters Most

Of all six parts, your switch choice has the greatest impact on how the finished keyboard feels. Switches fall into three categories: linear (smooth, no bump), tactile (a bump at the actuation point), and clicky (tactile bump plus an audible click). For a first build, linear or tactile are strongly recommended, as they are more forgiving to lube and more universally pleasant.

To go deeper before choosing, read our guide to tactile vs linear switches. For the best switches at each price point, see our best linear switches roundup.

Keycaps: ABS vs PBT

Keycaps come in two main plastics: ABS (smooth, vivid colours, develops shine over time) and PBT (slightly textured, more durable, resistant to shine). For a first build, PBT doubleshot or dye-sublimated keycaps offer the best durability and value.

5. Case Mount Types Explained

The mount type determines how the plate and PCB assembly connects to the case, which directly affects sound and typing feel.
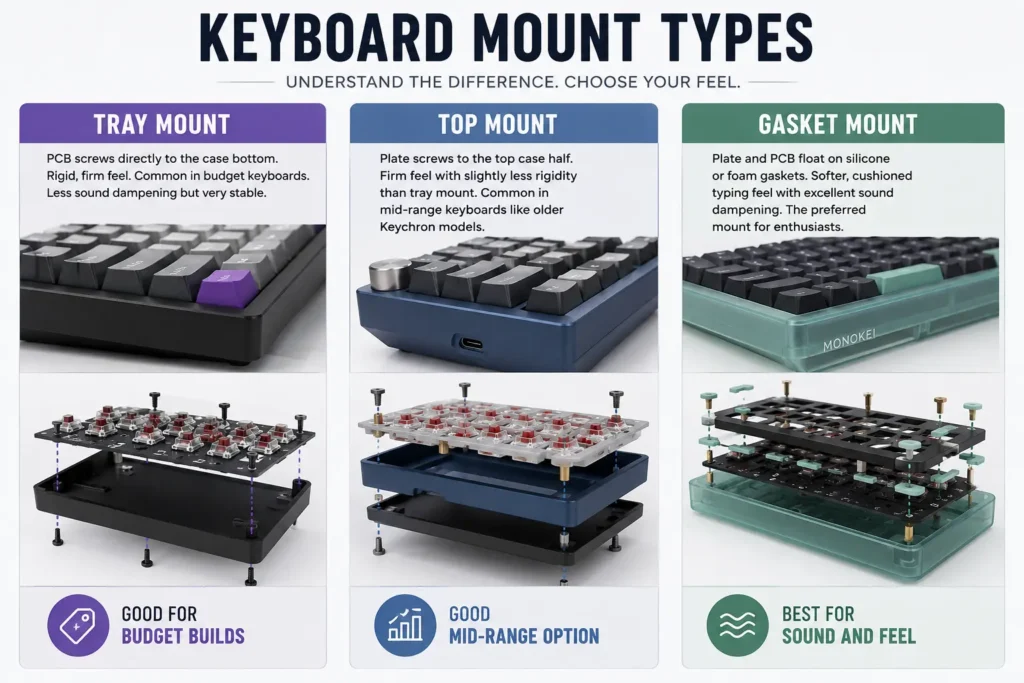
ℹ️ For a first build: Gasket mount is worth paying for if your budget allows, the improvement in sound and feel is immediately noticeable. The KBD67 Lite ($90) offers gasket mount at an entry-level price and is the best-value starting point in 2026.

6. Tools You Need

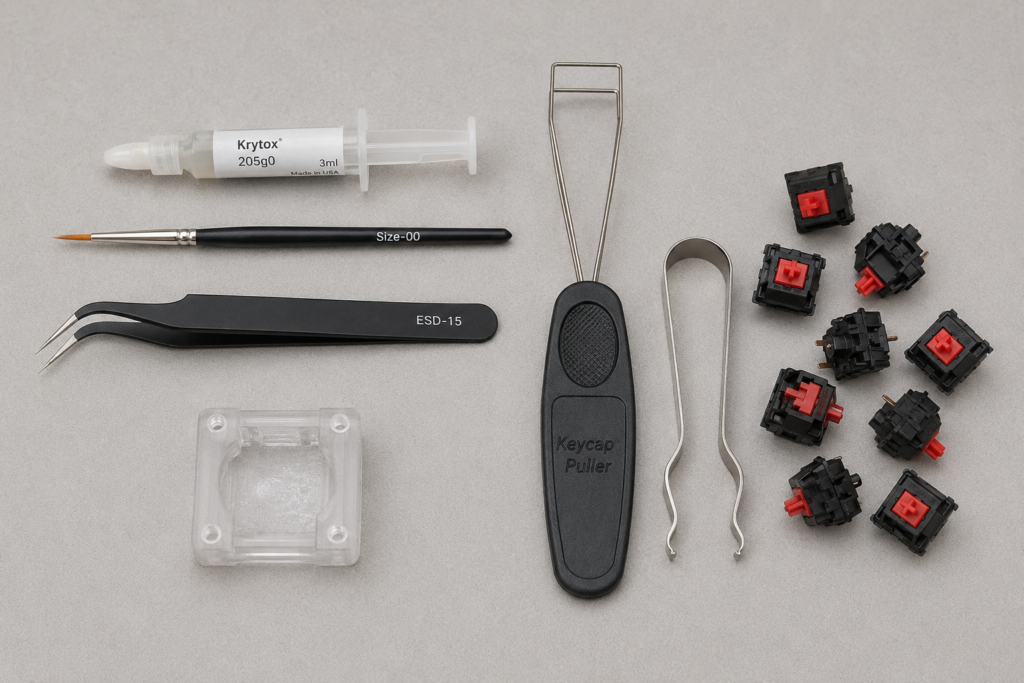
Most of these are one-time purchases that carry across every future build. The switch opener and switch puller are the two items worth buying specifically for this hobby.

  • Phillips screwdriver (#0 and #1), for case screws. A precision set covers both, under $10.
  • Switch opener, for opening switches before lubing. Never use a flathead; it cracks housings. (~$5–8)
  • Fine-tip brush (size 00), for applying lube precisely. (~$3–5)
  • Switch puller, removes and installs hot-swap switches without bending pins. (~$5–8)
  • Wire keycap puller, always wire, never ring-style, to avoid scratches. (~$5)
  • Tweezers, for springs, stabilizer parts, and small components. (~$4)
  • USB-C cable, for PCB testing and firmware flashing.
  • Isopropyl alcohol (90%+), for cleaning parts and fixing lube mistakes.

7. Step-by-Step: How to Build Your Keyboard

This sequence applies to any hot-swappable 65% kit build. The order matters: stabilizers go in before switches, and the PCB is tested before both. Follow it and you will avoid the mistakes that forced me to disassemble my first board three times.

Step 1: Unbox and inventory all parts

Lay everything out on a clean mat. Account for every component: case halves, PCB, plate, all screws, the stabilizer set, foam sheets, and the USB cable. Count your switches, most 65% boards need 68–70. Check keycaps against a layout diagram. It is far better to find a missing part now than three hours into the build.
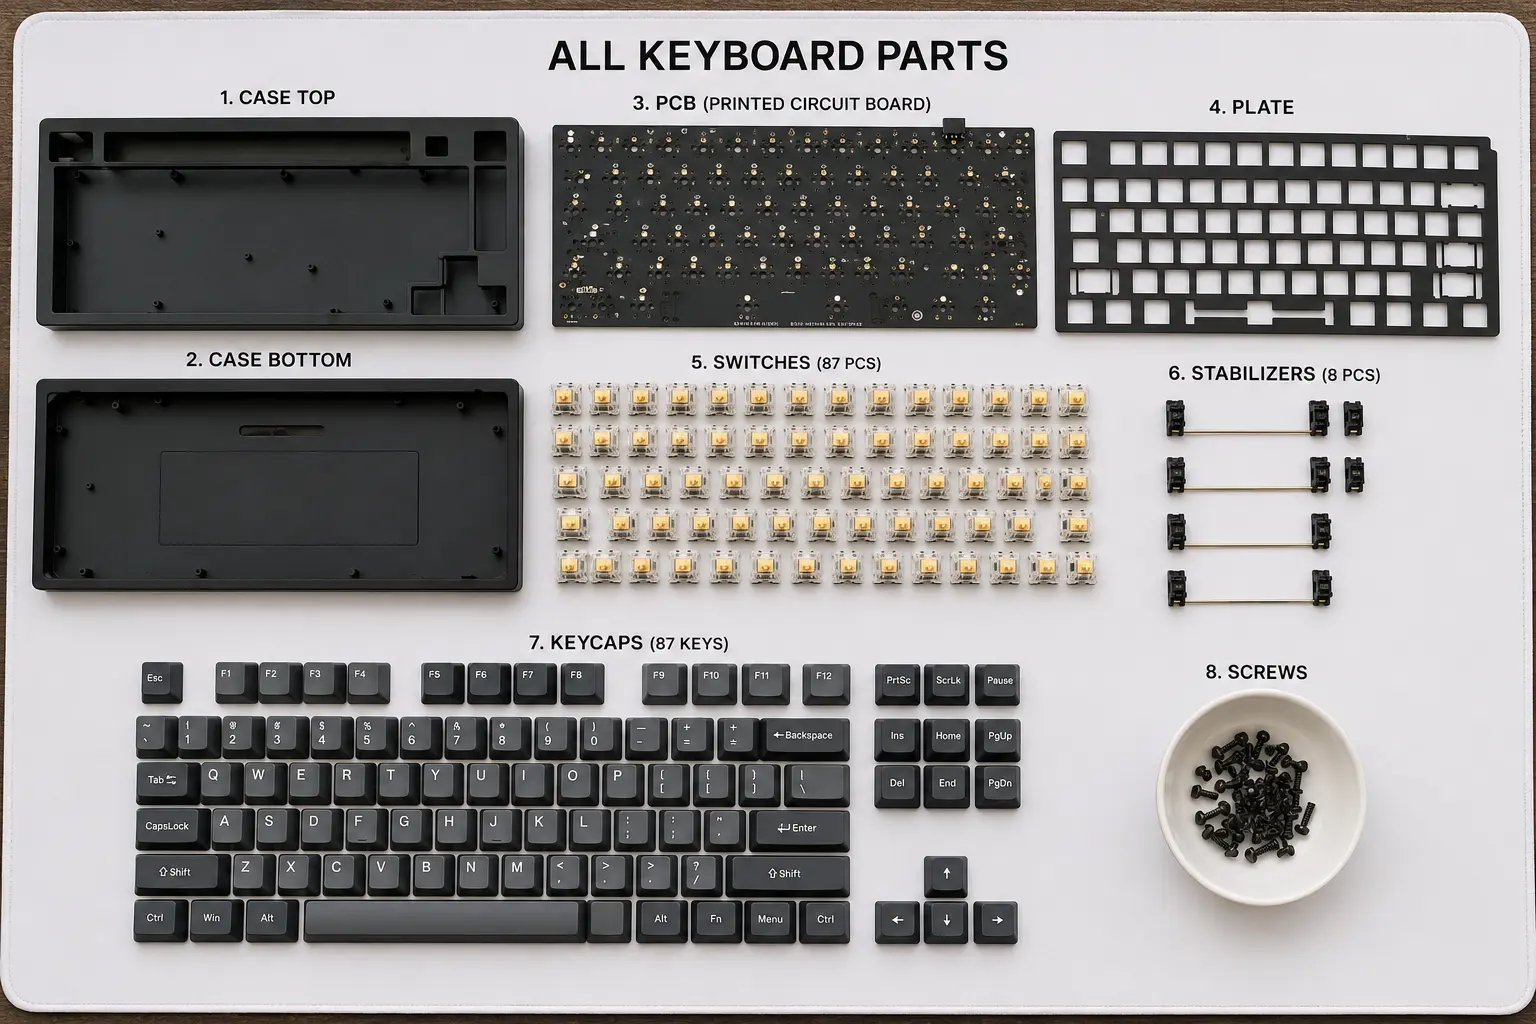
All keyboard parts laid out and labeled
Step 1: Lay out all parts and verify inventory before beginning

Step 2: Lube and prepare stabilizers

This takes 30–45 minutes and is the single most impactful thing you can do for final sound quality. Disassemble each stabilizer into housing, stem, and wire. Apply Krytox 205g0 to the housing interior and stem sides. Apply dielectric grease to both wire ends to eliminate rattle. Apply the band-aid mod to the PCB stabilizer pads. Full instructions in our stabilizer guide.
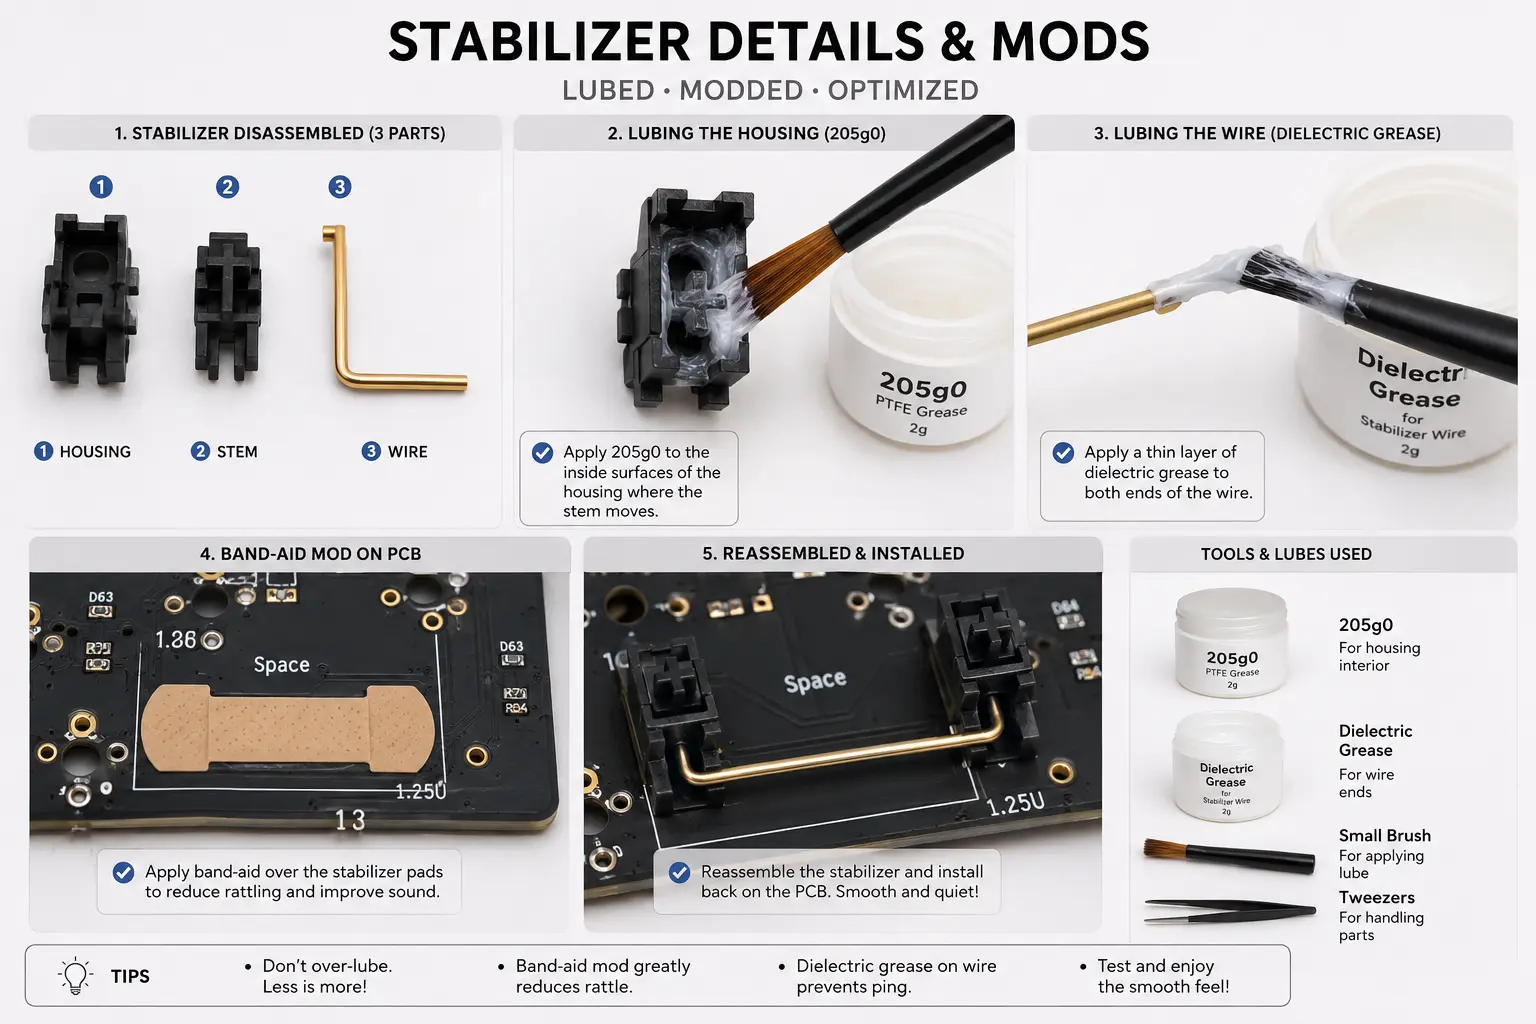
Stabilizer preparation and lubing process
Step 2: Prepare and lube stabilizers for optimal performance

Step 3: Install stabilizers onto the PCB

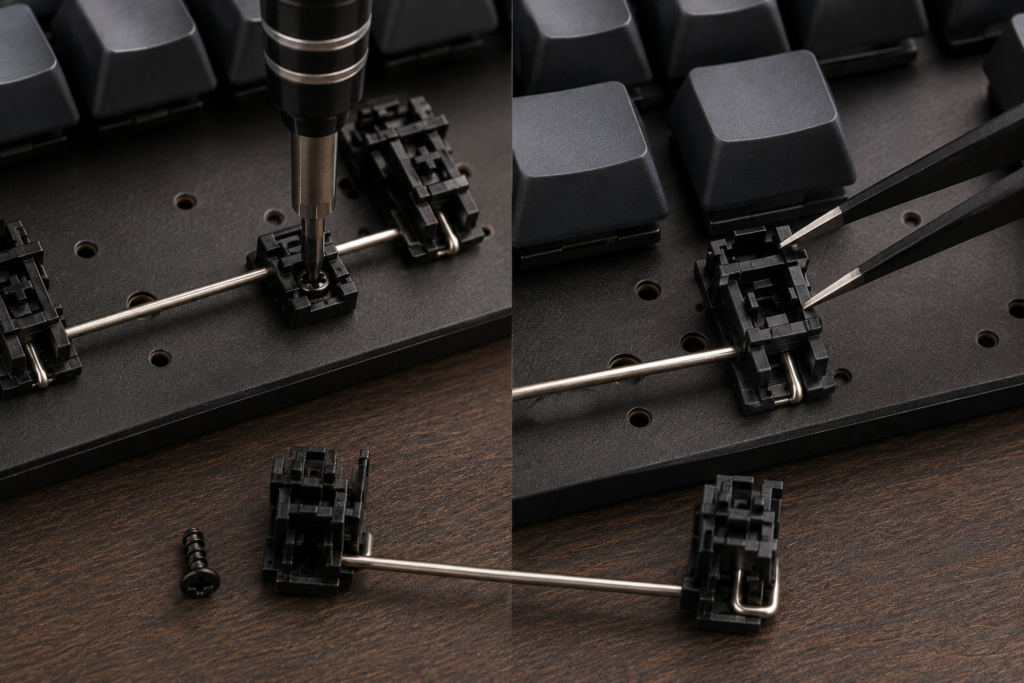
Screw-in stabilizers install through the PCB with a screw on the back and a clip on the front. Insert the clip side first, then thread the screw from the back with a #0 screwdriver. Tighten until snug, but do not overtighten, as PCBs can crack. Wiggle the housings and press the stems; there should be minimal rattle.
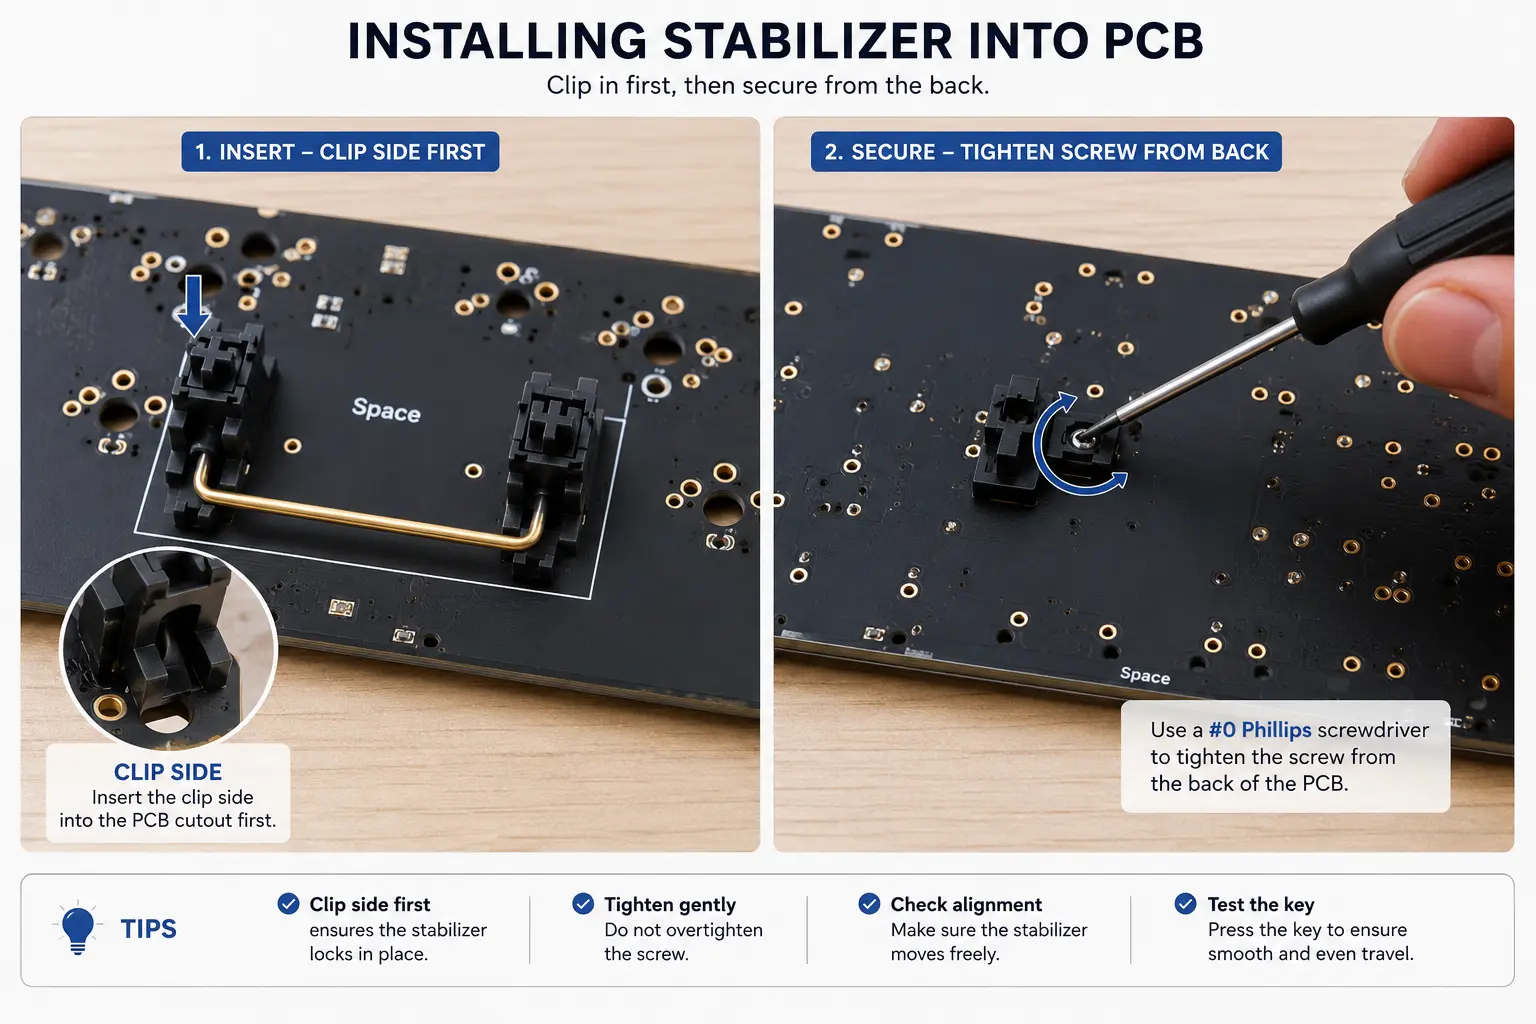
Installing stabilizers onto PCB
Step 3: Install stabilizers securely onto the PCB

Step 4: Test the PCB before installing switches

This saves enormous time. Connect the PCB via USB-C and open a key tester in Chrome. Use metal tweezers to briefly short each hot-swap socket, and every position should register on screen. If one does not, check for debris, a bent socket pin, or a solder bridge. Fix issues now, before switches and keycaps are on.
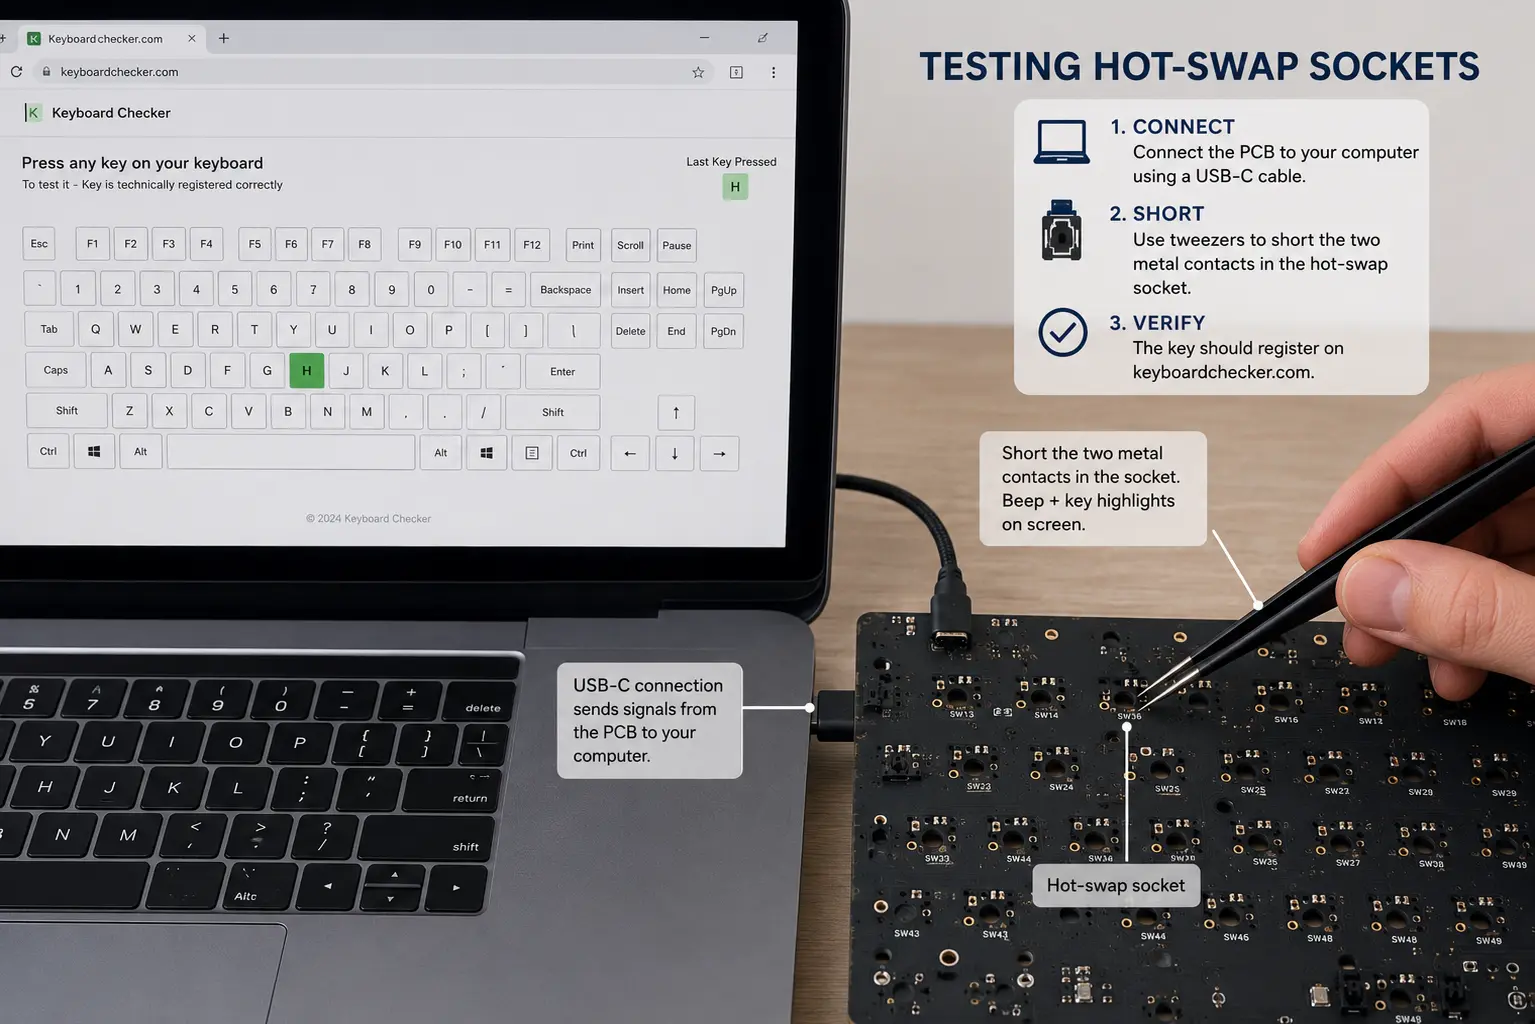
Testing PCB before installing switches
Step 4: Test all PCB positions before proceeding

Step 5: Lube your switches

Open each switch, apply Krytox 205g0 (linear) or Tribosys 3203 (tactile) to the stem and housing rails, lube the springs, and reassemble. This adds 1–2 hours but transforms the result, the difference between lubed and unlubed is immediately audible. Full technique: How to Lube Keyboard Switches.
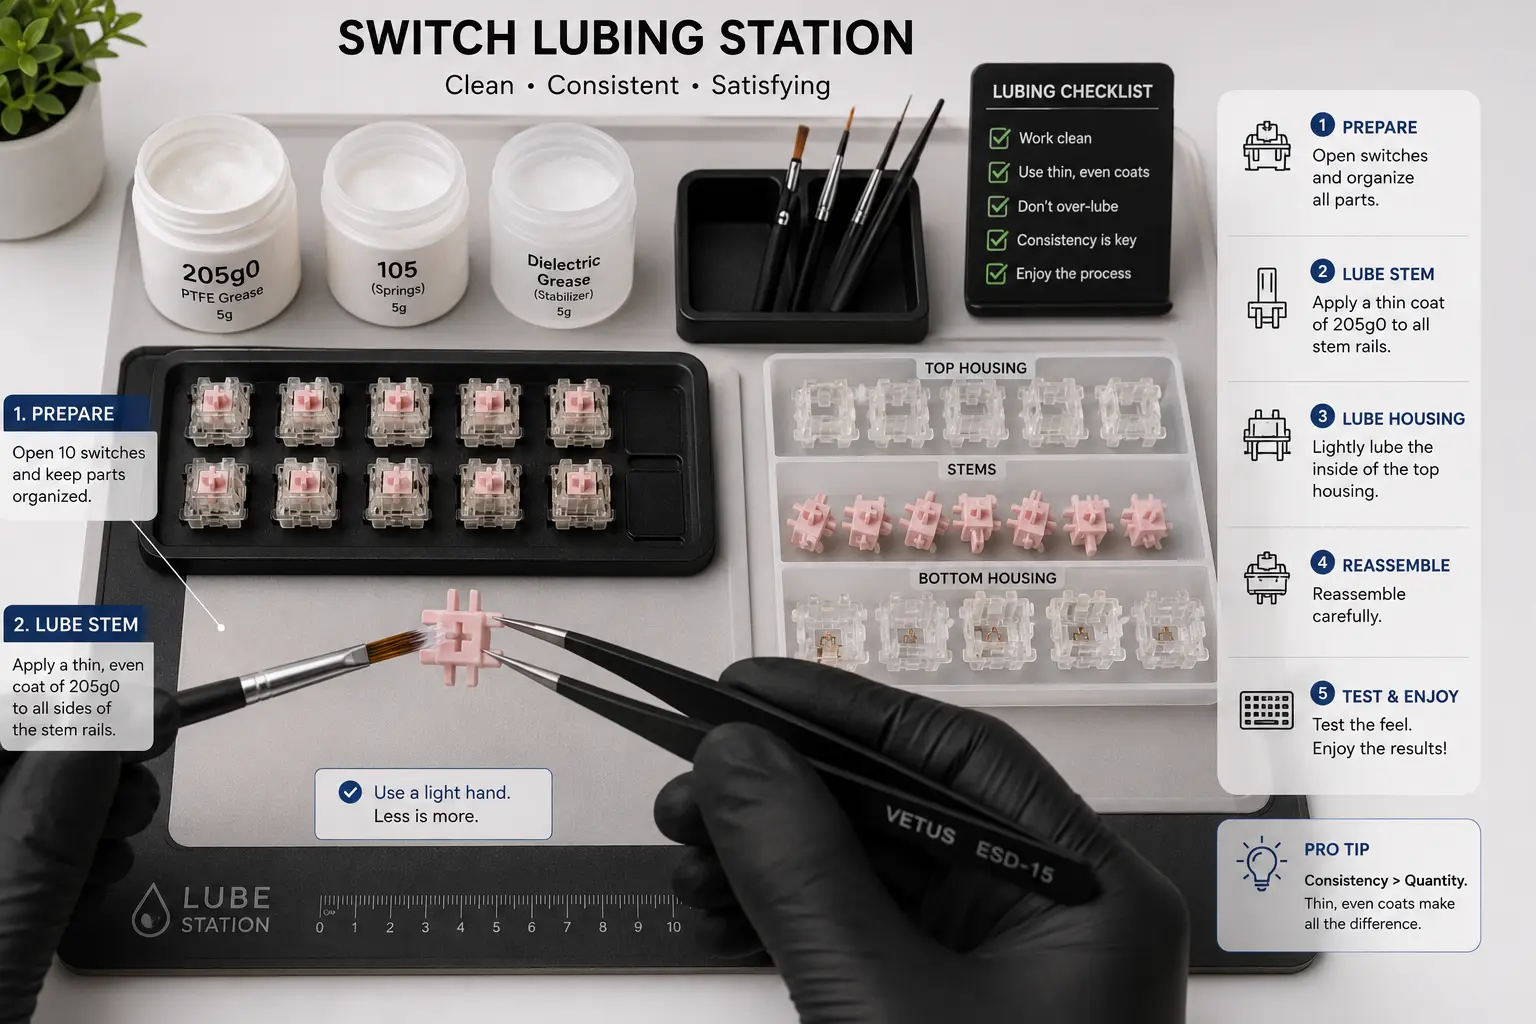
Lubing switches for smooth keystrokes
Step 5: Lube each switch for optimal feel and sound

Step 6: Seat switches into the plate, then press onto PCB

Insert each switch through the plate cutouts until the tabs click. Install all switches into the plate first, then align the assembly above the PCB, making sure every pin lines up with a socket. Press down firmly and evenly from the center outward. Do not force switches in at an angle; that bends pins.
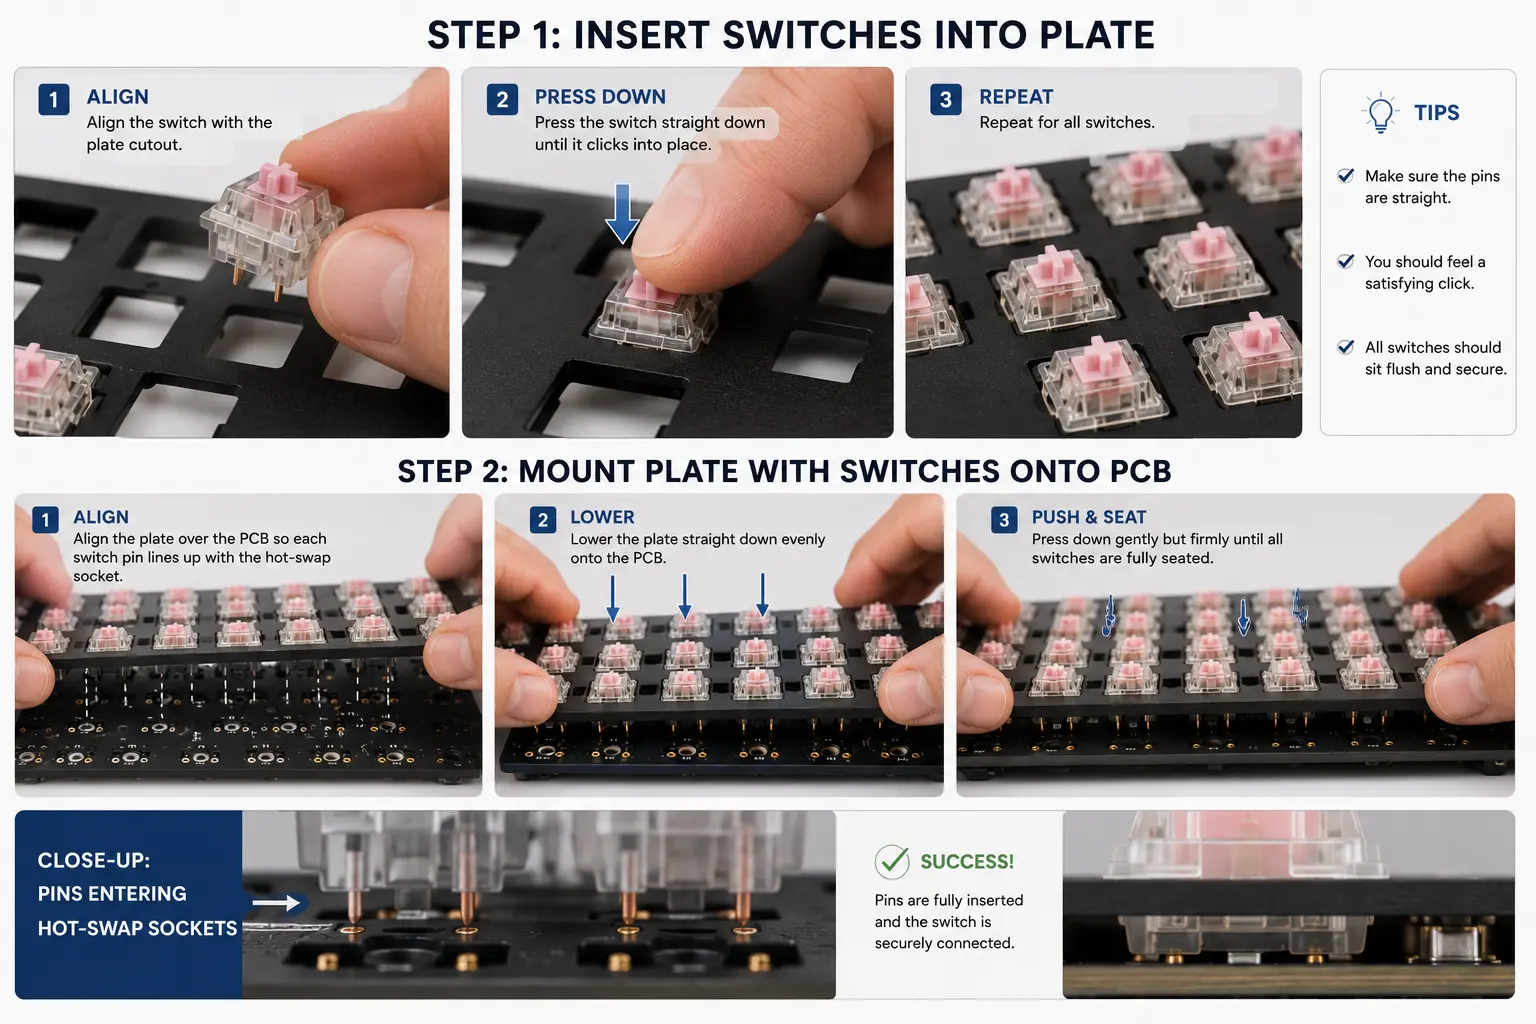
Installing switches into plate and PCB
Step 6: Install switches into the plate, then press onto the PCB

Step 7: Add foam dampening (optional but recommended)

Before closing the case, add sound dampening. Case foam reduces hollowness. PCB foam tightens the sound. The PE foam mod (a thin sheet on top of the PCB before switches) produces the warm, poppy sound popular in 2024–2026. Cut foam to your PCB layout and place it before the next step.
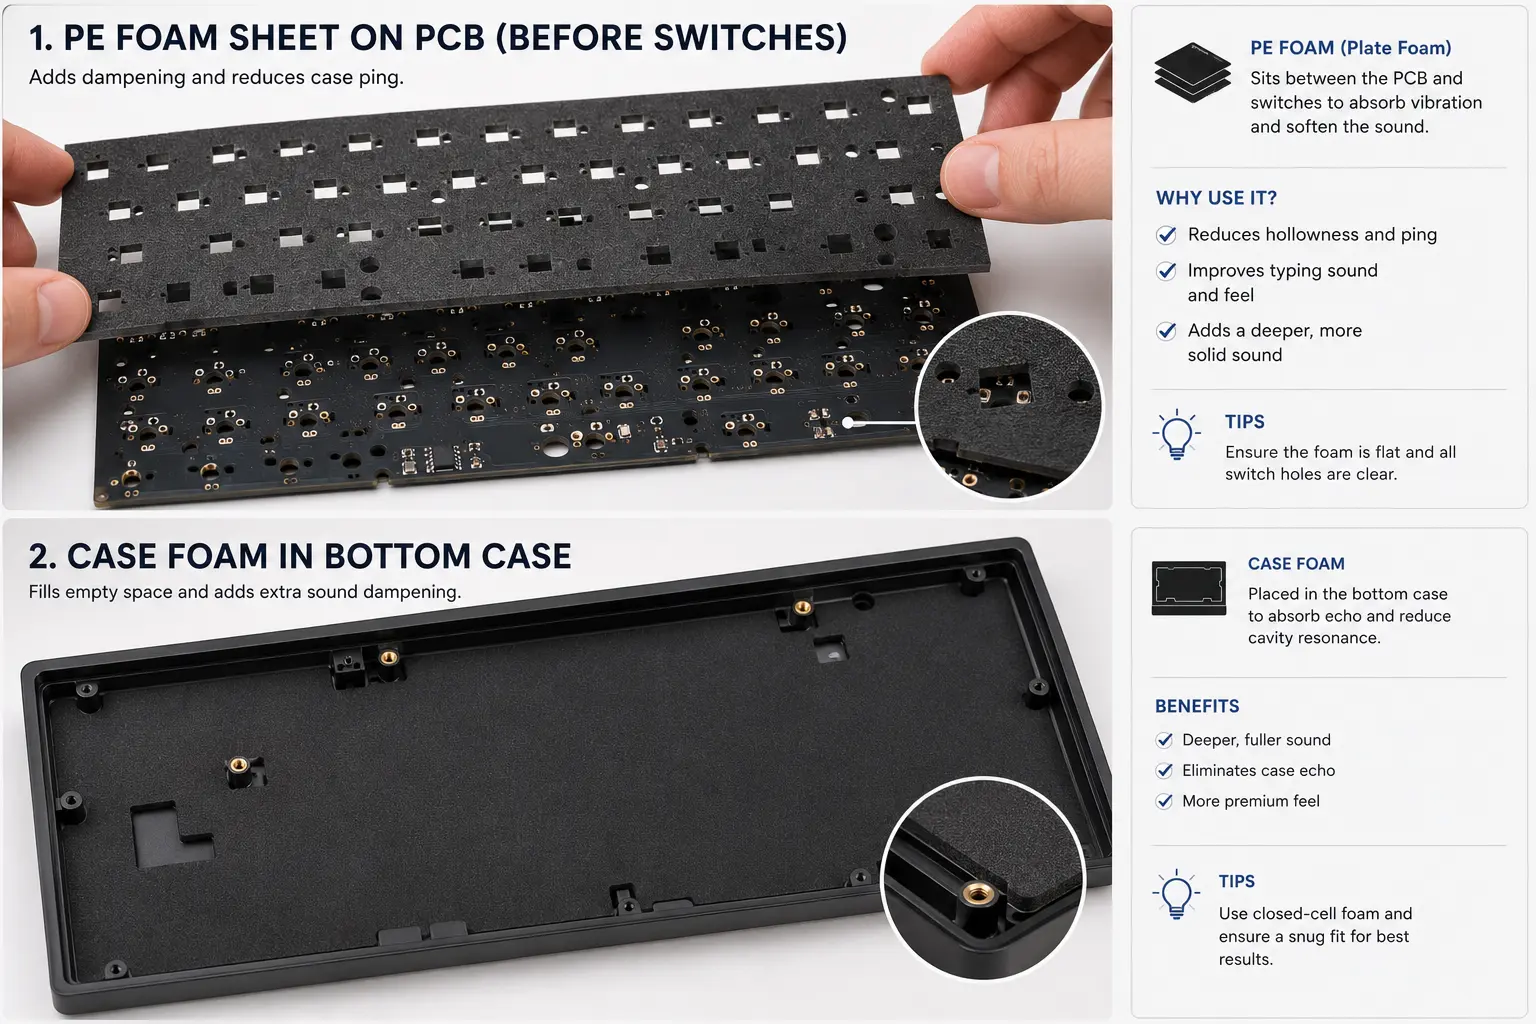
Adding foam dampening to keyboard
Step 7: Add foam layers for improved sound and feel

Step 8: Assemble the case

For gasket mount, align the gasket strips with the case channels before pressing the halves together. Thread all case screws by hand first, then tighten in a star pattern for even pressure. Finger-tight plus a quarter turn is enough. Overtightening warps PCBs and strips threads.
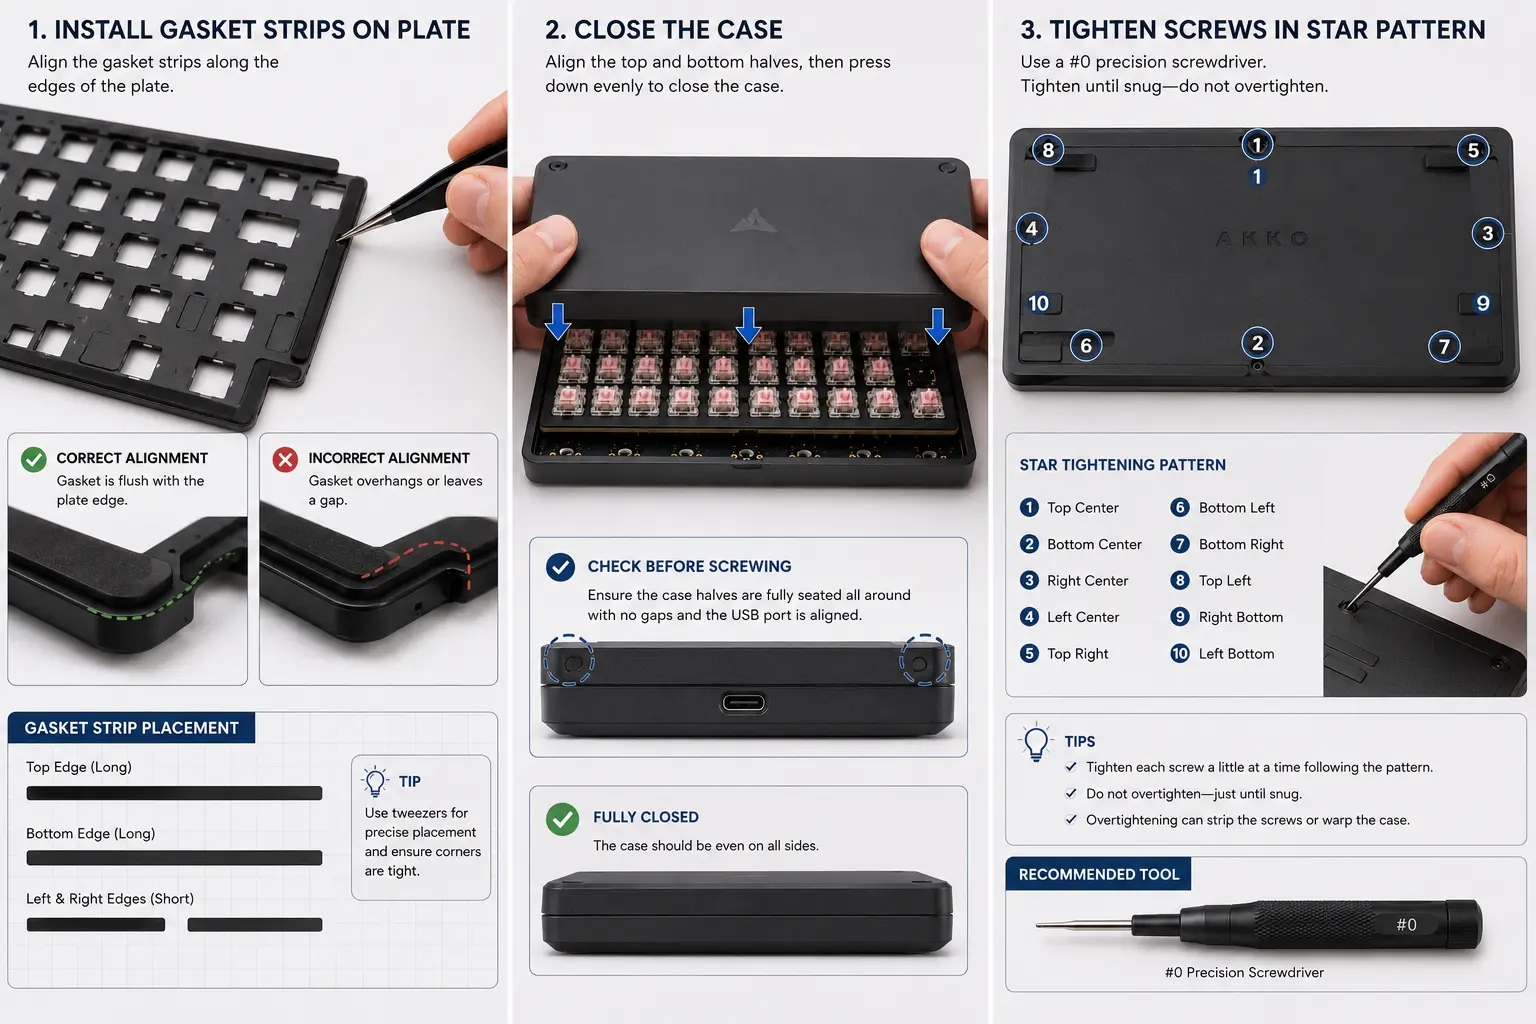
Assembling the keyboard case
Step 8: Assemble case halves and secure with proper torque

Step 9: Install keycaps and run final test

Press keycaps onto the stems, alphas first, then modifiers, then special keys. Once all are on, connect the board and open a key tester. Press every key and confirm it registers. Test stabilized keys and listen for rattle. If a key is dead, pull the switch, check for a bent pin, straighten, and reinstall.
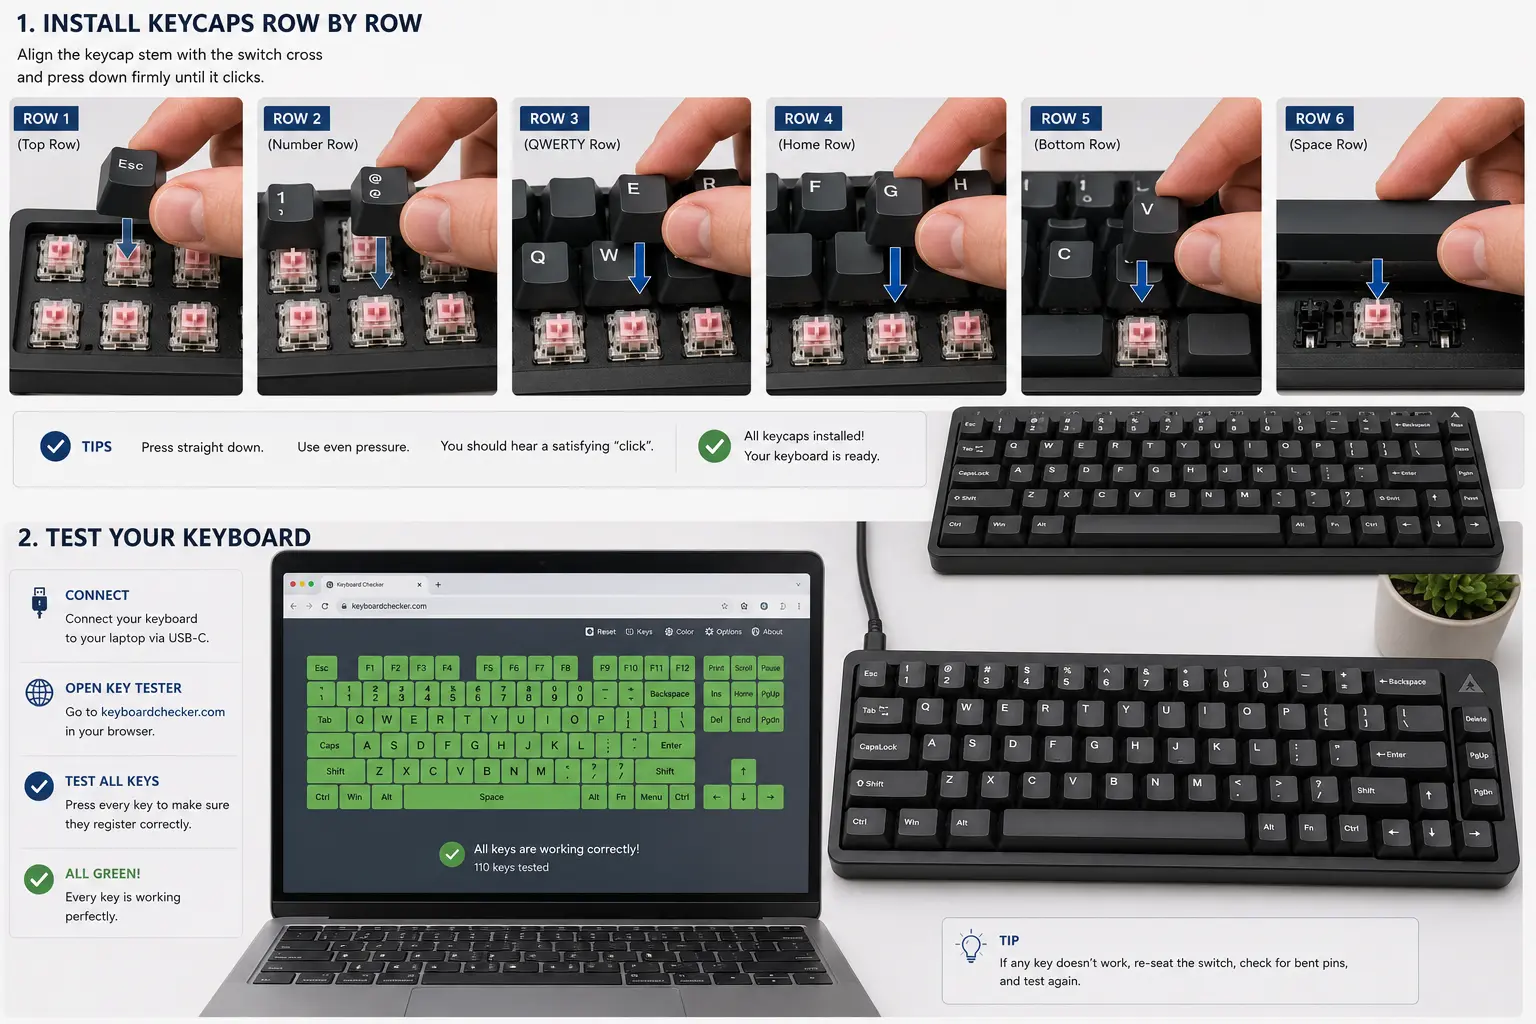
Installing keycaps and testing the keyboard
Step 9: Install keycaps and test every key

8. Common Beginner Mistakes

🚫 Not testing the PCB first. A dead key found after assembly means removing keycaps and switches to diagnose, 20 minutes. Testing takes 5 minutes before assembly. Always test first.

🚫 Skipping stabilizer lubing. An unlubed spacebar in an otherwise great build sounds like a rattling tin can. Budget 30–45 minutes and do it properly, it cannot be shortcut.

⚠️ Overtightening case screws. Screws only need to be snug. Overtightening warps PCBs, strips threads, and can crack polycarbonate cases. Finger-tight plus a quarter turn is correct.

💡 Buying cheap stabilizers. This is the one place where spending $5 more makes a disproportionate difference. Durock V2 or TX stabilizers ($15–25) are dramatically better than generic bundled ones. Upgrade these before anything else.

9. Firmware: VIA and QMK

Most modern PCBs ship with QMK pre-flashed and VIA enabled, so you can remap keys on first connection, no coding required.

Using VIA (recommended for beginners)

VIA is a browser-based tool that connects over USB and lets you remap keys, create layers, and assign macros visually, no install, no code. It requires Chrome (Web USB). Changes save to the keyboard’s onboard memory and persist unplugged. Learn more in our guide to QMK and VIA.

Using QMK (advanced)

QMK is the open-source firmware underneath VIA, giving access to per-key RGB, tap-dance, combos, and custom functions. The trade-off is compiling from source. The official QMK docs are excellent, but for a first build, use VIA.

10. Frequently Asked Questions

How much does it cost to build a custom mechanical keyboard?

A solid entry-level build costs $100–180. A mid-range build with gasket-mount case, premium switches, and quality keycaps costs $200–350. Enthusiast builds start at $400 and climb. The sweet spot for most beginners is $150–200.

Is building a custom keyboard hard for beginners?

A hot-swap build is beginner-friendly, no soldering. If you can follow instructions and assemble flat-pack furniture, you can build a keyboard. Budget 3–4 hours, work carefully, and test the PCB before installing switches.

Do I need to solder to build a custom keyboard?

No, hot-swap PCBs require zero soldering. Switches press into metal sockets on the PCB. Look specifically for “hot-swap” in the product listing.

What switches should I choose for my first build?

For linear, Gateron G Pro 3.0 or Gateron Oil King. For tactile, Boba U4 (silent) or Gateron Brown Pro 3.0. Unsure? Read our full comparison first.

What is a gasket mount keyboard and should I buy one?

A gasket mount suspends the plate and PCB on gaskets instead of screwing them rigidly to the case, creating a softer feel and better dampening. Worth choosing if sound and feel are priorities. The KBD67 Lite offers it at $90.
⚡ Quick answer

To film a switch, open it, drop a thin plastic film onto the bottom housing so it fills the gap between the two halves, then reassemble. Filming reduces housing wobble and tightens the sound. Not sure whether your switches even need it? Read what switch films are and whether you need them first, then come back here for the how-to.

This guide is the step-by-step. If you have your films and want to get filming, everything you need is below.

What you need

  • Your switches and a set of switch films (usually 0.15mm to start)
  • A switch opener (do not use a flathead, it cracks housings)
  • Tweezers for handling the film
  • A clean, well-lit workspace and a tray to catch springs

Step-by-step: how to film a switch

  1. Open the switch. Set it in the switch opener and press down to pop the top housing off the bottom. Set the stem and spring aside so nothing gets lost.
  2. Place the film. Lay the film onto the rim of the bottom housing. Most films have cutouts that line up with the internal posts and the gold contact leaf. Line them up and do not cover the leaf.
  3. Check the fit. The film should sit flat and flush against the rim, with no overhang, lifting, or wrinkling. Nudge it with tweezers until it seats cleanly.
  4. Reassemble. Drop the spring and stem back in, then snap the top housing on. It should close with a normal press. If it needs real force, the film is too thick, so switch to a thinner one.
  5. Test it. Press the switch a few times. A filmed switch should feel noticeably tighter with less side-to-side wobble than before.

Repeat for each switch. A full board takes 1 to 2 hours once you find a rhythm.

Pro tips

  • Film before you lube. Handle the dry housing and film first, then apply lube after the film is seated. If you plan to lube too, our switch lubing guide covers the next step.
  • Start with 0.15mm. It suits most switches. Go thinner (0.125mm) if reassembly feels tight, thicker (0.2mm) only for very loose housings.
  • Do a test batch of five before committing to the whole board, so you can confirm the thickness is right.

Common mistakes to avoid

  • Covering the contact leaf with the film, which stops the switch registering. Keep the leaf area clear.
  • Forcing a too-thick film, which raises the top housing and can bind the stem. Drop to a thinner film instead.
  • Wrinkled or overhanging film, which prevents a clean close. Reseat it flat.

Frequently asked questions

How long does it take to film a keyboard’s switches?

About 1 to 2 hours for a 60 to 80 key board, similar to lubing. It goes faster once you settle into a rhythm.

Should I film or lube first?

Film first, then lube, since both need the switch open and lube would get in the way of seating the film cleanly.

What thickness film should I use?

Start with 0.15mm. It works for most switches; go thinner or thicker only if reassembly is too tight or the housing is very loose.

Do all switches need filming?

No. Tight, premium switches gain little. See our switch films explainer for how to tell if yours will benefit.

The bottom line

Filming is simple once you have the rhythm: open, seat the film, reassemble, test. Start with a small batch at 0.15mm, film before you lube, and keep the contact leaf clear. Done right, your switches will feel tighter and sound cleaner.


We keep our how-to guides updated as tools and techniques change.

⚡ Quick answer: To lube keyboard stabilizers, identify whether your board uses screw-in, PCB clip-in or plate-mounted stabilizers, then disconnect it and remove only the parts your design allows. Clean old lubricant if needed. Apply a thin coat of plastic-safe grease to sliding surfaces and a small amount to each wire end where it moves in the stem. Reassemble, test travel and add lubricant only if a specific rattle remains. If a key sticks, stop and run the binding checks. Padding and wire balancing are optional diagnosis-led steps, not prerequisites.

There is a specific sound that every keyboard builder dreads: that hollow, metallic clatter on the spacebar that makes an otherwise excellent keyboard sound like a toy. You lube your switches, you foam the case, you install a nice brass weight, and then you press the spacebar and it goes clack-rattle-clank. All of that careful work undone by two bent pieces of wire.

Stabilizers are the most underappreciated component in a mechanical keyboard build. They are not glamorous. Nobody posts about them on social media. There are no enthusiast-grade stabilizer colorways or artisan wire-bending studios. And yet they are responsible for a disproportionate amount of the acoustic character of your finished board, for better or worse.

I have modded stabilizers on more than 20 builds, from cheap boards with factory clip-ins to high-end ones with Durock V2s and Gateron Inks, and every last one needed proper lubing to sound right. Everything I have picked up along the way is here: which lubes actually work, how to apply them, the order that matters, and the optional mods that take a decent stab job to a much quieter one. If your stabilizers already rattle or stick, start with the symptom table below to find the cause first.

Illustration of a keyboard stabilizer

Start here: match the symptom to the cause

Stabilizer noise and stickiness have a handful of distinct causes, and each needs a different fix. Take the keycap off, press the stabilizer stem by hand, and match what you hear or feel to the table before you open anything up.

What you noticeMost likely causeQuick checkFix
Metallic tick or rattle when pressing or releasingDry or loose wire ends in the stemsKeycap off: press each stem and listen at each endThick grease on the wire ends (step 7); Holee mod if it persists
Hollow clack at the bottom of the pressHousing movement, keycap impact or another hard-contact pointPress slowly, then inspect the mount and listen with the keycap removedReseat the housing; consider thin padding only at a confirmed contact point (section 7)
Scratchy or gritty travelDry stem and housing, or old factory greaseSlide one stem up and down without the wireClean, then 205g0 on stem and housing (steps 3, 5, 6)
Key sticks, returns slowly or feels heavy (binding)Misaligned or loose housing, bent wire, too much grease, or a tight keycapRun the stop-if-binding checks belowFix the cause found; never force it
One end lower than the other, or tiltsWire out of balance, or one housing not fully seatedPress each end separately; compare depthReseat the housing; balance the wire (section 8)
Rattle from only one endWire not fully clipped into that stemLook at the stem: the wire should sit fully in the channelUnclip and re-seat the wire end
Housing lifts or wobblesClip-in tab not engaged, or screw loose or strippedPush gently on the housing with the keycap offRe-clip or tighten; replace if the hole is stripped
Spacebar won’t fit or binds on the stemsWrong spacebar size or stabilizer spacingMeasure the keycap and stem spacingSee our spacebar sizes guide

If a key sticks: stop-if-binding checks

Binding means a stabilized key sticks, returns slowly or drags on one side. It usually means something is out of line, so stop pressing as soon as you feel it: forcing a binding key can bend the wire, crack a housing or pull a hot-swap socket off the board. Work through these checks in order and stop at the first one that finds the problem.

  1. Take the keycap off. Press the stabilizer stems by hand. If the binding disappears, the keycap is the problem: its stems may be too tight, or it may be the wrong size for your stabilizer spacing.
  2. Check both housings are fully seated. Clip-in housings should sit flat with the tab clicked in. Screw-in housings should not move at all. A half-seated housing holds its stem at an angle.
  3. Check the wire is clipped into both stems. Each wire end should sit fully in its stem channel. A wire riding on the edge of a channel binds and rattles.
  4. Check for over-tightened screws. On screw-in stabilizers, back each screw off slightly. Over-tightening can squeeze the housing and pinch the stem.
  5. Check the wire is straight. Remove it and lay it on a flat surface. If either end lifts or the wire twists, straighten it gently or replace it.
  6. Check for excess grease. Thick grease on the stem (rather than just the wire ends) makes keys slow and heavy. Clean the stem and housing and re-lube thinly.
  7. Still binding? Swap in a known-good stabilizer. If the problem moves with the stabilizer, replace it; if it stays, check the plate or PCB cutout for damage or debris.

⚠️ Stop and don’t force it if: the keycap needs real pressure to go on, a housing flexes when you press, a screw keeps turning without tightening, or you hear a crack. Each of these means something will break if you keep going.

1. Why stabilizers rattle (and why it is not the switches)

Rattle is not one problem, it is four, and each one has its own fix. Figuring out which you are actually hearing saves you from lubing the wrong part and wondering why the noise will not go away.

🔗 Wire-to-stem contact
The most common cause. The bent metal wire hooks rattle inside the plastic stem channel during every keystroke. Fix: reseat the wire, then use a small amount of compatible grease where each hook moves in its stem channel.

🏠 Stem-to-housing friction
The plastic stem slides up and down inside the housing with inadequate lubrication. This creates scratchiness and a slight clatter on return. Fix: Krytox 205g0 on all stem surfaces and inner housing walls.

💥 Bottom-out impact
A hollow clack can come from the keycap, housing, plate or case. Locate the contact before changing anything. Fix: reseat a loose mount; add a thin nonconductive pad only where an actual hard impact is identified.

⚖️ Wire imbalance
If the wire is not perfectly centered, one side of the keycap bottoms out before the other, creating a wobbly, inconsistent feel and sound. Fix: wire balancing, gently bending the wire until both sides are level.

💡 Worth knowing: lubing your switches does nothing for stabilizer rattle. These are entirely separate systems. A rattly stabilizer can remain distracting even when the switches are quiet. Diagnose the long keys separately and fix only the source you hear.

2. Types of stabilizers: which one do you have?

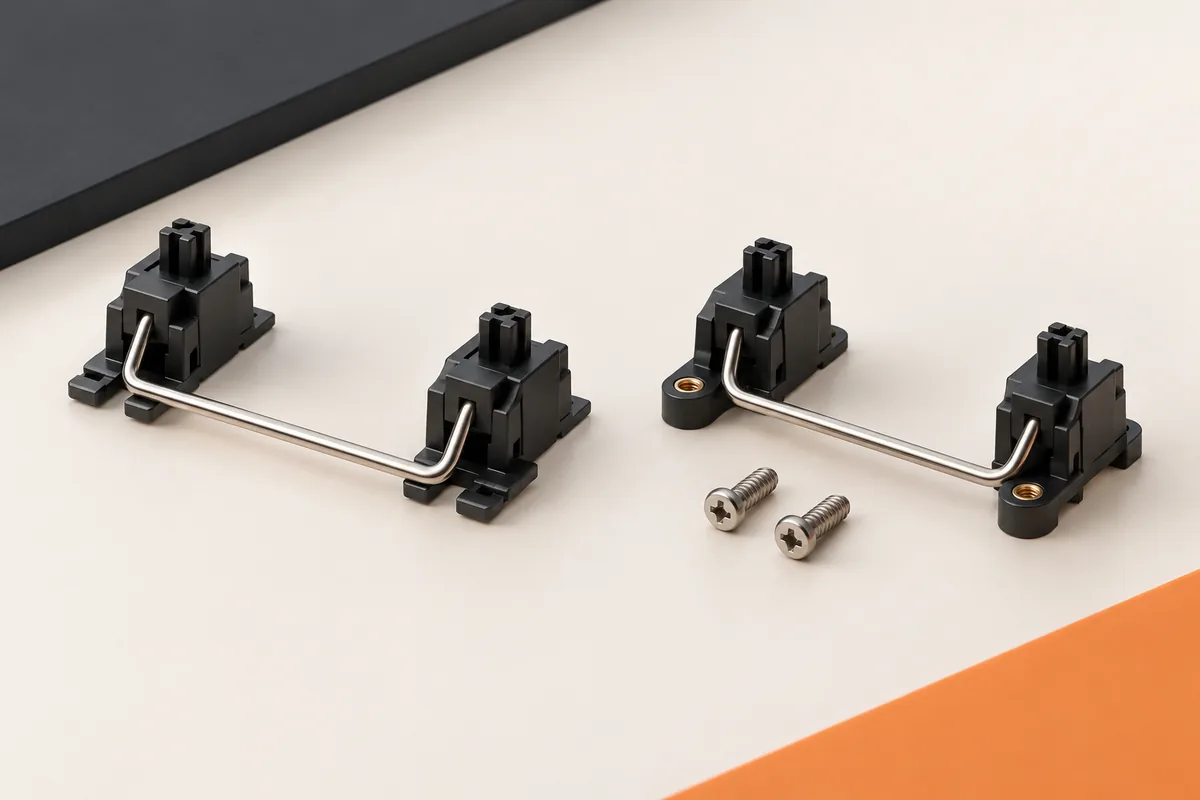
The sliding parts can be lubricated in similar ways, but removal and mounting differ among screw-in, PCB clip-in and plate-mounted stabilizers. First check the board manual and whether disassembly is required. The wrong removal method can damage your PCB or break the stabilizer tabs.

⭐ Recommended
🔩 Screw-in (PCB mount)
Held by a small screw that goes up through the PCB from underneath into the housing. The most stable design, with no wobble during keystrokes. Found on many quality boards. To check, look at the back of the PCB: you’ll see a screw head under each stabilizer. These are the gold standard and worth upgrading to if your board supports them.

Common
📎 Clip-in (PCB mount)
Hook into a cutout in the PCB at one end and lock with a springy tab at the other. No screws, but more prone to movement under heavy use. Found on many budget and mid-range boards. To remove, press the tab and lift that end first, then slide the hook out. Can be upgraded to screw-in on compatible PCBs.

Less common
🔧 Plate-mount
Clips into holes in the keyboard plate rather than the PCB. Common on older keyboards and some budget gaming boards. Its fit depends on the plate cutout and clips. It can be tuned successfully, but remove it from the plate rather than looking for PCB screws or clips. Check the exact design before adding padding.

Custom builds
🏗️ Integrated / custom
Some premium custom keyboards use proprietary stabilizer designs: Topre-style or Alps-style stabilizers, or plate-integrated solutions. These require different lubricants and techniques. This guide covers standard MX-compatible stabilizers, which account for the vast majority of the market.

⚠️ Not sure which type you have? Remove the spacebar keycap and look at the stabilizer. Screw heads on the back of the PCB under each stabilizer mean screw-in. A hook and a springy tab through the PCB, with no screw, mean clip-in. Attached to the metal plate rather than the circuit board means plate-mount. When in doubt, check your keyboard’s product page or Reddit’s r/MechanicalKeyboards.

Screw-in, clip-in and plate-mount stabilizers, side viewThree side views. Screw-in: the stabilizer housing sits on top of the circuit board and a screw goes up through the board from underneath into the housing. Clip-in: the housing hooks into a cutout in the circuit board at one end and is held by a springy tab at the other, with no screw. Plate-mount: the housing clips into the metal plate above the circuit board instead of the board itself.Screw-in (PCB mount)Clip-in (PCB mount)Plate-mountscrew goes in from UNDER the PCBmost stable; needs the PCB out to removePCBhookspringy tabhook + tab through a PCB cutoutno screw; press the tab to removeplateclips into the plate, not the PCBcommon on older and budget boardsSimplified side views; housing shapes vary by brand.
How each stabilizer type is held: screw-in stabilizers are screwed in from under the PCB, clip-in stabilizers hook through a PCB cutout, and plate-mount stabilizers clip into the plate.

3. Stabilizer anatomy: what to lube, what to avoid

A typical MX-style stabilizer has housings, stems and a connecting wire. Lubricate only surfaces that actually rub, and keep grease away from the PCB and switch contacts.

🏠 Housing (×2) · Lube: 205g0
The outer plastic shell that mounts to the PCB or plate. Contains the vertical channel the stem slides through. Apply a thin film of plastic-safe grease to the sliding contact surfaces. Keep it off the PCB and avoid pools of grease at the bottom.

🔲 Stem (×2) · Lube: 205g0
The white or clear plastic piece that slides inside the housing, with a hook channel at the top for the wire. Lube all four outer sides, the top cap face, and crucially the interior of the hook channel where the wire sits.

〰️ Wire (×1) · Lube: XHT-BDZ
The steel wire connecting both housings and stabilizing the keycap. The two bent hook ends are the primary source of rattle. Coat the moving contact area lightly with a plastic-safe grease. A thicker grease is an option for a loose wire, but excess can slow the key.

🔩 Mounting screw · Do not lube
The small Phillips screw that secures screw-in stabilizers to the PCB. Do not apply lubricant to it: it can cause the screw to slip, loosen over time, or damage the mounting hole. Tighten firmly but do not overtighten, as the PCB material is fragile.

4. Best lubes for stabilizers: the complete comparison

You can tune a stabilizer with one suitable plastic-safe grease; some builders prefer a thicker grease specifically for the wire ends. Use a light amount first and test each key. Excess grease can slow return, cause binding or migrate onto the PCB.

MaterialWhere it can helpPractical limit
Plastic-safe medium grease, such as Krytox GPL 205g0Thin film on stem rails and housing contact surfaces; a small amount at the wire hooks can also be triedStart sparingly. Remove excess if travel slows.
Thicker plastic-safe grease, such as XHT-BDZ or suitable dielectric greaseWire ends where they move inside the stem channelsUse only enough to coat the contact area; packed grease can make a key sluggish.
Light oilNot a first choice for an exposed stabilizer wire channelIt may migrate; follow the stabilizer maker’s instructions.
General-purpose sprays or unverified household lubricantsSkip for this procedureMaterial compatibility and application control are uncertain. Follow the product’s material guidance.

Keychron recommends its 205-style lubricant for both the wires and inner housings of its unlubed PCB stabilizer set, showing that a second grease is optional rather than mandatory. KBDfans advises applying lubricant sparingly and checking seating, wire balance and excess material when a long key still rattles or binds. See Keychron’s stabilizer instructions and KBDfans’ stabilizer diagnosis.

5. Stabilizer fixes by symptom

Lubrication is only one possible fix. The table below lists common modifications, but their usefulness depends on whether the noise comes from a wire, housing, keycap or mounting problem.

SymptomFirst checkPossible fix
Metallic tickWire seated at both stems?Reseat; use a small amount of grease at the hook contact
Scratchy travelStem slides freely without the wire?Clean and apply a thin film to sliding surfaces
One-sided noiseBoth housings flat and wire even?Reseat; balance only if the wire is actually bent
Hollow impactWhich surface makes contact?Correct the mount; use thin padding only if a hard contact is confirmed
Slow return or bindingExcess grease, padding or misalignment?Remove excess, then retest before closing the case

💡 Where to start: start by seating the housing and wire correctly. Apply a small amount of lubricant only where friction or rattle remains, then test. Padding and wire balancing are optional fixes for specific diagnosed problems.

6. Step by step: how to lube keyboard stabilizers

🛠️ Supplies checklist: plastic-safe grease suitable for your stabilizer · small brush · keycap puller · tweezers · screwdriver only for screw-in designs · cotton swabs and cleaning material suitable for the parts. Optional: a thicker compatible grease for loose wire ends and thin nonconductive padding for a diagnosed contact point. Disconnect the board before opening it.

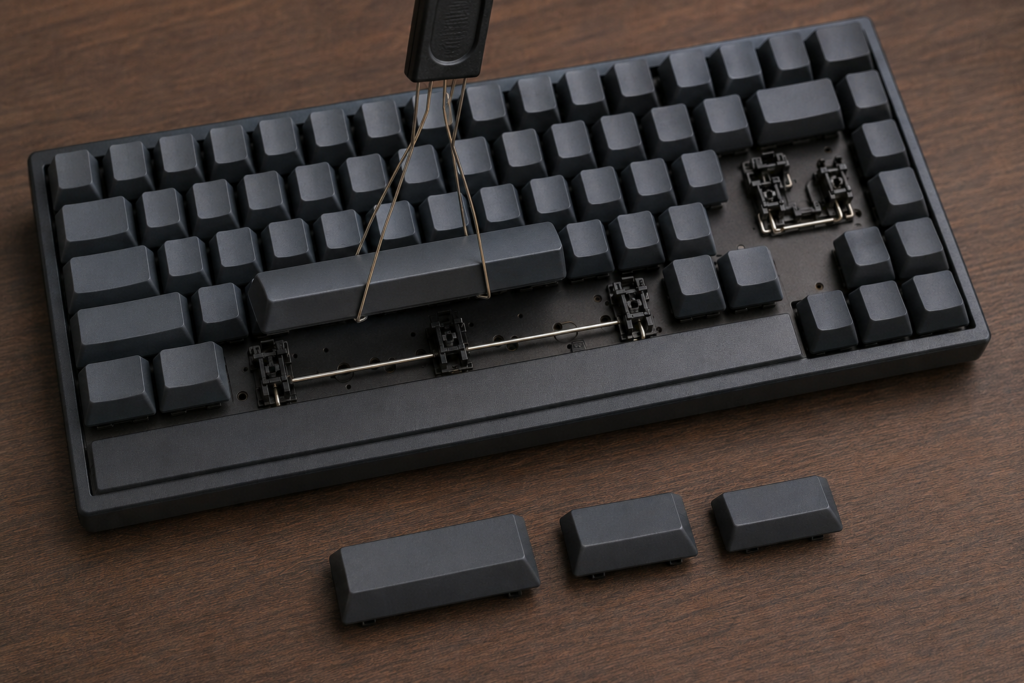
Step 1. Remove large keycaps and identify all stabilizers

Use a wire keycap puller to remove all stabilized keys: spacebar (typically 6.25u), left and right shift, enter, backspace, plus end-column keys on full-size boards. Lay them aside carefully, as these are the largest keycaps and most prone to scratching. Count your stabilizers before removal so you know what to expect: most 65% keyboards have 3 or 4, full-size boards have 7 to 9.

Removing the spacebar and other large keycaps with a wire keycap puller to expose the stabilizers

Step 2. Remove stabilizers from the PCB

For screw-in stabilizers: the screws are on the underside of the PCB, so take the PCB out of the case first (on hot-swap boards, pull the switches if they block access). Remove the screw under each housing with a small Phillips screwdriver, keep the screws (and any washers) in a small container, then lift the housing off the top of the PCB.

For clip-in stabilizers: press the springy tab with tweezers or a small flathead and lift that end of the housing, then slide the hooked end out of the PCB cutout. Do not force it. If the tab is still engaged, the housing will not release cleanly.

Removing a keyboard stabilizer housing from the PCB

Step 3. Disassemble and clean all components

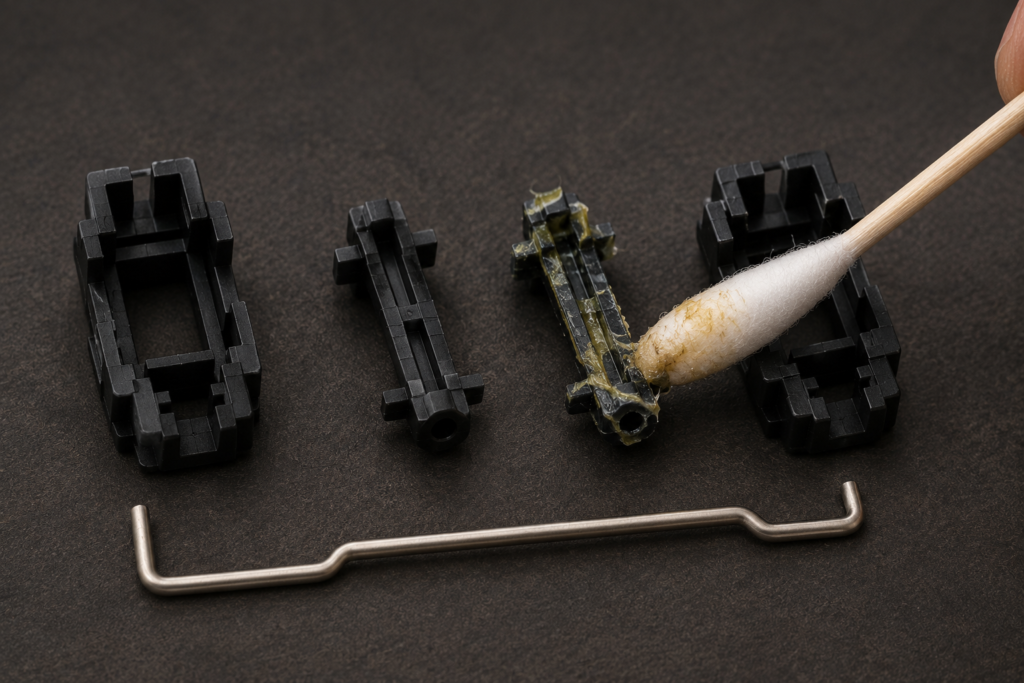
Separate each stabilizer into its three parts: two housings, two stems, and one wire. To remove the wire, hook it out of the stem channels by rotating each wire end 90 degrees toward you and pulling free. Remove the stems from the housings by pressing and lifting. If your stabilizers are brand new, wipe off any visible factory grease with a dry cotton swab. If they are used, wash the plastic parts in warm soapy water or soak in isopropyl alcohol for 10 minutes to dissolve all previous lubricant. Dry completely, as no moisture should remain before you apply new lube.

Disassembled keyboard stabilizer: two housings, two stems and the wire

Step 4. Check the mounting area; pad only if needed

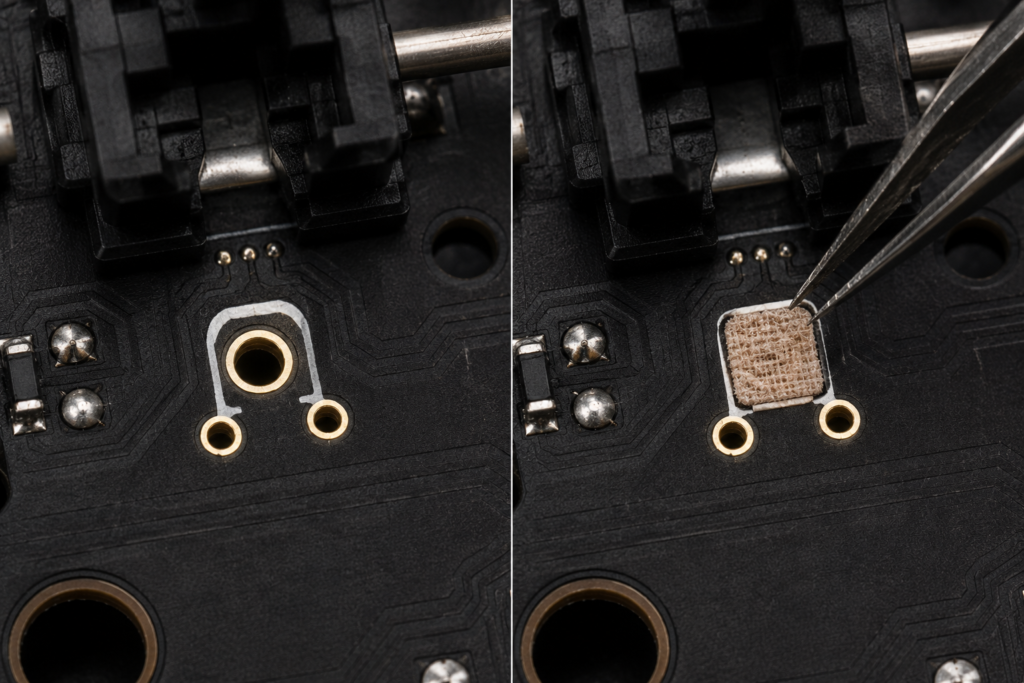
Padding is optional. If you can identify a housing or wire striking a hard surface, use a very thin, nonconductive pad only at that contact point, away from switch contacts, solder joints and screw holes. Refit the stabilizer to confirm both housings sit flat and the key travels freely. Skip padding when there is no contact noise or when the maker already fitted dampers.

Small adhesive pads placed near the stabilizer mount on a keyboard PCB

Step 5. Lube the housing interior

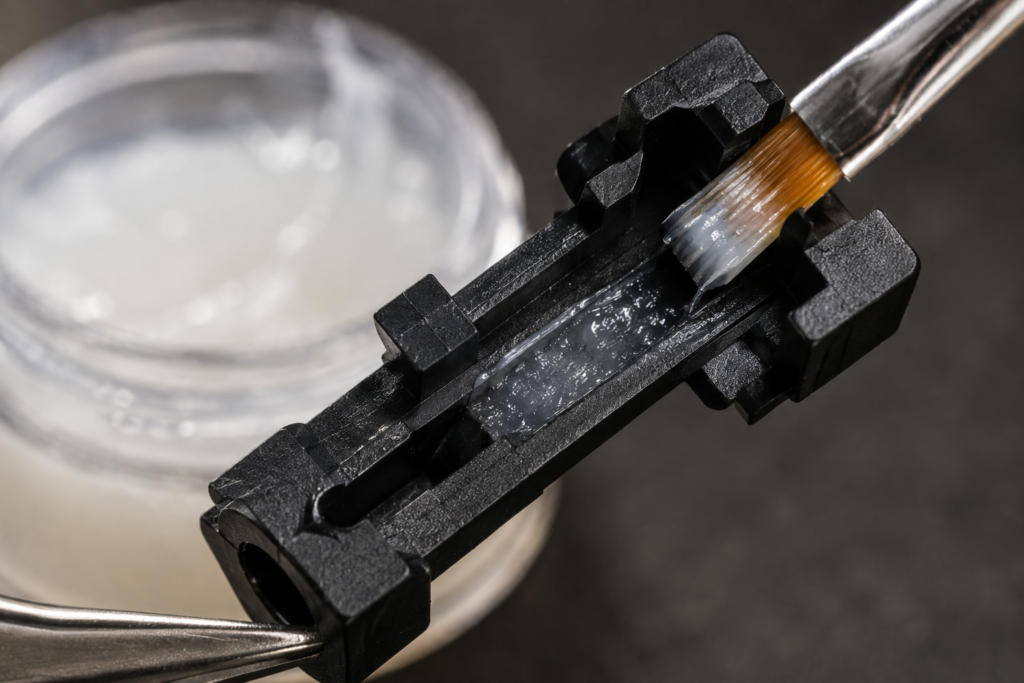
Put a small amount of plastic-safe grease on the brush and coat only the housing surfaces that contact the moving stem. The film should look thin, without blobs in the bottom of the channel. Keep lubricant off the PCB and electrical contacts. Reassemble a single stabilizer first so you can adjust the amount before doing the rest.

Brushing Krytox 205g0 into the interior of a stabilizer housing

Step 6. Lube the stabilizer stem thoroughly

Brush a thin film onto the stem rails that slide against the housing. Put only a small amount inside the wire channel where the metal hook actually moves; a packed channel can slow return. Leave the keycap mount and other noncontact surfaces clean. Slide the stem through the housing before fitting the wire: it should move freely without sticking.

Brush applying 205g0 to the stem faces and inside the wire-hook channel of a keyboard stabilizer stem

Step 7. Lube the wire hook ends with thick grease

Coat the part of each wire end that moves inside its stem channel with a small, even amount of plastic-safe grease. A thicker grease can help a loose wire, but it is not mandatory and more is not always better. Reassemble and press each side: if the key returns slowly or feels heavy, remove excess grease before adding any other mod.

Applying grease to the hook ends of a keyboard stabilizer wire

Step 8. Reassemble each stabilizer

Insert the lubed stems back into the lubed housings. They should slide in smoothly and seat fully at the bottom. Hook both wire ends into the stem channels: insert each hook into its stem channel opening, then rotate the wire 90 degrees away from you to lock it. You should hear a soft click as each side locks. Press the stem up and down a few times, as it should travel smoothly with no scratching or resistance. If you hear any click or rattle, the wire is not fully seated.

Reassembling a stabilizer: stem into housing, wire hooks inserted and rotated to lock, then travel-tested

Step 9. Reinstall and replace keycaps

Screw-in: place the housing on top of the PCB over its holes, then drive the screw up from underneath the PCB into the housing. Tighten until snug and stop: the PCB is fragile, stripped holes are hard to fix, and an over-tightened housing can pinch the stem and cause binding.

Clip-in: align the two tabs over the PCB cutouts and press firmly until both click into place. Test stability by attempting to pull the housing, and it should not flex or lift.

Reinstall all large keycaps by pressing firmly and evenly onto the switch and stabilizer stems simultaneously. Test each key: press slowly to bottom out, then release. Listen for any rattle or clack.

Screw-in stabilizer secured with a Phillips screwdriver, keycap pressed on, spacebar tested for clean bottom-out

7. Padding: an optional fix for a verified impact

The so-called band-aid mod adds a thin nonconductive pad under a stabilizer housing or at another confirmed hard-contact point. It is not a universal requirement and will not cure a loose wire inside a stem. First press the key slowly with the cap on and off to locate the actual source of the noise. A rattle at the wire hook calls for checking seating and lubrication; a housing moving against a plate or PCB calls for checking its mount. Only consider padding when you can identify a hard impact and have room to add material without lifting the housing or obstructing the switch.

If padding is warranted, disconnect the board and remove the stabilizer using the correct method for its mount. Use a very small, thin, nonconductive piece at the identified contact point. Keep it clear of switch contacts, solder joints, screws and the stabilizer’s moving path. Reinstall the stabilizer and test the key repeatedly before closing the case. If the key becomes mushy, sticks or fails to return, remove the pad. Do not stack layers simply to chase a deeper sound.

Plate-mounted and PCB-mounted stabilizers have different contact surfaces. A plate-mounted housing clips to the plate; a PCB clip-in or screw-in housing attaches to the PCB. Follow the board’s manual, and do not assume a pad shown for one design belongs in another. KBDfans’ stabilizer guide lists excess material under a stabilizer as a cause of mushy bottom-out or binding.

8. Wire balancing: fixing uneven key feel

Wire balancing is an advanced technique rarely discussed in beginner guides, but it makes a noticeable difference on the spacebar and long shift keys. If your spacebar feels like it tilts, or if one side seems to bottom out before the other, the wire is out of balance.

How to diagnose wire imbalance

Press the spacebar slowly and feel whether both ends reach bottom at exactly the same time. Press one end only, and it should bottom out at the same depth as the other. If the key feels like a seesaw, or produces different sounds depending on where you press, the wire needs balancing.

The balancing process

Remove the wire from the stabilizer. Lay it on a flat surface and assess its symmetry. If one side is bent differently from the other, gently apply pressure to correct it, making small adjustments then checking and repeating. The goal is for both wire hook ends to sit at exactly the same height when the wire is laid flat. This ensures both stems reach bottom simultaneously during a keystroke.

⚠️ Wire balancing caution: steel stabilizer wire is forgiving but not infinitely so. Do not attempt aggressive bends, only small and gradual adjustments. If you overbend in either direction, it is very difficult to recover the original geometry. Test frequently and adjust minimally. Cheap stabilizers have softer wire that bends more easily but also loses shape more quickly.

When to upgrade instead

Any stabilizer can have a bent wire or loose housing. If a wire remains uneven after careful reseating, consider a compatible replacement. Verify the board’s mounting system, plate cutouts, PCB holes and key sizes before buying.

9. Common stabilizer tuning mistakes

  • Adding grease before diagnosing the noise. A loose housing, bent wire or incompatible keycap will not be fixed by packing the stem with grease.
  • Using too much lubricant. Grease on the stem rails or wire ends should coat the moving contact, not fill the housing. If return slows, disassemble and remove the excess.
  • Mixing unknown lubricants. Clean old material before applying a different product when its compatibility is uncertain, and check the materials guidance for the stabilizer.
  • Padding by default. A pad can lift a housing or obstruct travel. Add one only after identifying a hard-contact point, then test the key before closing the case.
  • Testing only with the keycap off. Press the exposed stems to isolate the stabilizer, then reinstall the keycap and verify normal travel and return.

10. Before and after: the difference in sound and feel

A successful tune should reduce the specific rattle, tick or friction you diagnosed while keeping the key’s travel and return normal. The result varies with the wire, housing, keycap, plate and case. If a key becomes slower or softer than you wanted, undo the last change and retest rather than adding more grease or padding.

Want to compare your own before and after? Record both under the same conditions, or the comparison tells you nothing:

  • Same keyboard, keycaps, desk and surface, in the same quiet room
  • Phone or microphone at a fixed distance (for example 30 cm), same angle, same recording app and settings
  • No noise cancellation or automatic gain if your recorder lets you turn them off
  • Press each stabilized key the same way: five slow presses, then five normal typing-speed presses
  • Record before you open the board, then again after, without moving the microphone

Listen back on the same headphones. Rattle shows up as a short metallic tick after the main sound; a bottom-out clack shows up as a sharp, hollow peak.

11. Frequently asked questions

What is the best lube for keyboard stabilizers?

A plastic-safe medium grease such as 205g0 can be used sparingly on stem and housing contact surfaces and on the wire ends. Some builders prefer a thicker compatible grease on the wire ends. Follow your stabilizer maker’s material guidance, start with a thin coat, and remove excess if the key returns slowly.

What is the band-aid mod for keyboard stabilizers?

It uses a thin, nonconductive pad at a confirmed hard-contact point near a stabilizer mount. Its placement depends on whether the stabilizer attaches to the PCB or plate. It is optional; wire rattle and binding need different fixes. Keep padding away from electrical contacts and moving parts, and remove it if the key becomes mushy or sticks.

How do I fix a rattling spacebar?

First remove the keycap and press the stabilizer stems separately. A metallic tick may come from a loose wire end, an uneven wire or a moving housing. Reseat any loose part, then apply a small amount of compatible grease where the wire moves in the stem. Use a thin coat on sliding surfaces only if they feel scratchy. Reinstall and test before considering padding.

Why is my spacebar sticking after I lubed the stabilizers?

Usually because a housing isn’t fully seated, the wire isn’t clipped all the way into a stem, a screw is over-tightened, or thick wire grease got onto the stem. Take the keycap off, press the stems by hand, and work through the stop-if-binding checks in order. Don’t force a sticking key.

What is the difference between screw-in and clip-in stabilizers?

Screw-in stabilizers are fastened from the underside of the PCB; clip-in models lock into PCB cutouts. Both can work well when fully seated and correctly tuned. Check the PCB, plate and case clearances before changing mount style, and diagnose the actual noise before replacing a working set.

Do I need to lube stabilizers if I have already lubed my switches?

Yes, without exception. Switches and stabilizers are completely separate mechanical systems, and lubing your switches has zero effect on stabilizer rattle. On most keyboards the stabilizer rattle on the spacebar is significantly louder and more disruptive than any switch scratchiness. Always address both in the same session: lube your stabilizers first, since it requires a bare PCB for the band-aid mod, then lube your switches.

How often should I re-lube my stabilizers?

There is no reliable fixed interval: use, grease, temperature and stabilizer design vary. Recheck only if a key develops a new rattle or slow return. First look for a loose housing, unseated wire or keycap problem; add lubricant only where inspection shows it is needed.

Can I lube stabilizers without removing them?

Sometimes. With the keyboard disconnected and keycap removed, a small amount of suitable grease can reach an accessible wire contact point without removing the stabilizer. Keep it off the PCB and test return after each application. Full disassembly is preferable when parts need cleaning, the housing is loose, or the key binds; follow the board’s mount-specific instructions.

Should I upgrade my stabilizers or just lube the stock ones?

Keep stock stabilizers if they are seated, return freely and can be tuned to remove the noise that bothers you. Consider replacement when a housing or wire is damaged, the mount remains loose, or the existing design cannot be tuned. Verify the PCB, plate, key size and case clearances before buying a different mount style.


✍️ Elizabeth Blake
Founder and Lead Writer, ClickyBoard · Custom keyboard builder since 2019

Elizabeth has completed over 20 custom mechanical keyboard builds and modded stabilizers on everything from stock clip-ins on budget gaming boards to Owlstab and TX Stabilizer sets on high-end aluminium cases. She still remembers the first build where she forgot to lube the stabs, a cautionary tale she now shares with everyone who will listen. ClickyBoard exists to document every lesson learned so you can skip straight to the good part. She currently types on a Satisfaction75 with lubed TX Stabs and lubed Gateron Oil King switches.

Lubing switches is the biggest change you can make to how a keyboard feels, and it costs about ten pounds in supplies. If your board is hot-swappable you can do it without touching a soldering iron. If it is soldered, there is still a lot you can fix, just not at the switch itself.

⚡ Quick answer: Hot-swap board? Pull the switches, open them, brush a thin film on the stem sides and the housing rails, reassemble. Use Krytox 205g0 for linears and Tribosys 3203 for tactiles. Soldered board? You cannot properly lube in place, but tuning the stabilizers gets you most of the sound improvement anyway.

What scratchiness actually is

Inside a switch, a POM stem slides against nylon or polycarbonate housing walls. Neither surface is perfectly smooth at a microscopic level, so as the stem travels it alternately grips and releases against the housing. Engineers call this stick-slip, and it is what you feel as scratchiness and hear as a grainy rasp on the downstroke.

Lubricant puts a thin film between those two surfaces so they never touch directly. The stem glides on the film instead of dragging on the plastic. That is the entire mechanism, and it explains two things that confuse beginners: why lube transforms a cheap scratchy switch but barely improves an already-smooth one, and why the film needs to be thin. You are separating two surfaces by microns, not filling the switch with grease.

The viscosity ladder

This is the part most guides skip, and it is the reason people ruin tactile switches. Krytox 205g0, Tribosys 3204 and Tribosys 3203 are all NLGI Grade 0 greases, so by the standard classification they are the same consistency. What differs is the viscosity of the base oil inside them.

LubeRelative thicknessBest forWhy
Krytox 205g0ThickestLinearMaximum smoothness and dampening. The buttery feel people describe.
Tribosys 3204MiddleEitherOne step thinner than 205g0. Forgiving if you tend to over-apply.
Tribosys 3203ThinnestTactile and clickySmooths travel without filling in the tactile bump.

💡 Why thickness ruins tactiles: a tactile bump exists because the leaf catches on a bulge in the stem. Thick grease fills the space around that bulge and lets the leaf slide over it instead of catching. You do not lose some tactility, you round off the exact feature you paid for. On linears there is no bump to protect, so thicker is simply smoother.

Never use WD-40, sewing machine oil, petroleum jelly or any general-purpose lubricant. They degrade the plastic over time and will ruin the switches. A syringe of the correct product costs less than a set of switches.

First: is your keyboard hot-swappable?

Pull a keycap and look at the switch. If it sits in a socket you can lift it out with a puller, the board is hot-swap and this guide applies fully. If the switch is fixed and you can see solder joints through the case, it is soldered.

Being honest about the soldered case: you cannot properly lube a switch without opening it, and you cannot open it while it is soldered to the board. Spraying lubricant into an assembled switch attracts dust and can cause chattering. Skip to the soldered section below for what genuinely helps.

What you need

  • Lube matched to your switch type from the table above. One 3ml syringe does several boards.
  • A size-00 brush or smaller. A cheap art brush is fine.
  • A switch opener matched to your switch brand.
  • Keycap puller and switch puller, usually included with hot-swap boards.
  • Tweezers for handling springs and stems.
  • Krytox 105 oil, optional, for springs only.

The process

Step 1. Remove the keycaps and switches

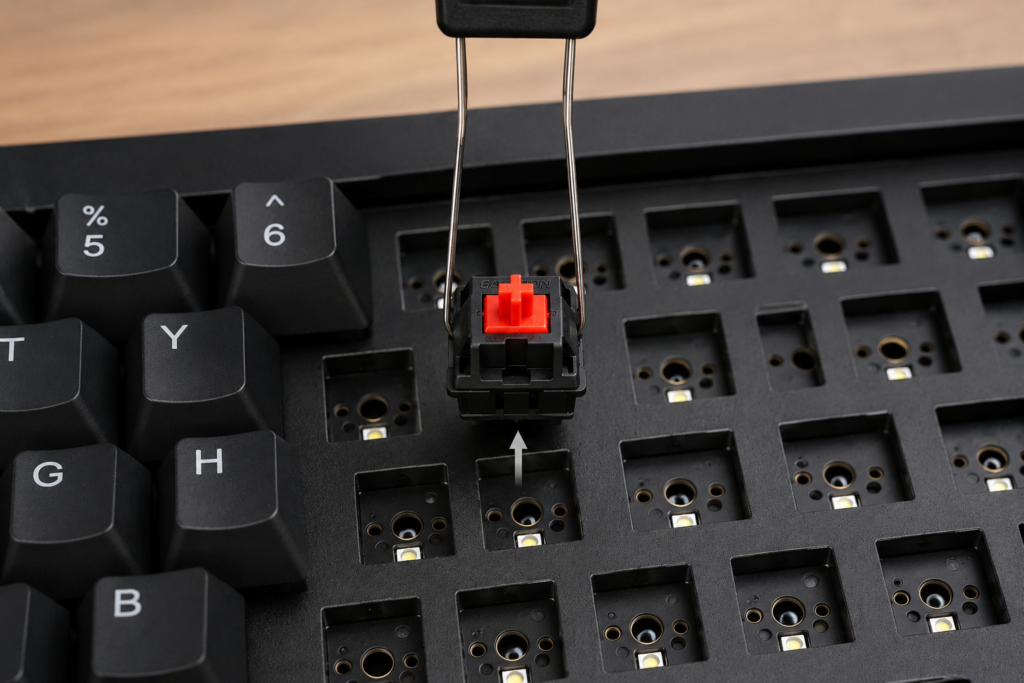
Pull each switch straight up with the switch puller. Angling it bends the pins, which is the most common way people damage switches during a swap. Check every switch’s pins are straight before it goes back in later.

wirekeycappuller removing spacebar shift and enter keys to expose the stabilizers on the bare PCB 1
keycap puller 1 1

Step 2. Open a switch

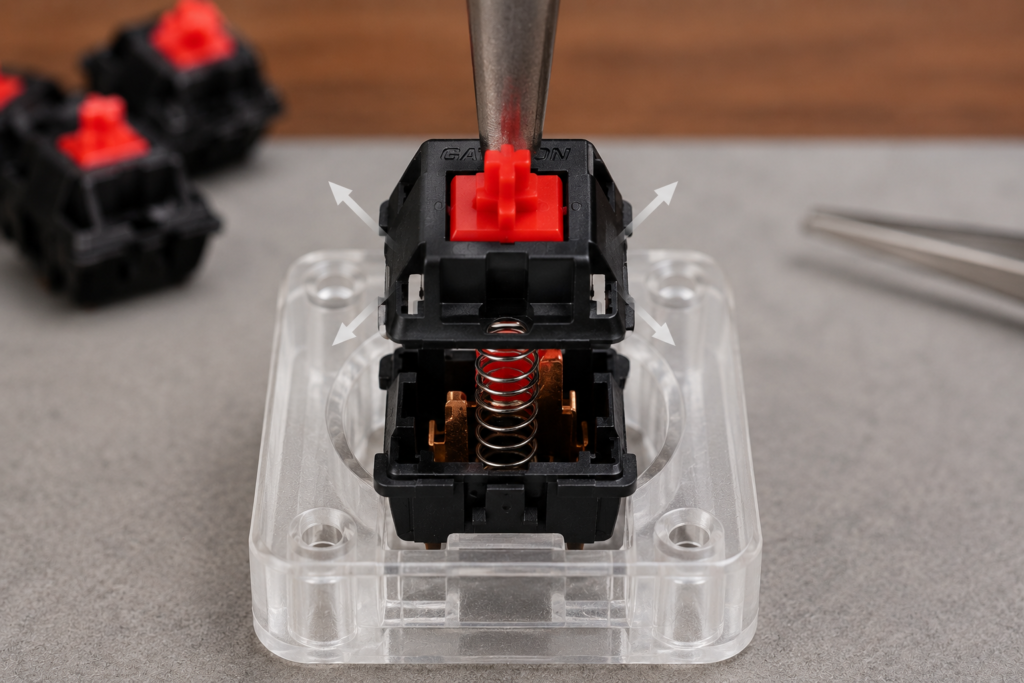
Press it into the opener to release the four corner clips. The top housing lifts off, leaving the stem and spring sitting in the bottom housing. Work over a tray, because springs escape and are difficult to find on a patterned floor.

ChatGPT Image Aug 5 2026 03 12 36 PM

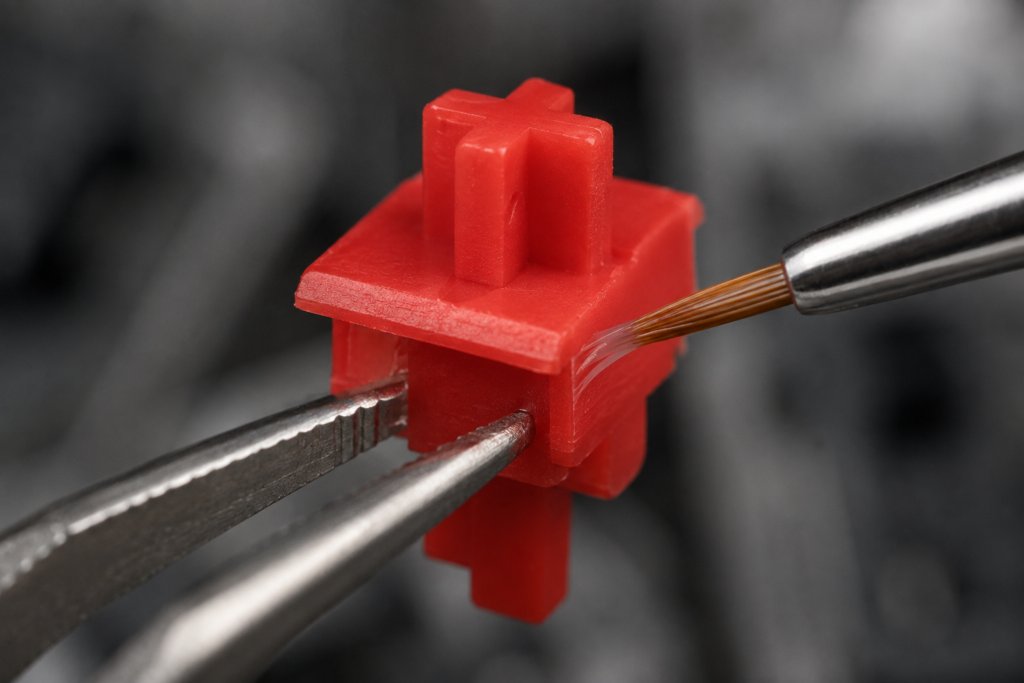
Step 3. Lube the stem

Brush a thin coat on the two flat vertical sides that contact the housing rails. Those two faces do almost all the sliding, so they matter most.

On a tactile switch, keep lube off the tactile leg entirely. That is the bulge the leaf rides over, and it is the one surface you must leave dry.

ChatGPT Image Aug 5 2026 03 21 00 PM

Step 4. Lube the housing rails

A light pass on the vertical channels inside the bottom housing where the stem slides. Avoid the metal contact leaf completely. Lube on the leaf can cause a key that registers intermittently or not at all, which is far more annoying to diagnose than scratchiness.

lubing housing rails

Step 5. Lube the springs

Optional, and worth it if you can hear spring ping. Ping is the spring itself resonating after a keypress, a faint metallic ring that sits above the thock. A drop of oil damps that resonance.

The efficient method is bag lubing: put all the springs in a zip-lock bag, add a few drops of Krytox 105 oil, and shake for thirty seconds. It coats every spring at once. It is less precise than brushing each one, but for springs precision does not matter.

lube the springs

Step 6. Reassemble and repeat

Snap the top housing back on, press the switch a few times and confirm it travels cleanly with no catching. Then move to the next one.

How much lube is the right amount

Less than you think, by a wide margin. This is the mistake that spoils more switches than any other.

You want a film so thin it barely changes the appearance of the plastic, showing as a faint sheen rather than a visible layer. If you can see grease sitting on the surface, it is too much. Over-lubed switches feel sluggish and muted, they sound dead rather than deep, and fixing them means opening every switch again and wiping it out.

A practical test: load the brush, then wipe most of it off on the syringe or a paper towel before it touches the switch. The brush should look almost clean. That is roughly the right loading.

How long it takes

Budget 60 to 90 minutes for a 65% board on your first attempt, dropping to perhaps 40 once you find a rhythm. A full-size board is closer to two hours. It is repetitive work best done in front of something you are half-watching.

Be honest with yourself about whether it is worth it. On scratchy switches like stock Cherry MX or cheap Outemu, the improvement is dramatic. On factory-lubed switches such as Gateron Yellow Pro or Akko’s V3 Pro line, the gain is marginal and rarely justifies the hours. Our factory-lubed guide covers switches that arrive finished.

If your board is soldered

Three options that genuinely help, none of which require desoldering.

  • Lube the stabilizers. This is the big one. Stabilizer rattle on the spacebar, enter and shift is usually the loudest and worst-sounding part of a keyboard, and stabilizers come off without desoldering on most boards. Our stabilizer guide walks through it.
  • Add O-rings. They soften the bottom-out and cut noise, and they fit onto the keycap stem in seconds. See our O-rings guide.
  • Add case foam. Cheap neoprene or shelf liner in the case reduces hollowness and echo.

If you want the switch-level improvement and your board is soldered, buying factory-lubed switches for your next build is far easier than desoldering 87 switches.

Frequently asked questions

Is lubing actually worth the time?

On scratchy switches, absolutely. Stock Cherry MX and cheaper Outemu switches improve dramatically. On already-smooth or factory-lubed switches the gain is much smaller and often not worth several hours. Judge by how the switch feels now, not by whether lubing is generally recommended.

Can I lube switches without opening them?

Not properly. The surfaces that need lubricant are the stem sides and housing rails, both internal. Products that claim otherwise deposit lube where it does nothing useful and attracts dust. If you cannot open them, tune the stabilizers instead.

Which lube for tactile switches?

Tribosys 3203, the thinnest of the three common options. It smooths the travel without filling in the tactile bump. Use 205g0 on a tactile only if you deliberately want to soften it, and accept you are trading away tactility to do so.

What happens if I use too much?

The switch feels sluggish and sounds muffled rather than deep, and on tactiles the bump softens noticeably. Excess can also migrate onto the contact leaf over time and cause intermittent registration. The fix is opening each switch again and wiping the excess away, so it is worth going light the first time.

Does keyboard lube dry out?

Krytox is very stable and lasts years in normal use. We covered the detail separately in does keyboard lube dry out.

Do I need to lube stabilizers separately?

Yes, and with a different product. Stabilizers need thick grease on the wire ends, which is a separate job from switch lubing and uses Krytox XHT-BDZ rather than 205g0. Lubed switches on rattling stabilizers still sound bad, because the stabilizers dominate.