


We regularly review and update our guides to ensure keyboard recommendations, specs, and software information stay current with the latest releases and updates.
Affiliate disclosure: this article contains Amazon affiliate links. Purchases made through these links support Clickyboard at no extra cost to you.
Lubing switches is the biggest change you can make to how a keyboard feels, and it costs about ten pounds in supplies. If your board is hot-swappable you can do it without touching a soldering iron. If it is soldered, there is still a lot you can fix, just not at the switch itself.
⚡ Quick answer: Hot-swap board? Pull the switches, open them, brush a thin film on the stem sides and the housing rails, reassemble. Use Krytox 205g0 for linears and Tribosys 3203 for tactiles. Soldered board? You cannot properly lube in place, but tuning the stabilizers gets you most of the sound improvement anyway.
What scratchiness actually is
Inside a switch, a POM stem slides against nylon or polycarbonate housing walls. Neither surface is perfectly smooth at a microscopic level, so as the stem travels it alternately grips and releases against the housing. Engineers call this stick-slip, and it is what you feel as scratchiness and hear as a grainy rasp on the downstroke.
Lubricant puts a thin film between those two surfaces so they never touch directly. The stem glides on the film instead of dragging on the plastic. That is the entire mechanism, and it explains two things that confuse beginners: why lube transforms a cheap scratchy switch but barely improves an already-smooth one, and why the film needs to be thin. You are separating two surfaces by microns, not filling the switch with grease.
The viscosity ladder
This is the part most guides skip, and it is the reason people ruin tactile switches. Krytox 205g0, Tribosys 3204 and Tribosys 3203 are all NLGI Grade 0 greases, so by the standard classification they are the same consistency. What differs is the viscosity of the base oil inside them.
| Lube | Relative thickness | Best for | Why |
|---|---|---|---|
| Krytox 205g0 | Thickest | Linear | Maximum smoothness and dampening. The buttery feel people describe. |
| Tribosys 3204 | Middle | Either | One step thinner than 205g0. Forgiving if you tend to over-apply. |
| Tribosys 3203 | Thinnest | Tactile and clicky | Smooths travel without filling in the tactile bump. |
💡 Why thickness ruins tactiles: a tactile bump exists because the leaf catches on a bulge in the stem. Thick grease fills the space around that bulge and lets the leaf slide over it instead of catching. You do not lose some tactility, you round off the exact feature you paid for. On linears there is no bump to protect, so thicker is simply smoother.
Never use WD-40, sewing machine oil, petroleum jelly or any general-purpose lubricant. They degrade the plastic over time and will ruin the switches. A syringe of the correct product costs less than a set of switches.
First: is your keyboard hot-swappable?
Pull a keycap and look at the switch. If it sits in a socket you can lift it out with a puller, the board is hot-swap and this guide applies fully. If the switch is fixed and you can see solder joints through the case, it is soldered.
Being honest about the soldered case: you cannot properly lube a switch without opening it, and you cannot open it while it is soldered to the board. Spraying lubricant into an assembled switch attracts dust and can cause chattering. Skip to the soldered section below for what genuinely helps.
What you need
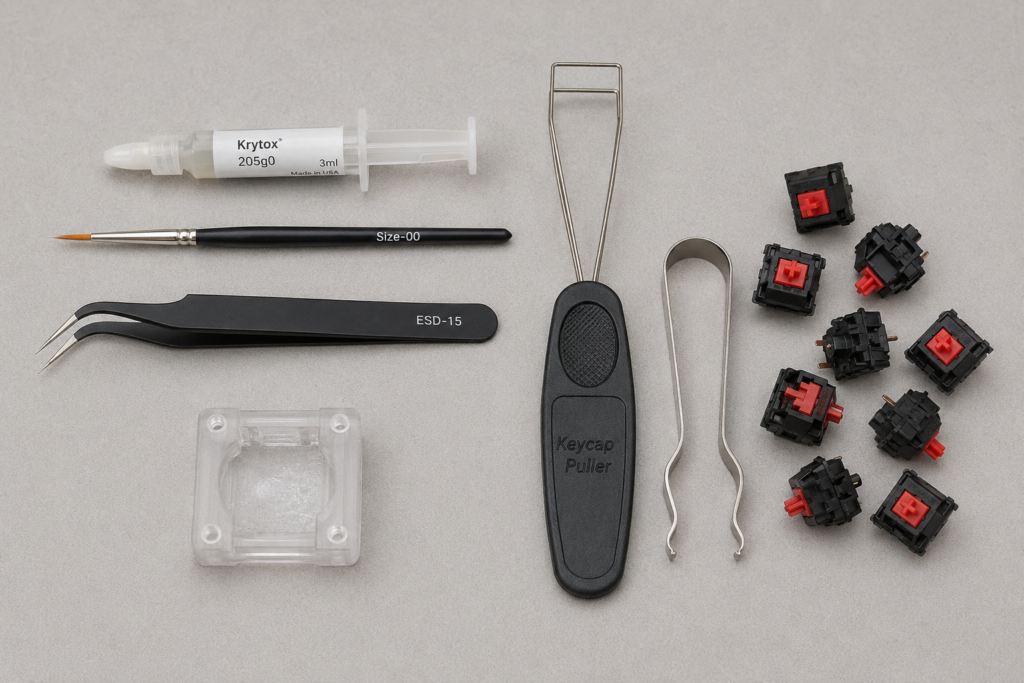
- Lube matched to your switch type from the table above. One 3ml syringe does several boards.
- A size-00 brush or smaller. A cheap art brush is fine.
- A switch opener matched to your switch brand.
- Keycap puller and switch puller, usually included with hot-swap boards.
- Tweezers for handling springs and stems.
- Krytox 105 oil, optional, for springs only.
The process
Step 1. Remove the keycaps and switches
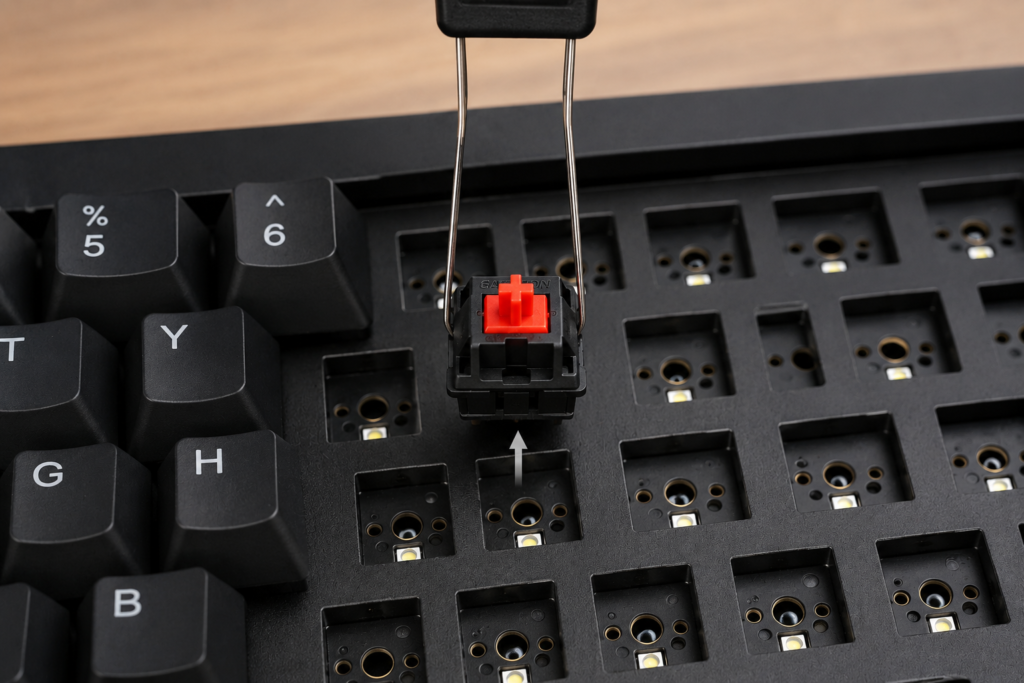
Pull each switch straight up with the switch puller. Angling it bends the pins, which is the most common way people damage switches during a swap. Check every switch’s pins are straight before it goes back in later.
Step 2. Open a switch
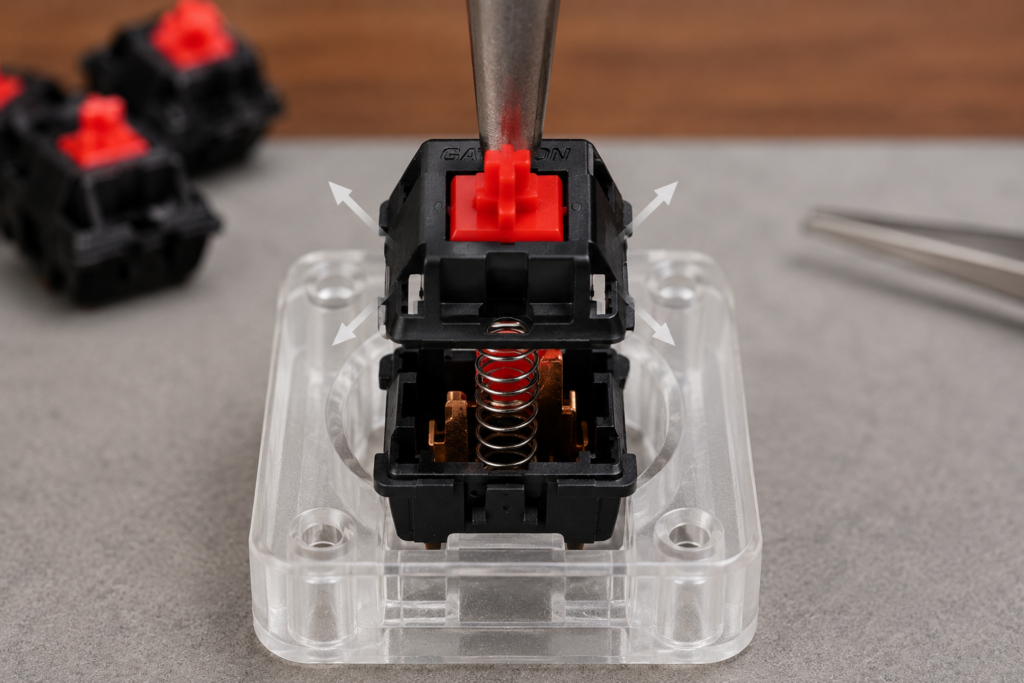
Press it into the opener to release the four corner clips. The top housing lifts off, leaving the stem and spring sitting in the bottom housing. Work over a tray, because springs escape and are difficult to find on a patterned floor.
Step 3. Lube the stem
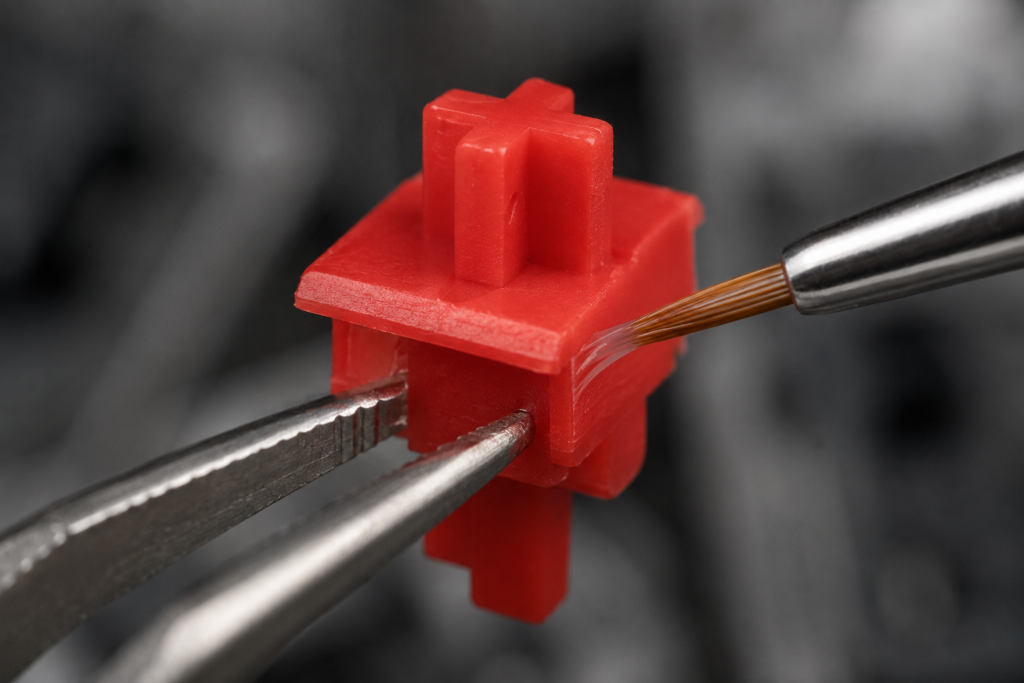
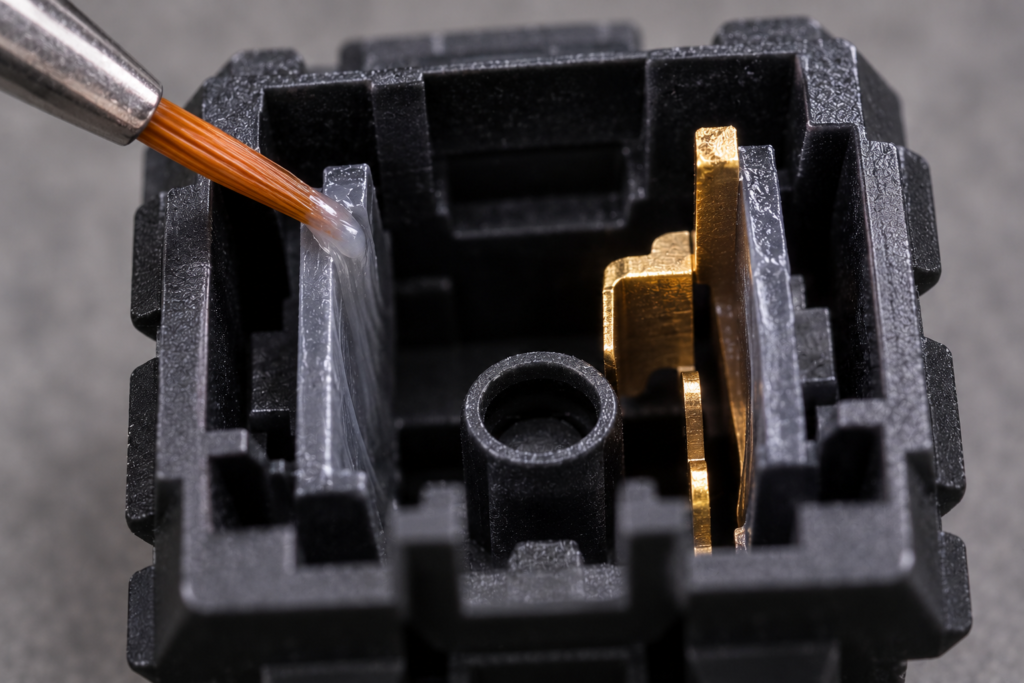
Brush a thin coat on the two flat vertical sides that contact the housing rails. Those two faces do almost all the sliding, so they matter most.
On a tactile switch, keep lube off the tactile leg entirely. That is the bulge the leaf rides over, and it is the one surface you must leave dry.
Step 4. Lube the housing rails
A light pass on the vertical channels inside the bottom housing where the stem slides. Avoid the metal contact leaf completely. Lube on the leaf can cause a key that registers intermittently or not at all, which is far more annoying to diagnose than scratchiness.
Step 5. Lube the springs
Optional, and worth it if you can hear spring ping. Ping is the spring itself resonating after a keypress, a faint metallic ring that sits above the thock. A drop of oil damps that resonance.
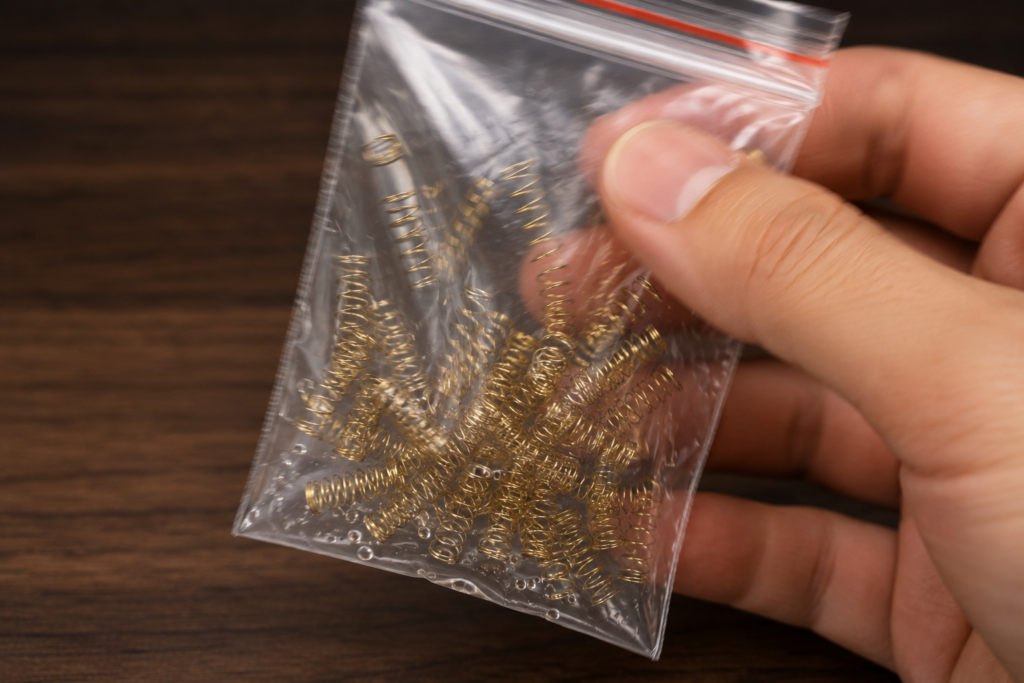
The efficient method is bag lubing: put all the springs in a zip-lock bag, add a few drops of Krytox 105 oil, and shake for thirty seconds. It coats every spring at once. It is less precise than brushing each one, but for springs precision does not matter.
Step 6. Reassemble and repeat
Snap the top housing back on, press the switch a few times and confirm it travels cleanly with no catching. Then move to the next one.
How much lube is the right amount
Less than you think, by a wide margin. This is the mistake that spoils more switches than any other.
You want a film so thin it barely changes the appearance of the plastic, showing as a faint sheen rather than a visible layer. If you can see grease sitting on the surface, it is too much. Over-lubed switches feel sluggish and muted, they sound dead rather than deep, and fixing them means opening every switch again and wiping it out.
A practical test: load the brush, then wipe most of it off on the syringe or a paper towel before it touches the switch. The brush should look almost clean. That is roughly the right loading.
How long it takes
Budget 60 to 90 minutes for a 65% board on your first attempt, dropping to perhaps 40 once you find a rhythm. A full-size board is closer to two hours. It is repetitive work best done in front of something you are half-watching.
Be honest with yourself about whether it is worth it. On scratchy switches like stock Cherry MX or cheap Outemu, the improvement is dramatic. On factory-lubed switches such as Gateron Yellow Pro or Akko’s V3 Pro line, the gain is marginal and rarely justifies the hours. Our factory-lubed guide covers switches that arrive finished.
If your board is soldered
Three options that genuinely help, none of which require desoldering.
- Lube the stabilizers. This is the big one. Stabilizer rattle on the spacebar, enter and shift is usually the loudest and worst-sounding part of a keyboard, and stabilizers come off without desoldering on most boards. Our stabilizer guide walks through it.
- Add O-rings. They soften the bottom-out and cut noise, and they fit onto the keycap stem in seconds. See our O-rings guide.
- Add case foam. Cheap neoprene or shelf liner in the case reduces hollowness and echo.
If you want the switch-level improvement and your board is soldered, buying factory-lubed switches for your next build is far easier than desoldering 87 switches.
Frequently asked questions
Is lubing actually worth the time?
On scratchy switches, absolutely. Stock Cherry MX and cheaper Outemu switches improve dramatically. On already-smooth or factory-lubed switches the gain is much smaller and often not worth several hours. Judge by how the switch feels now, not by whether lubing is generally recommended.
Can I lube switches without opening them?
Not properly. The surfaces that need lubricant are the stem sides and housing rails, both internal. Products that claim otherwise deposit lube where it does nothing useful and attracts dust. If you cannot open them, tune the stabilizers instead.
Which lube for tactile switches?
Tribosys 3203, the thinnest of the three common options. It smooths the travel without filling in the tactile bump. Use 205g0 on a tactile only if you deliberately want to soften it, and accept you are trading away tactility to do so.
What happens if I use too much?
The switch feels sluggish and sounds muffled rather than deep, and on tactiles the bump softens noticeably. Excess can also migrate onto the contact leaf over time and cause intermittent registration. The fix is opening each switch again and wiping the excess away, so it is worth going light the first time.
Does keyboard lube dry out?
Krytox is very stable and lasts years in normal use. We covered the detail separately in does keyboard lube dry out.
Do I need to lube stabilizers separately?
Yes, and with a different product. Stabilizers need thick grease on the wire ends, which is a separate job from switch lubing and uses Krytox XHT-BDZ rather than 205g0. Lubed switches on rattling stabilizers still sound bad, because the stabilizers dominate.